Choose and prepare images
A good edit starts with the right photo. Choose a tool, add your image to the appropriate field, and check the preview before you run it. For tools with an image-preparation workspace, you can replace the photo and mark an editing area before confirming.
Put each image in the right place
| Image | What to choose |
|---|---|
| Source image | The photo you want to edit: a person, product, room or scene. |
| Model or face reference | The person whose appearance you want to use. This is a separate reference, not the photo being edited. |
| Garment image | The clothing to put on a model. Include the whole item and keep its details visible. |
| Background reference | The setting you want to use, when the tool offers this option. |
| Mask | A selection of the area to edit, aligned with the source image. It is not another reference photo. |
You only need the images requested by your chosen tool. For example, AI Retouch starts with a source photo; Model Recast can also use a separate identity reference.
On Android and iOS
Tap Choose image to open the source sheet. The same three options are available when choosing a source, a supported reference or an image in the local editor:
| Source | Use it for |
|---|---|
| Photo library | A photo already saved in your device's library. |
| Take photo | A new photo using the camera. Allow camera access when asked. |
| Browse files | An image in Files, Downloads or a cloud drive available through your device's file picker. |
Select a source, then choose or take your photo. If asked to review the photo, accept it to return to PixelForce. Your device controls the appearance of the photo library, camera and file picker; those screens may differ between Android and iOS.
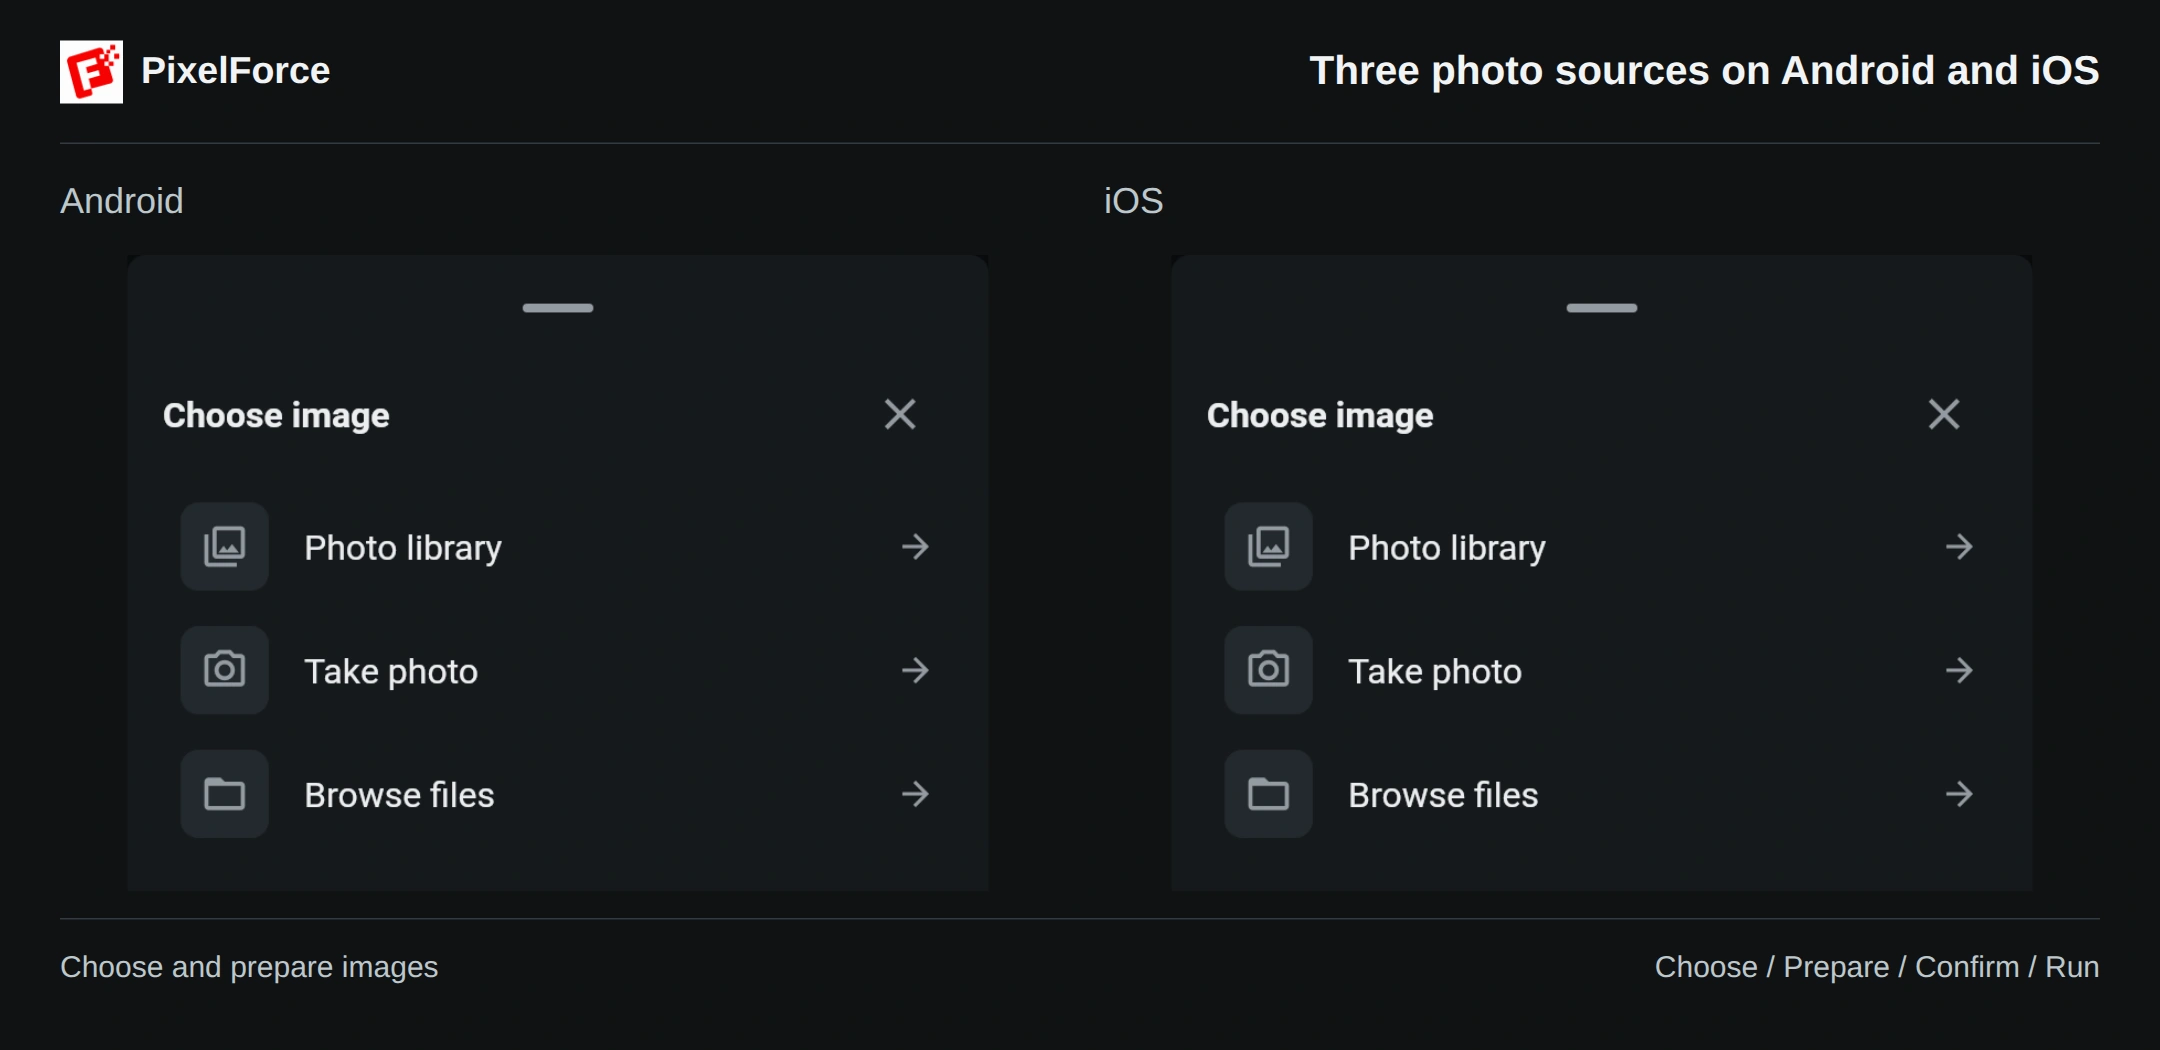
Closing the source sheet or leaving the system picker without selecting a photo keeps your current selection. If Android offers Recover photo after an interrupted selection, choose Use photo to bring it back or Discard to choose another. Recovery does not start generation.
On Web and macOS
Click the image input to open Image preparation, where the tool provides it, then click Choose image and select a file. Other image fields may open the file chooser directly.
Web and macOS use the system file chooser, not the native app's three-option sheet. This also applies to a phone or tablet browser: the browser decides which sources to offer. Where an input explicitly offers drag and drop, you can use that instead.
Check the original before confirming
- Open the image input and select your photo.
- In Original, check that the correct picture is loaded and the whole subject is visible. The displayed dimensions describe the prepared input, not the final generated image.
- Use Replace if you picked the wrong photo. Use the zoom controls for a closer look and Fit image to see the complete frame again. Zooming and panning change the view, not the photo's crop.
- Click Confirm when you are ready. The new or changed source and mask are applied together, and you return to the creation form.
The example below uses a photo of a bag, camera and cup. All three remain visible in the prepared image.
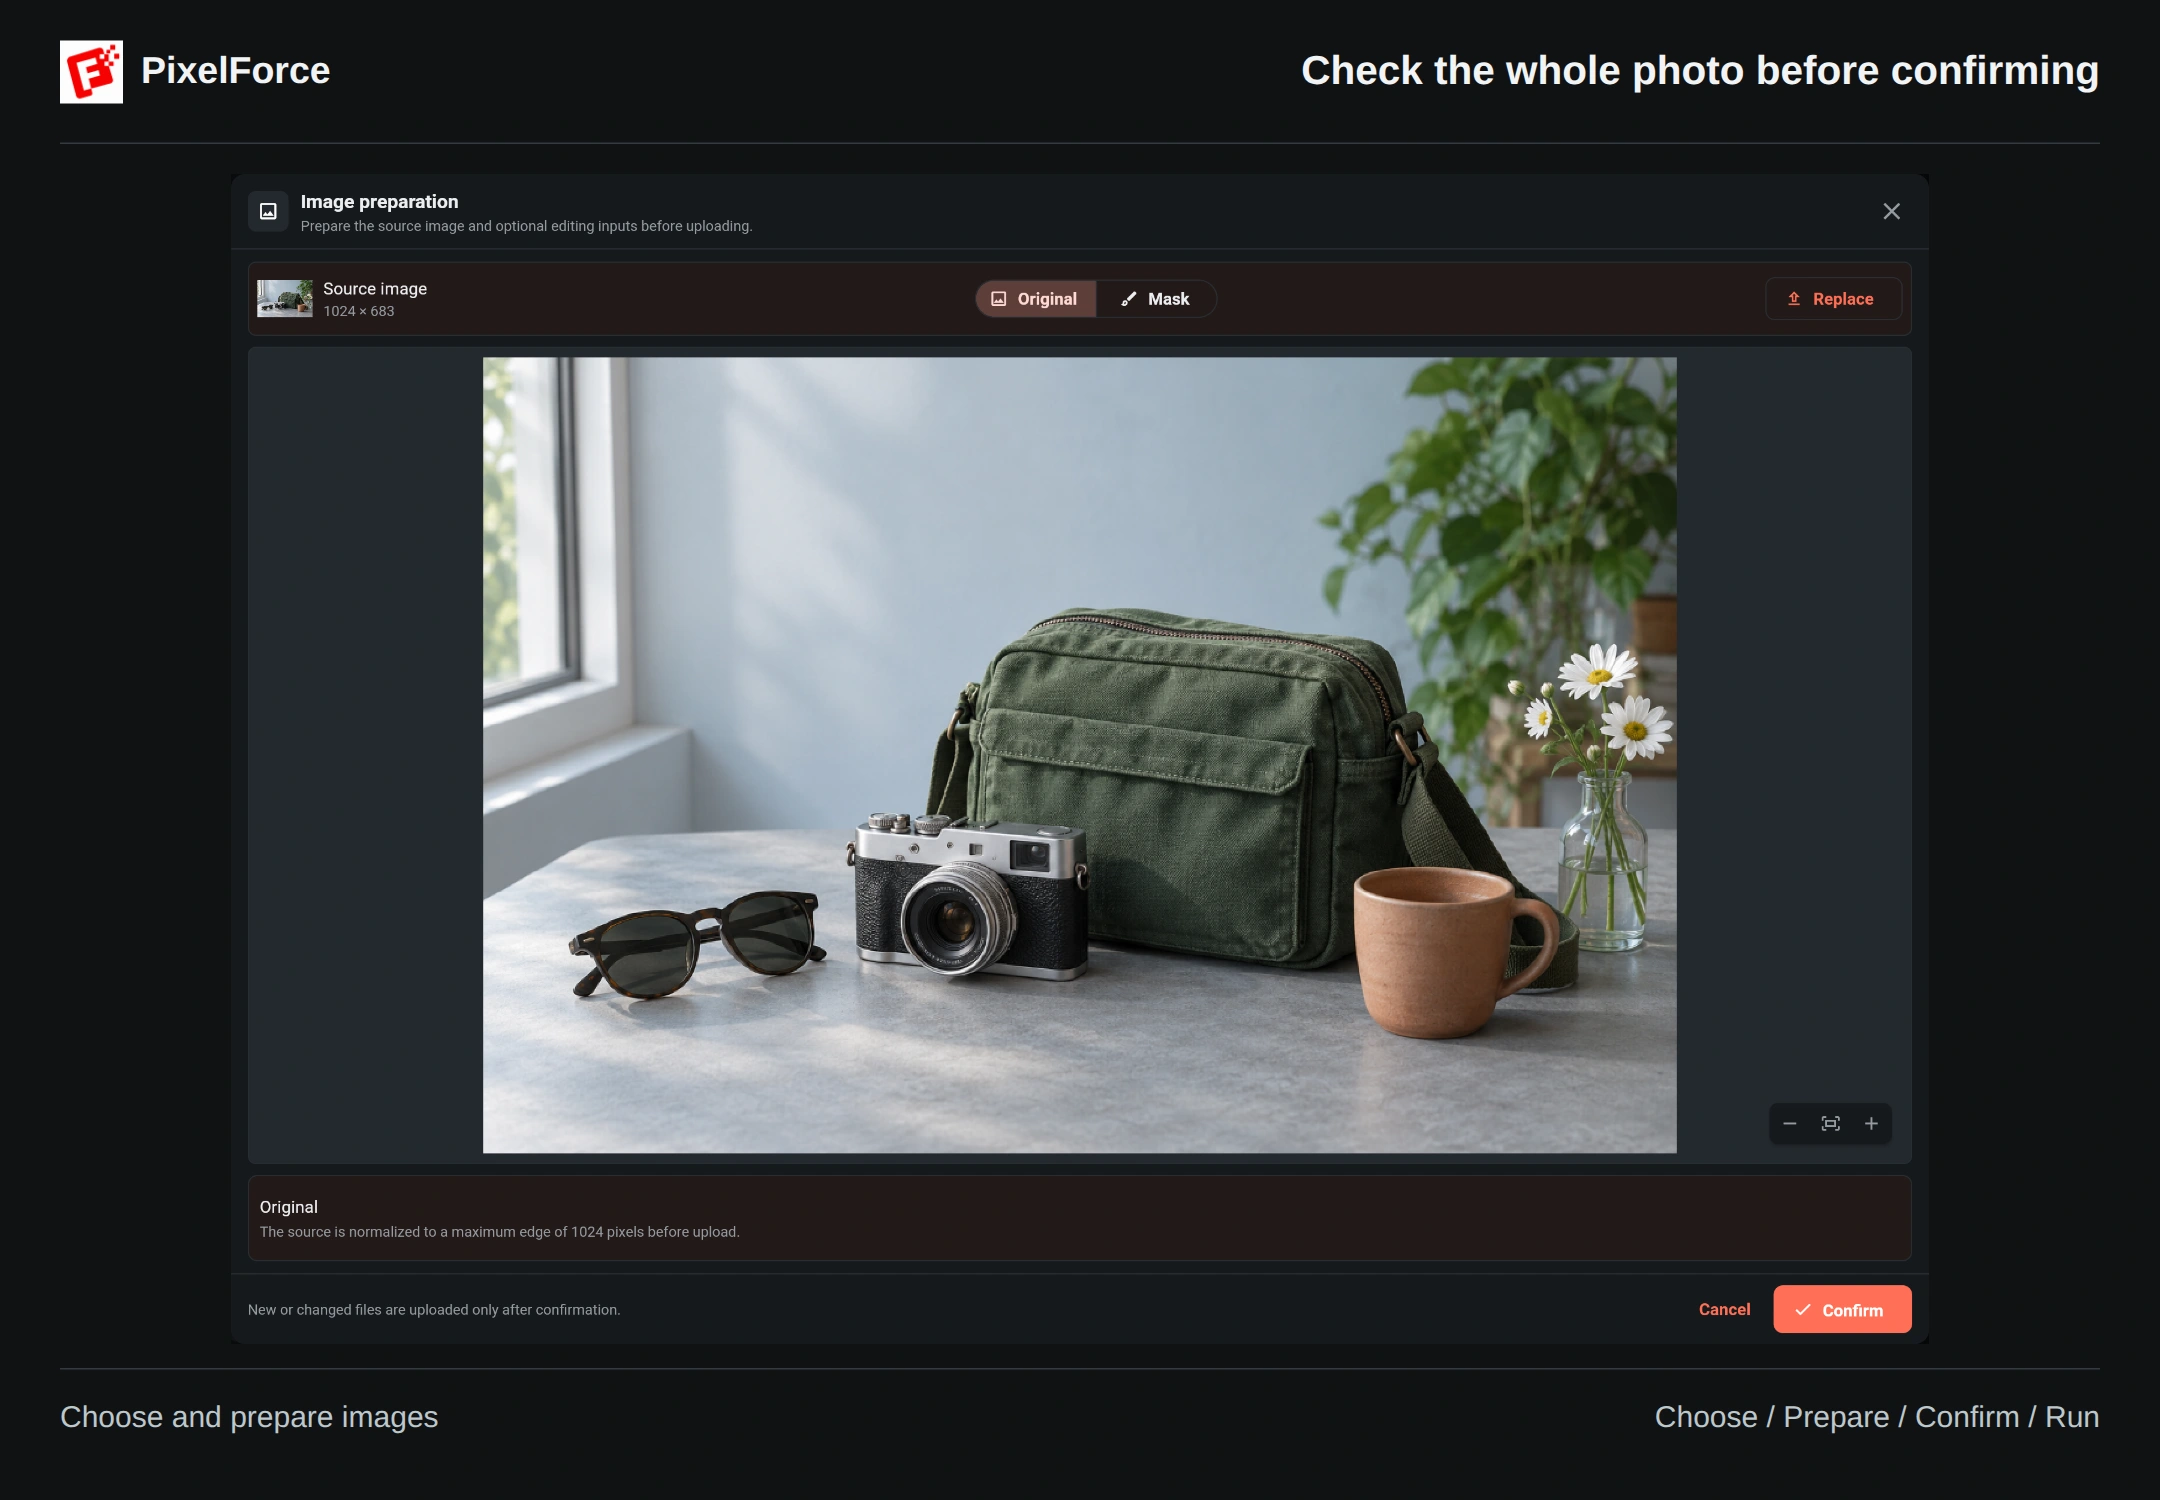
In this workspace, new or changed files are uploaded only after Confirm. Closing it without confirming keeps the previous source and mask. Some reference fields apply a selection directly and do not show this workspace.
Mark an editing area, when needed
A mask is useful when you want to change only part of a photo. For example, you could mark the cup in this image for a local edit while describing what should stay the same. Only tools that support a mask show the Mask tab.
| Control | What it does |
|---|---|
| Brush | Paint the area you want the AI to redraw. A dark overlay helps you see the selection. |
| Eraser | Remove part of your painted selection. |
| Brush size | Use a larger brush for broad areas and a smaller one near edges. |
| Pan image | Move around a zoomed image without painting. |
| Undo / Clear mask | Undo the latest stroke or remove the whole selection. |
| Import mask / Invert mask | Load an existing mask or swap the editable and preserved areas. |
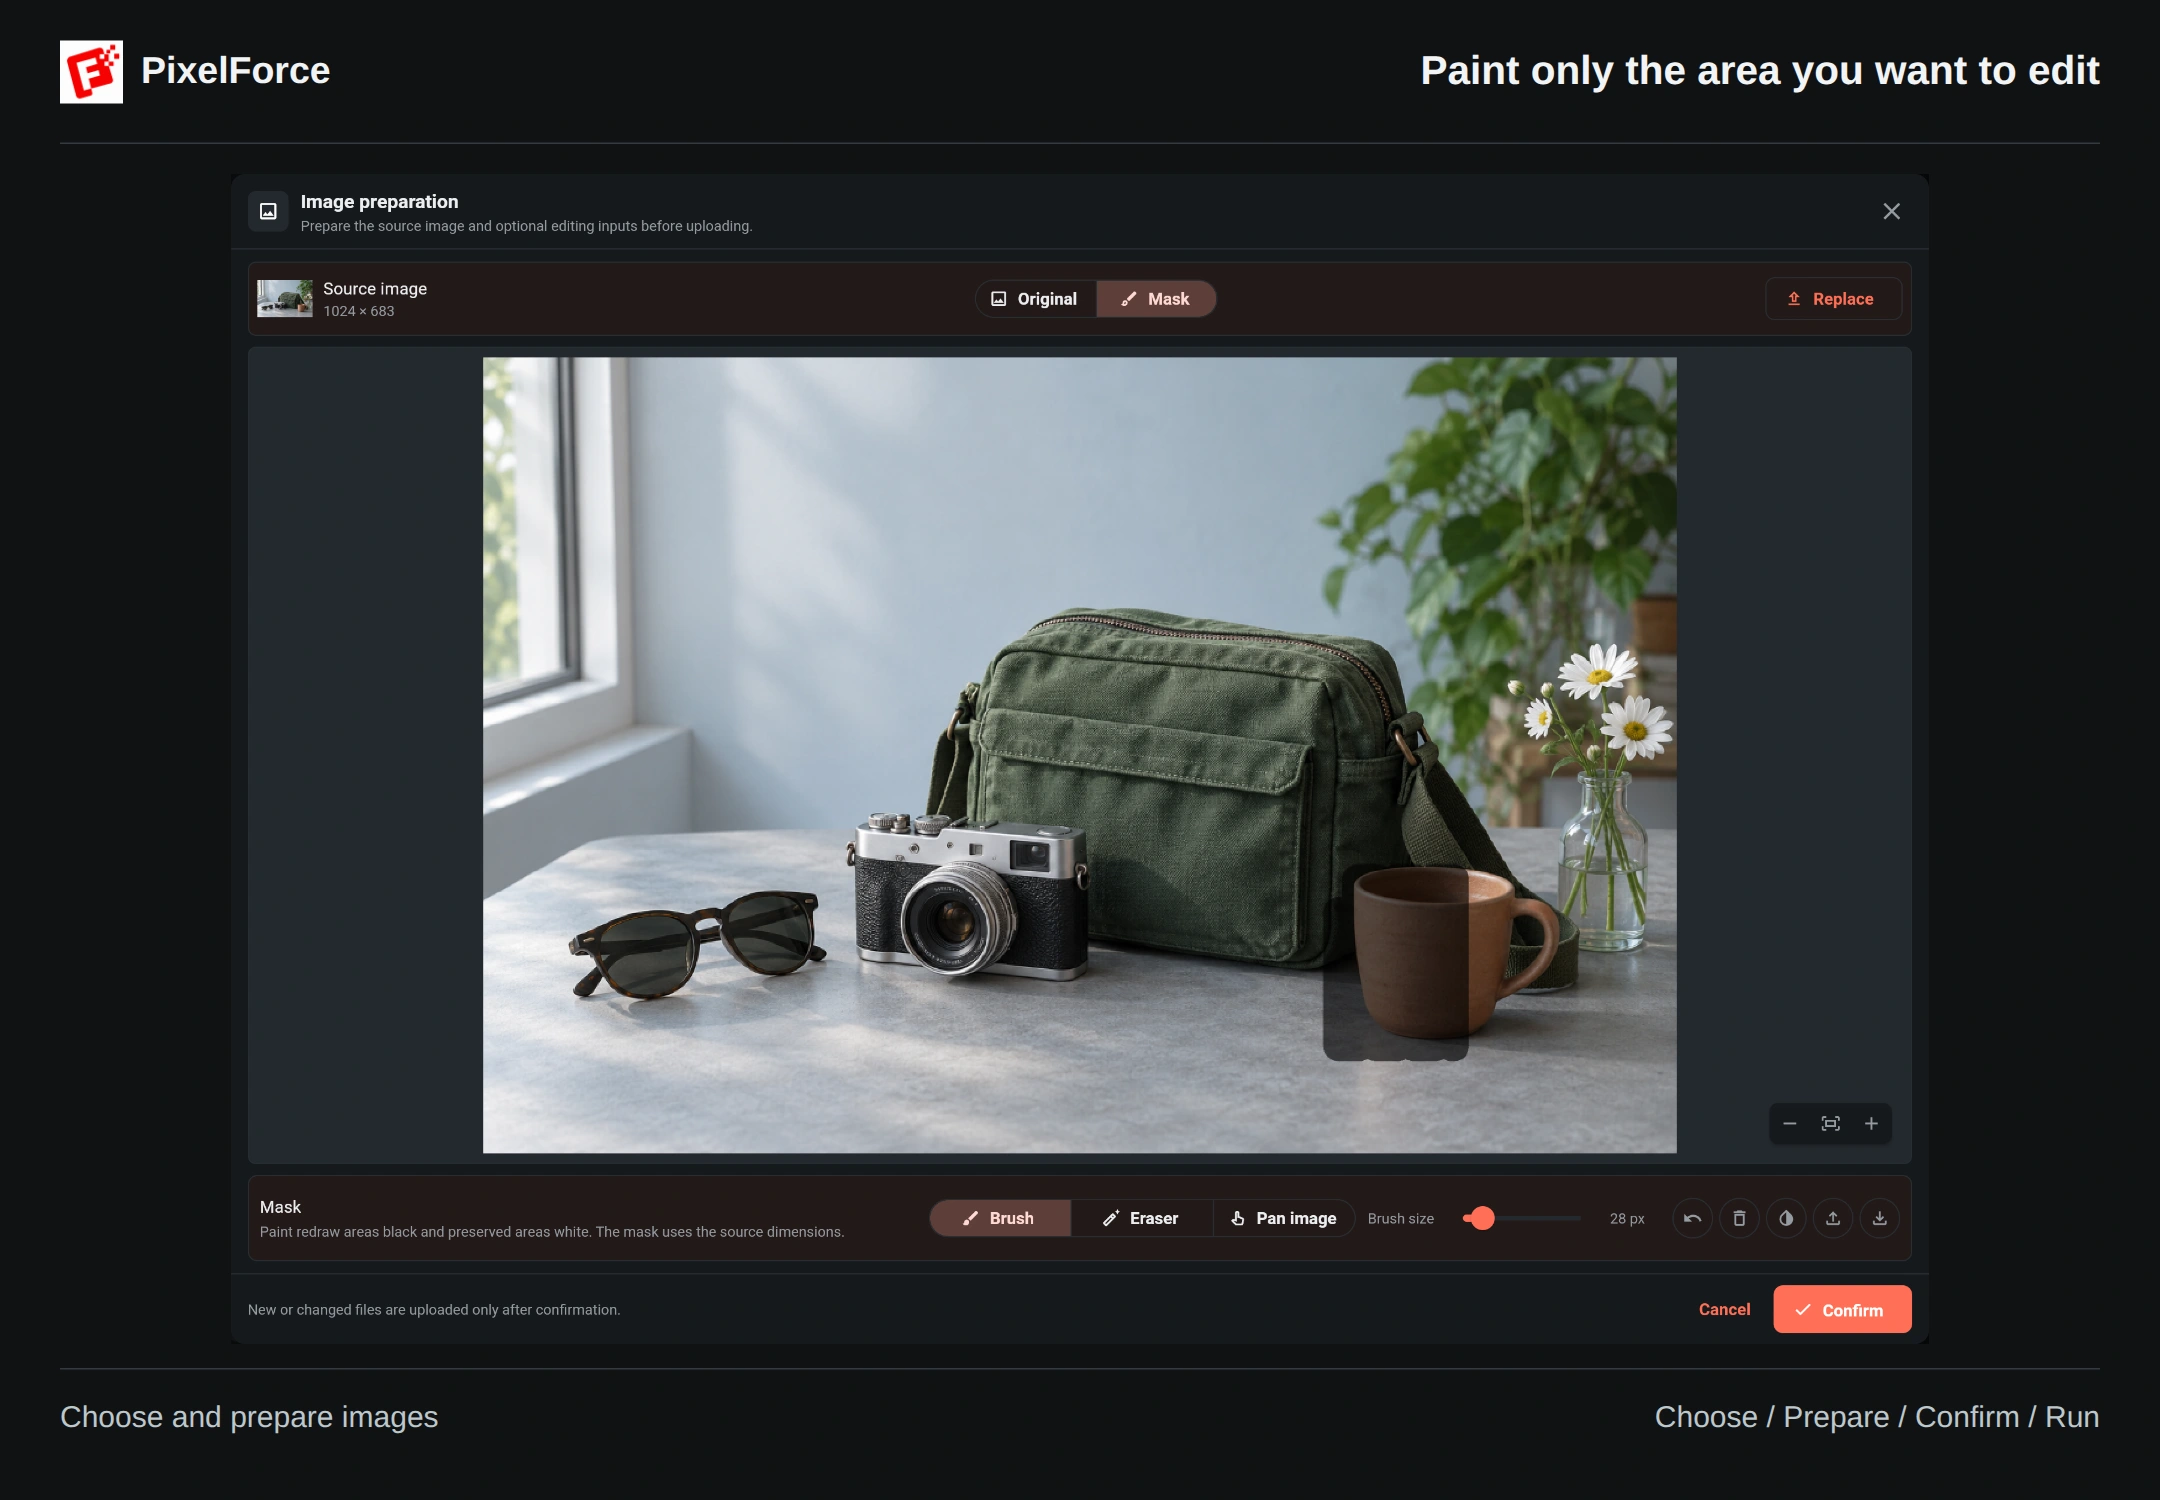
The saved mask uses black for areas to redraw and white for areas to preserve. Its dimensions match the prepared source; an imported mask is aligned to that canvas. Keep its framing aligned too: stretching a mask from a differently cropped photo can select the wrong area. A mask guides the edit; it is not a guarantee that every pixel outside it will remain identical.
Painting a mask does not generate an image. Check the selection, then click Confirm. Replacing the source resets the old mask, so mark the editing area again for the new photo.
Back in the creation form
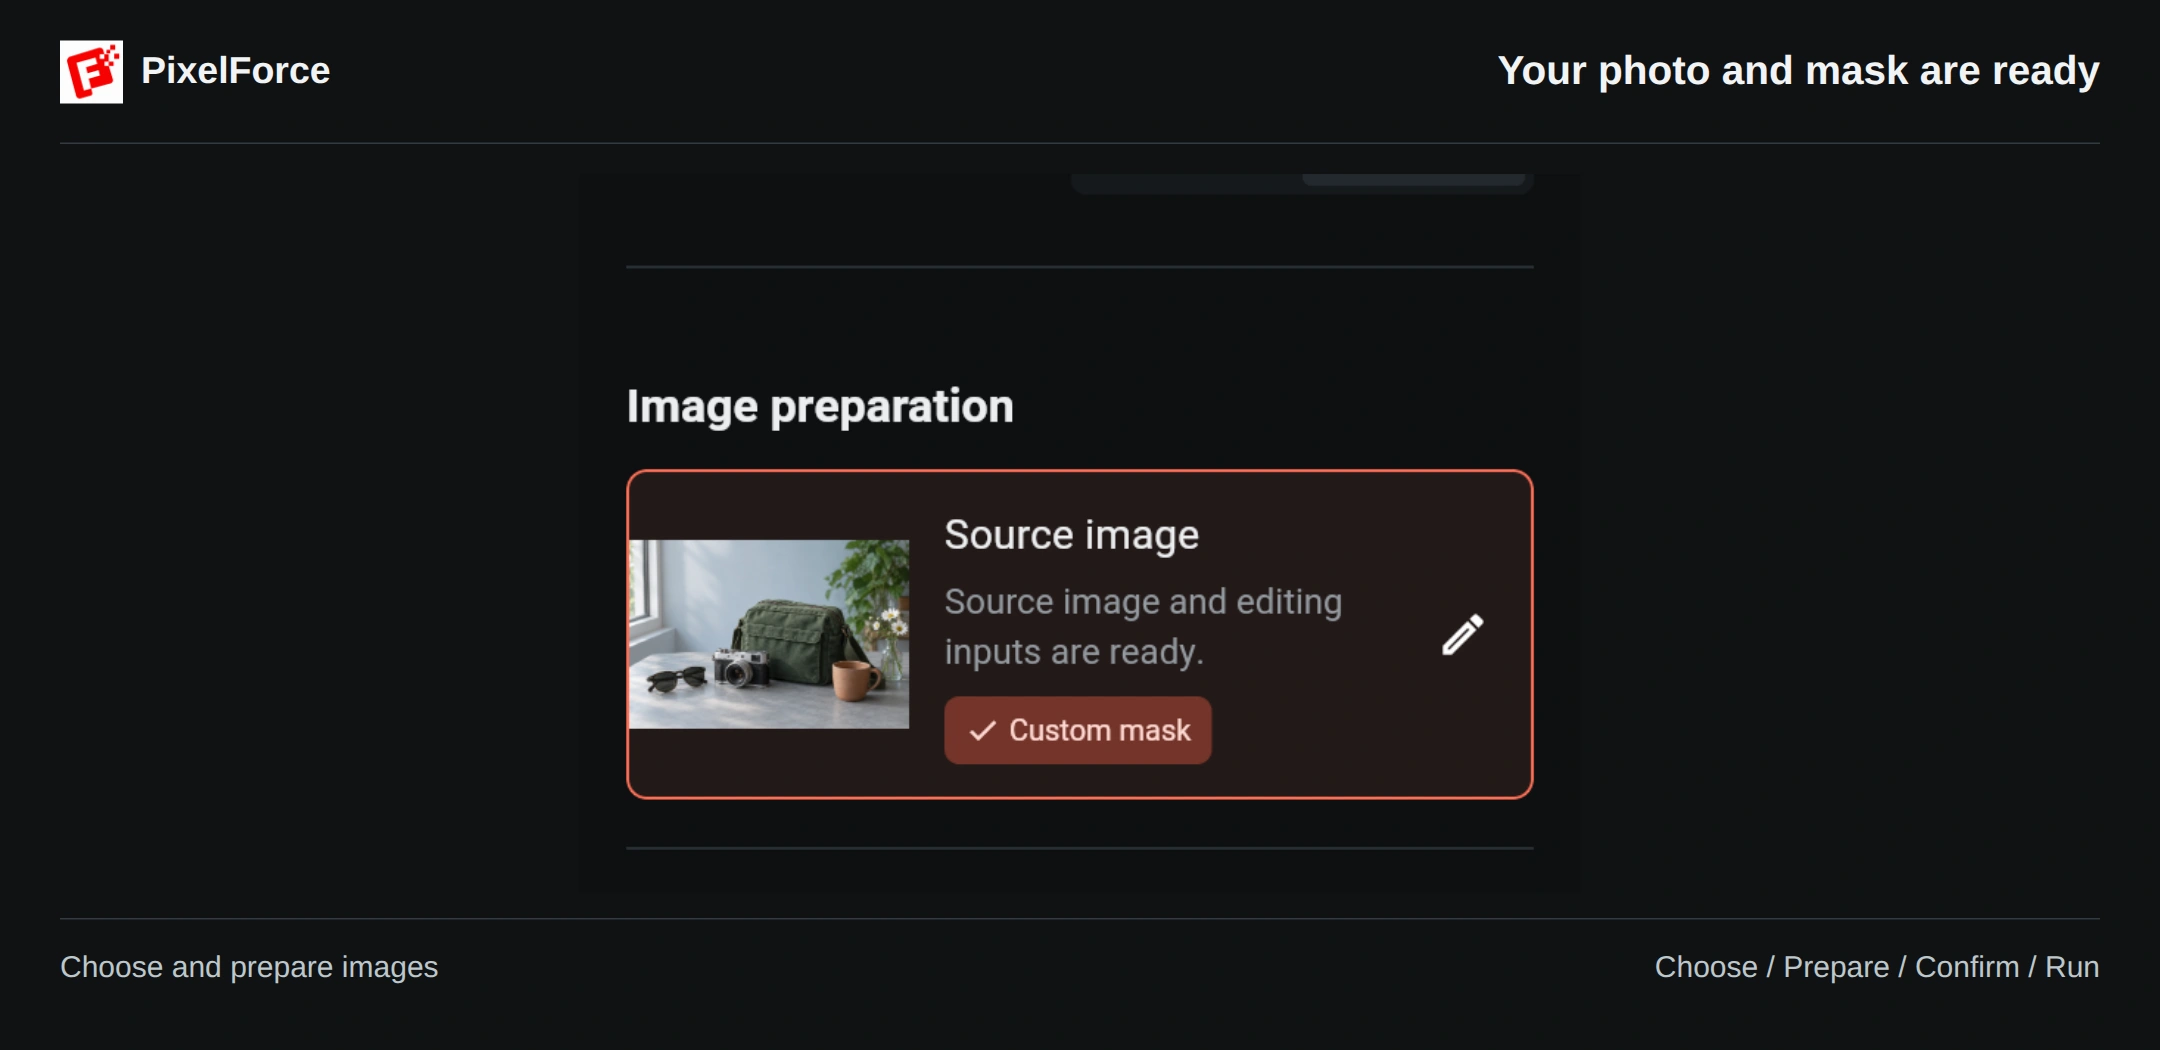
The image input now shows a preview and indicates whether a custom mask is set. Click Edit inputs to reopen it if you need a correction. Complete the remaining instructions and settings, then use Run to submit the task. Confirm prepares the inputs; Run starts generation.
Formats, size and photo quality
JPEG, PNG and WebP are dependable choices for file-based selection. If a photo in another format cannot be opened, export it as JPEG or PNG and try again. Use PNG when you need to retain transparency.
| Input | Preparation limit |
|---|---|
| File size | Up to 20 MB per image. |
| Ordinary generation input | Longer edge up to 1024 pixels. |
| AI Portrait Studio identity photo / uploaded Model Recast identity reference | Longer edge up to 2048 pixels. |
Larger images are reduced proportionally, keeping the complete frame rather than cropping it to a square. These limits apply to AI inputs, not the original file in your photo library or the generated output. The local Image Editor has separate limits and retains full resolution within them.
- For portraits, use a sharp, well-lit photo with the face and hair clearly visible. Avoid heavy beauty filters or objects covering the face.
- For clothing and products, show the whole item, including hems, sleeves and details you want to retain. Avoid fingers or other objects covering it.
- Prefer the original photo to a screenshot or a repeatedly compressed copy. A larger file cannot restore missing detail.
If a photo will not open
| What happened | What to try |
|---|---|
| Photo library or camera access is unavailable | Check PixelForce permissions in your device settings, or choose Browse files. |
| A cloud-drive image is still loading | Download it to the device first, then choose the local copy. |
| The file is too large or cannot be read | Export a smaller JPEG or PNG, keep the important detail, then select it again. |
| The preview shows the wrong photo | Use Replace; check the original and repaint any mask before confirming. |
| You closed the picker by mistake | Reopen the image input. Your previous confirmed selection is kept. |