Garment Try-On
Show how a garment looks on a model, starting with the product photo rather than a person already wearing it. Garment Try-On supports one upper garment, lower garment or dress, or a coordinated upper-and-lower pair. Choose a model, describe the presentation and review the clothing details in the result.
For a source photograph where someone already wears the outfit, use Garment-preserving redraw. For changing only the person in an existing photograph, start with Model Recast.
The current version does not support underwear, swimwear or similarly revealing garments for Garment Try-On. AI safety checks may classify the input or requested result as disallowed content and prevent generation. Choose everyday clothing with adequate coverage. A successful example does not guarantee that a similar garment will pass review.
From a pink product photo to a finished look
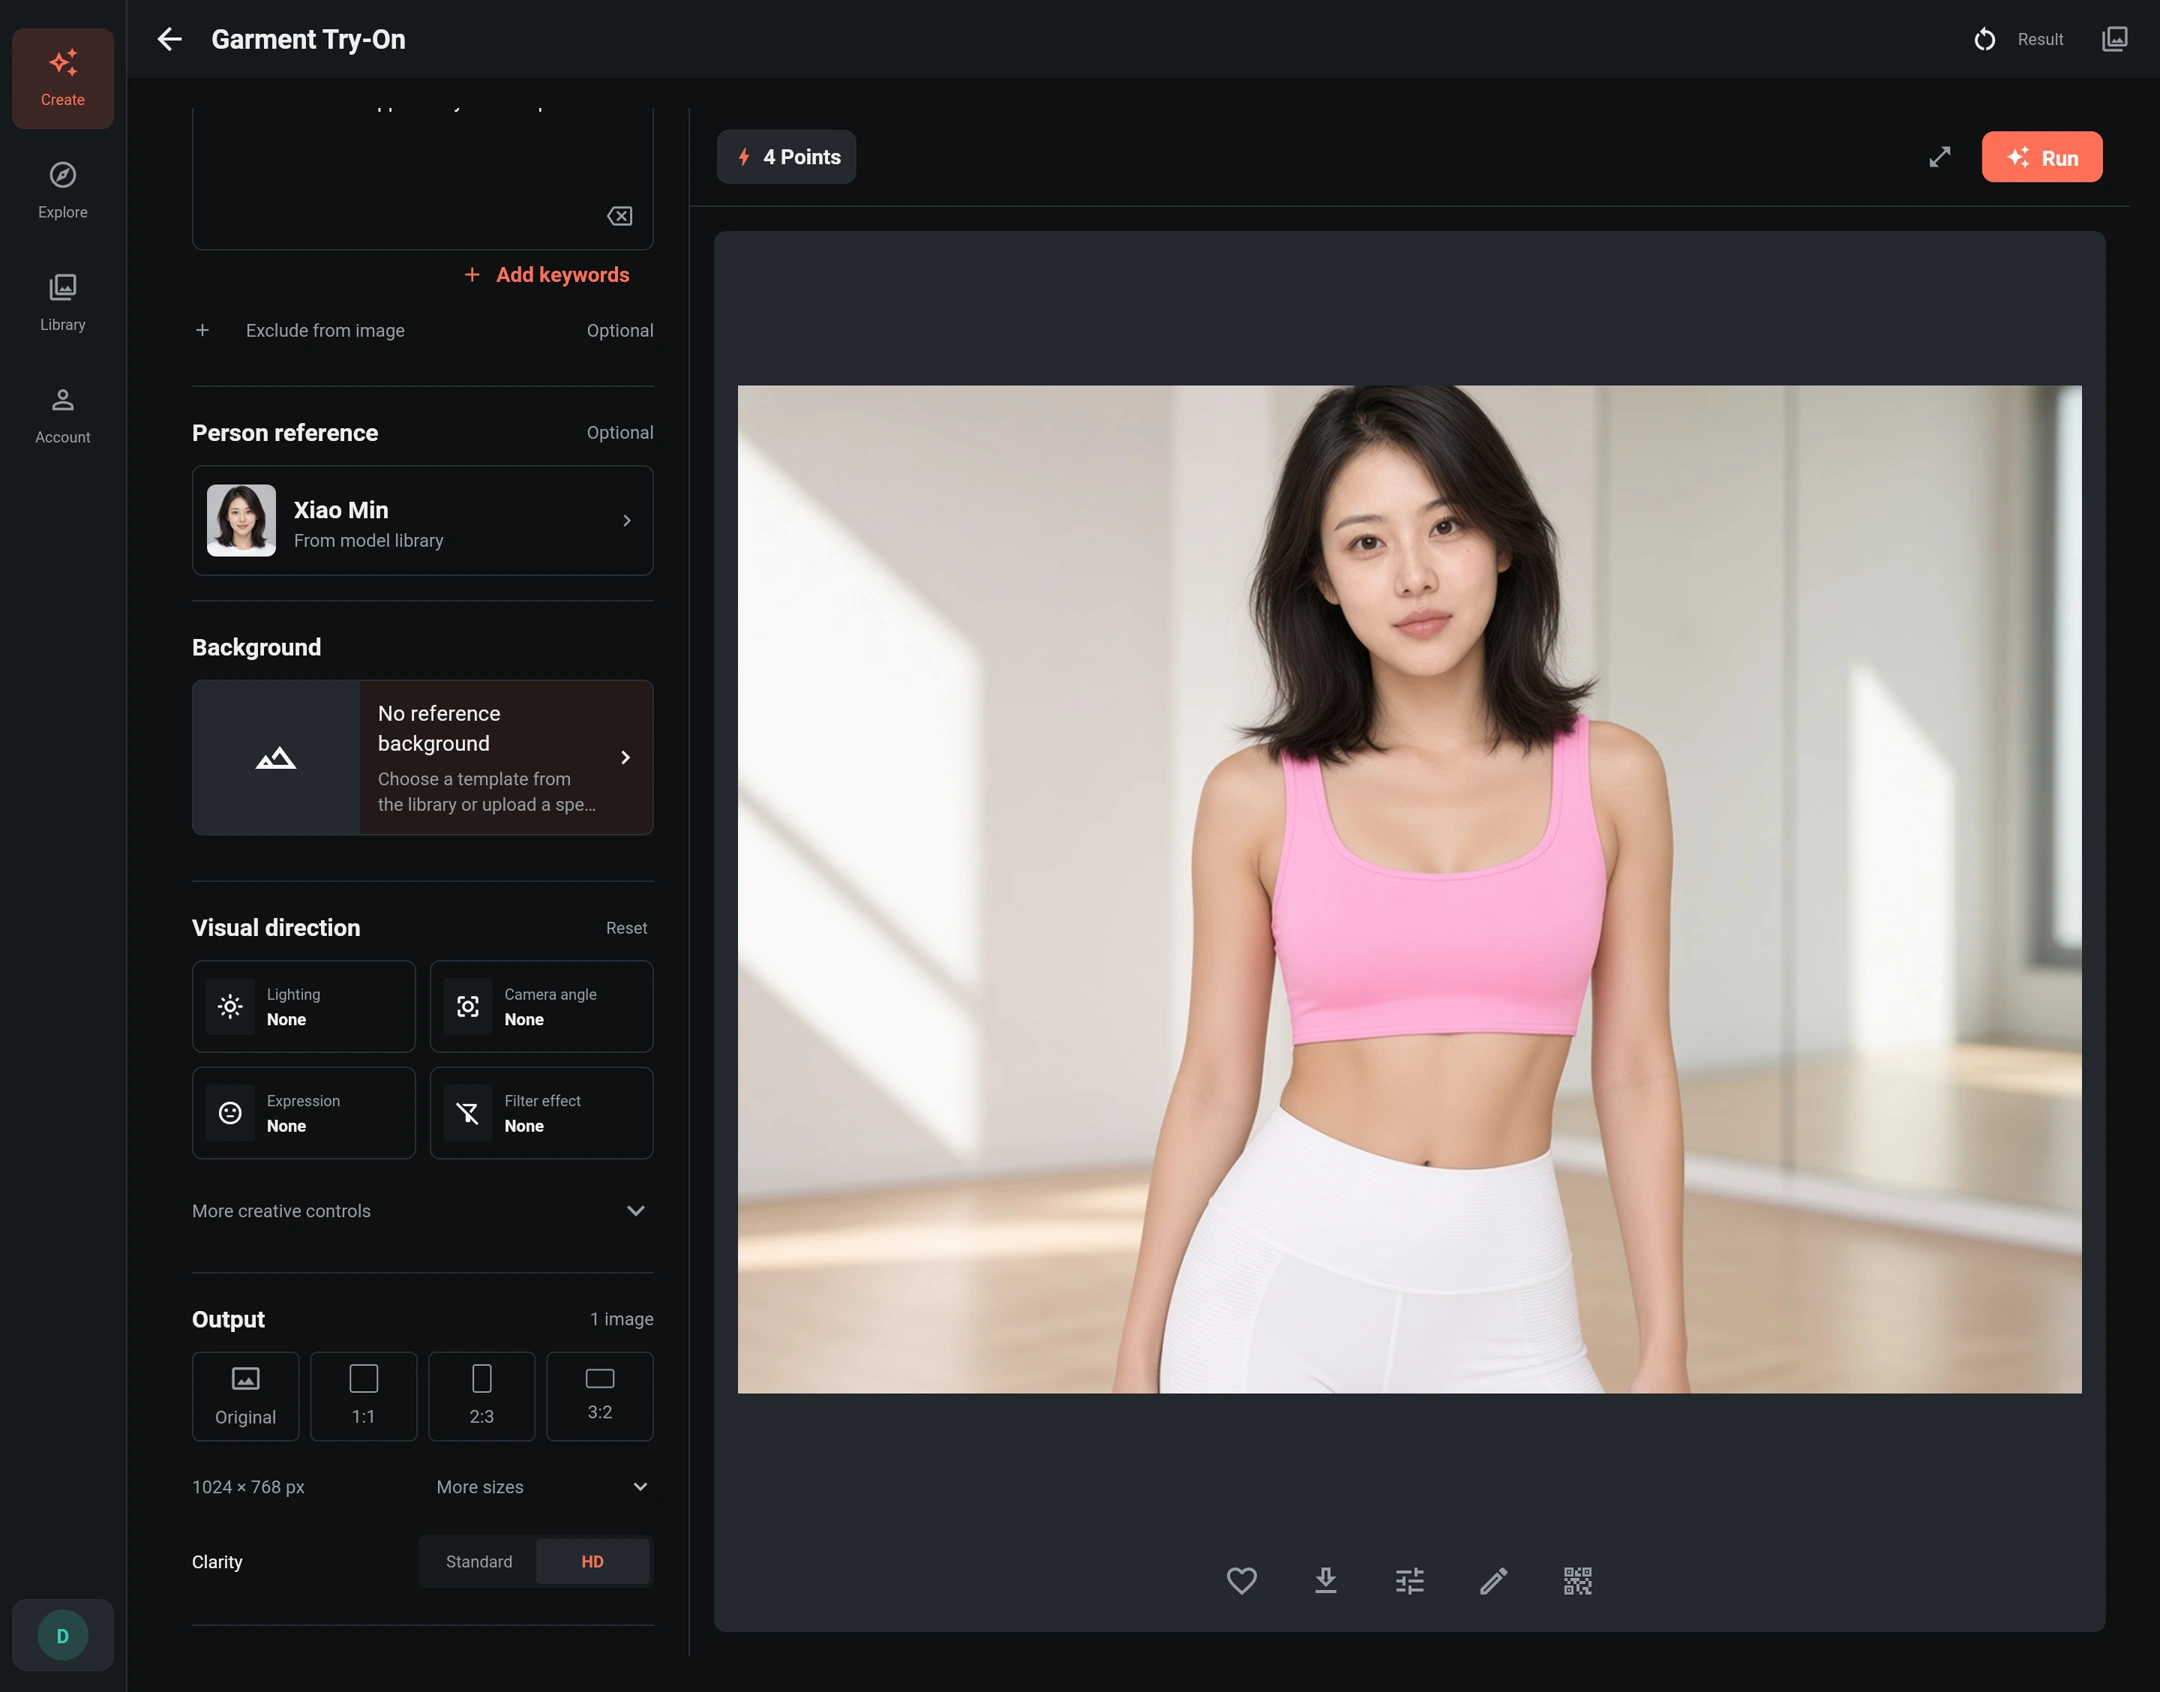
This example starts with a pink cropped top photographed on a plain background. The garment category is Upper, and the selected model is Xiao Min. The presentation request adds fitted white yoga pants and asks for framing from the upper body to the hips.
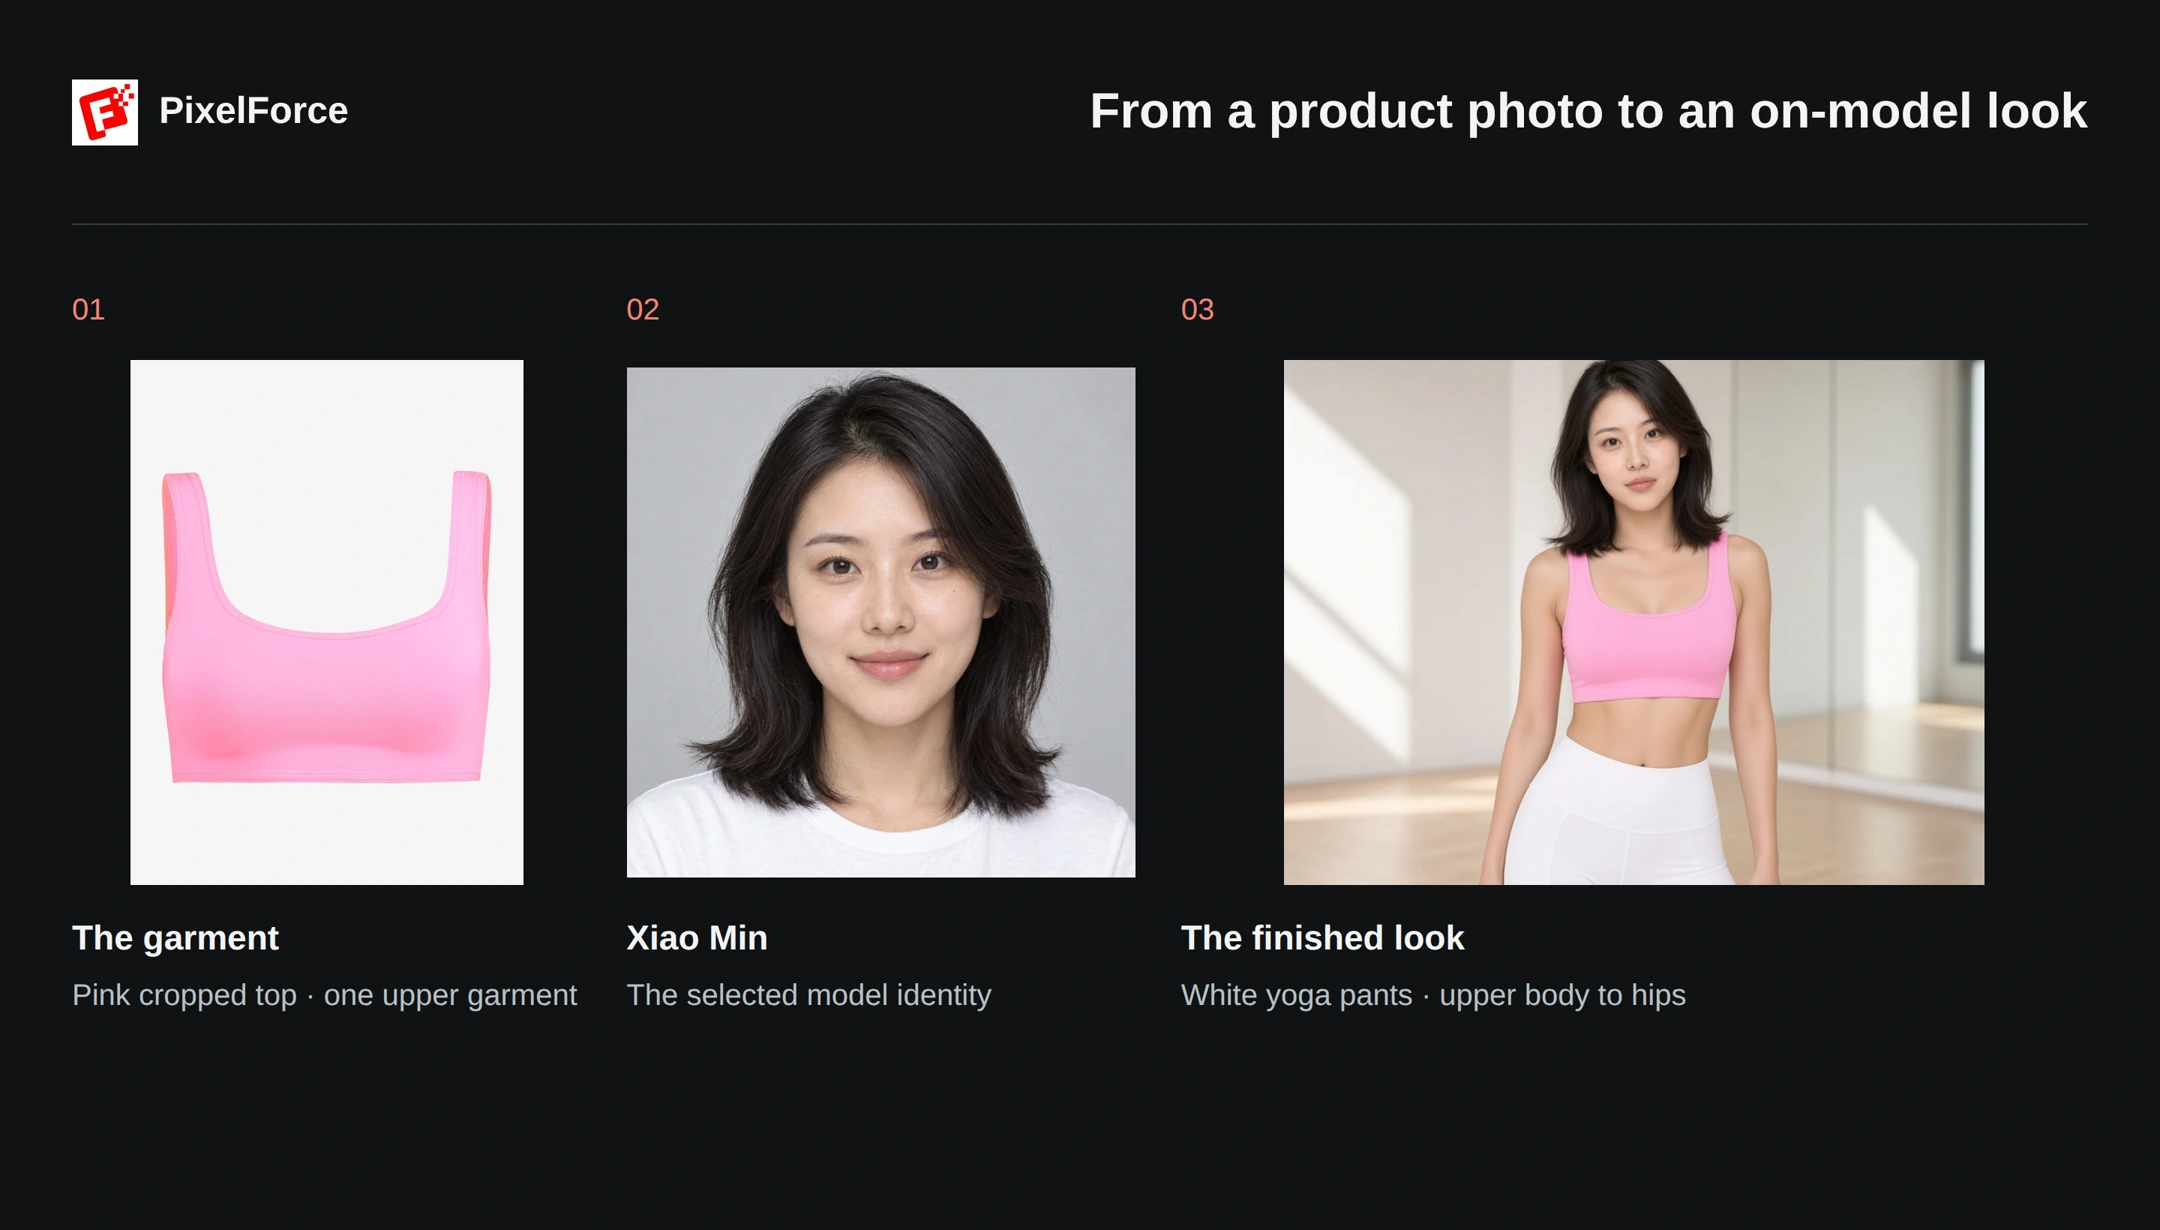
Only the pink top was uploaded. The white pants are described in the prompt, not supplied as a second product. Their appearance is generated; they are not a faithful reconstruction of a particular pair of pants. To present two actual products, upload both garment photos instead.
The references have different jobs: the garment photo defines the product; the model reference defines the person; the prompt and optional background define the presentation. Clothing in Xiao Min's portrait is not the clothing to copy.
Step 1: Add the garment and its category
- Open Garment Try-On from Create.
- In Garment images, add the product photo under Garment 1. Web opens a file picker; Android and iOS offer Photo library, Take photo and Browse files.
- Select Upper, Lower or Dress to match the actual garment. For this example, choose Upper.
- Check the whole garment in the preview. Use Replace to choose a clearer photo or Remove garment to clear it.
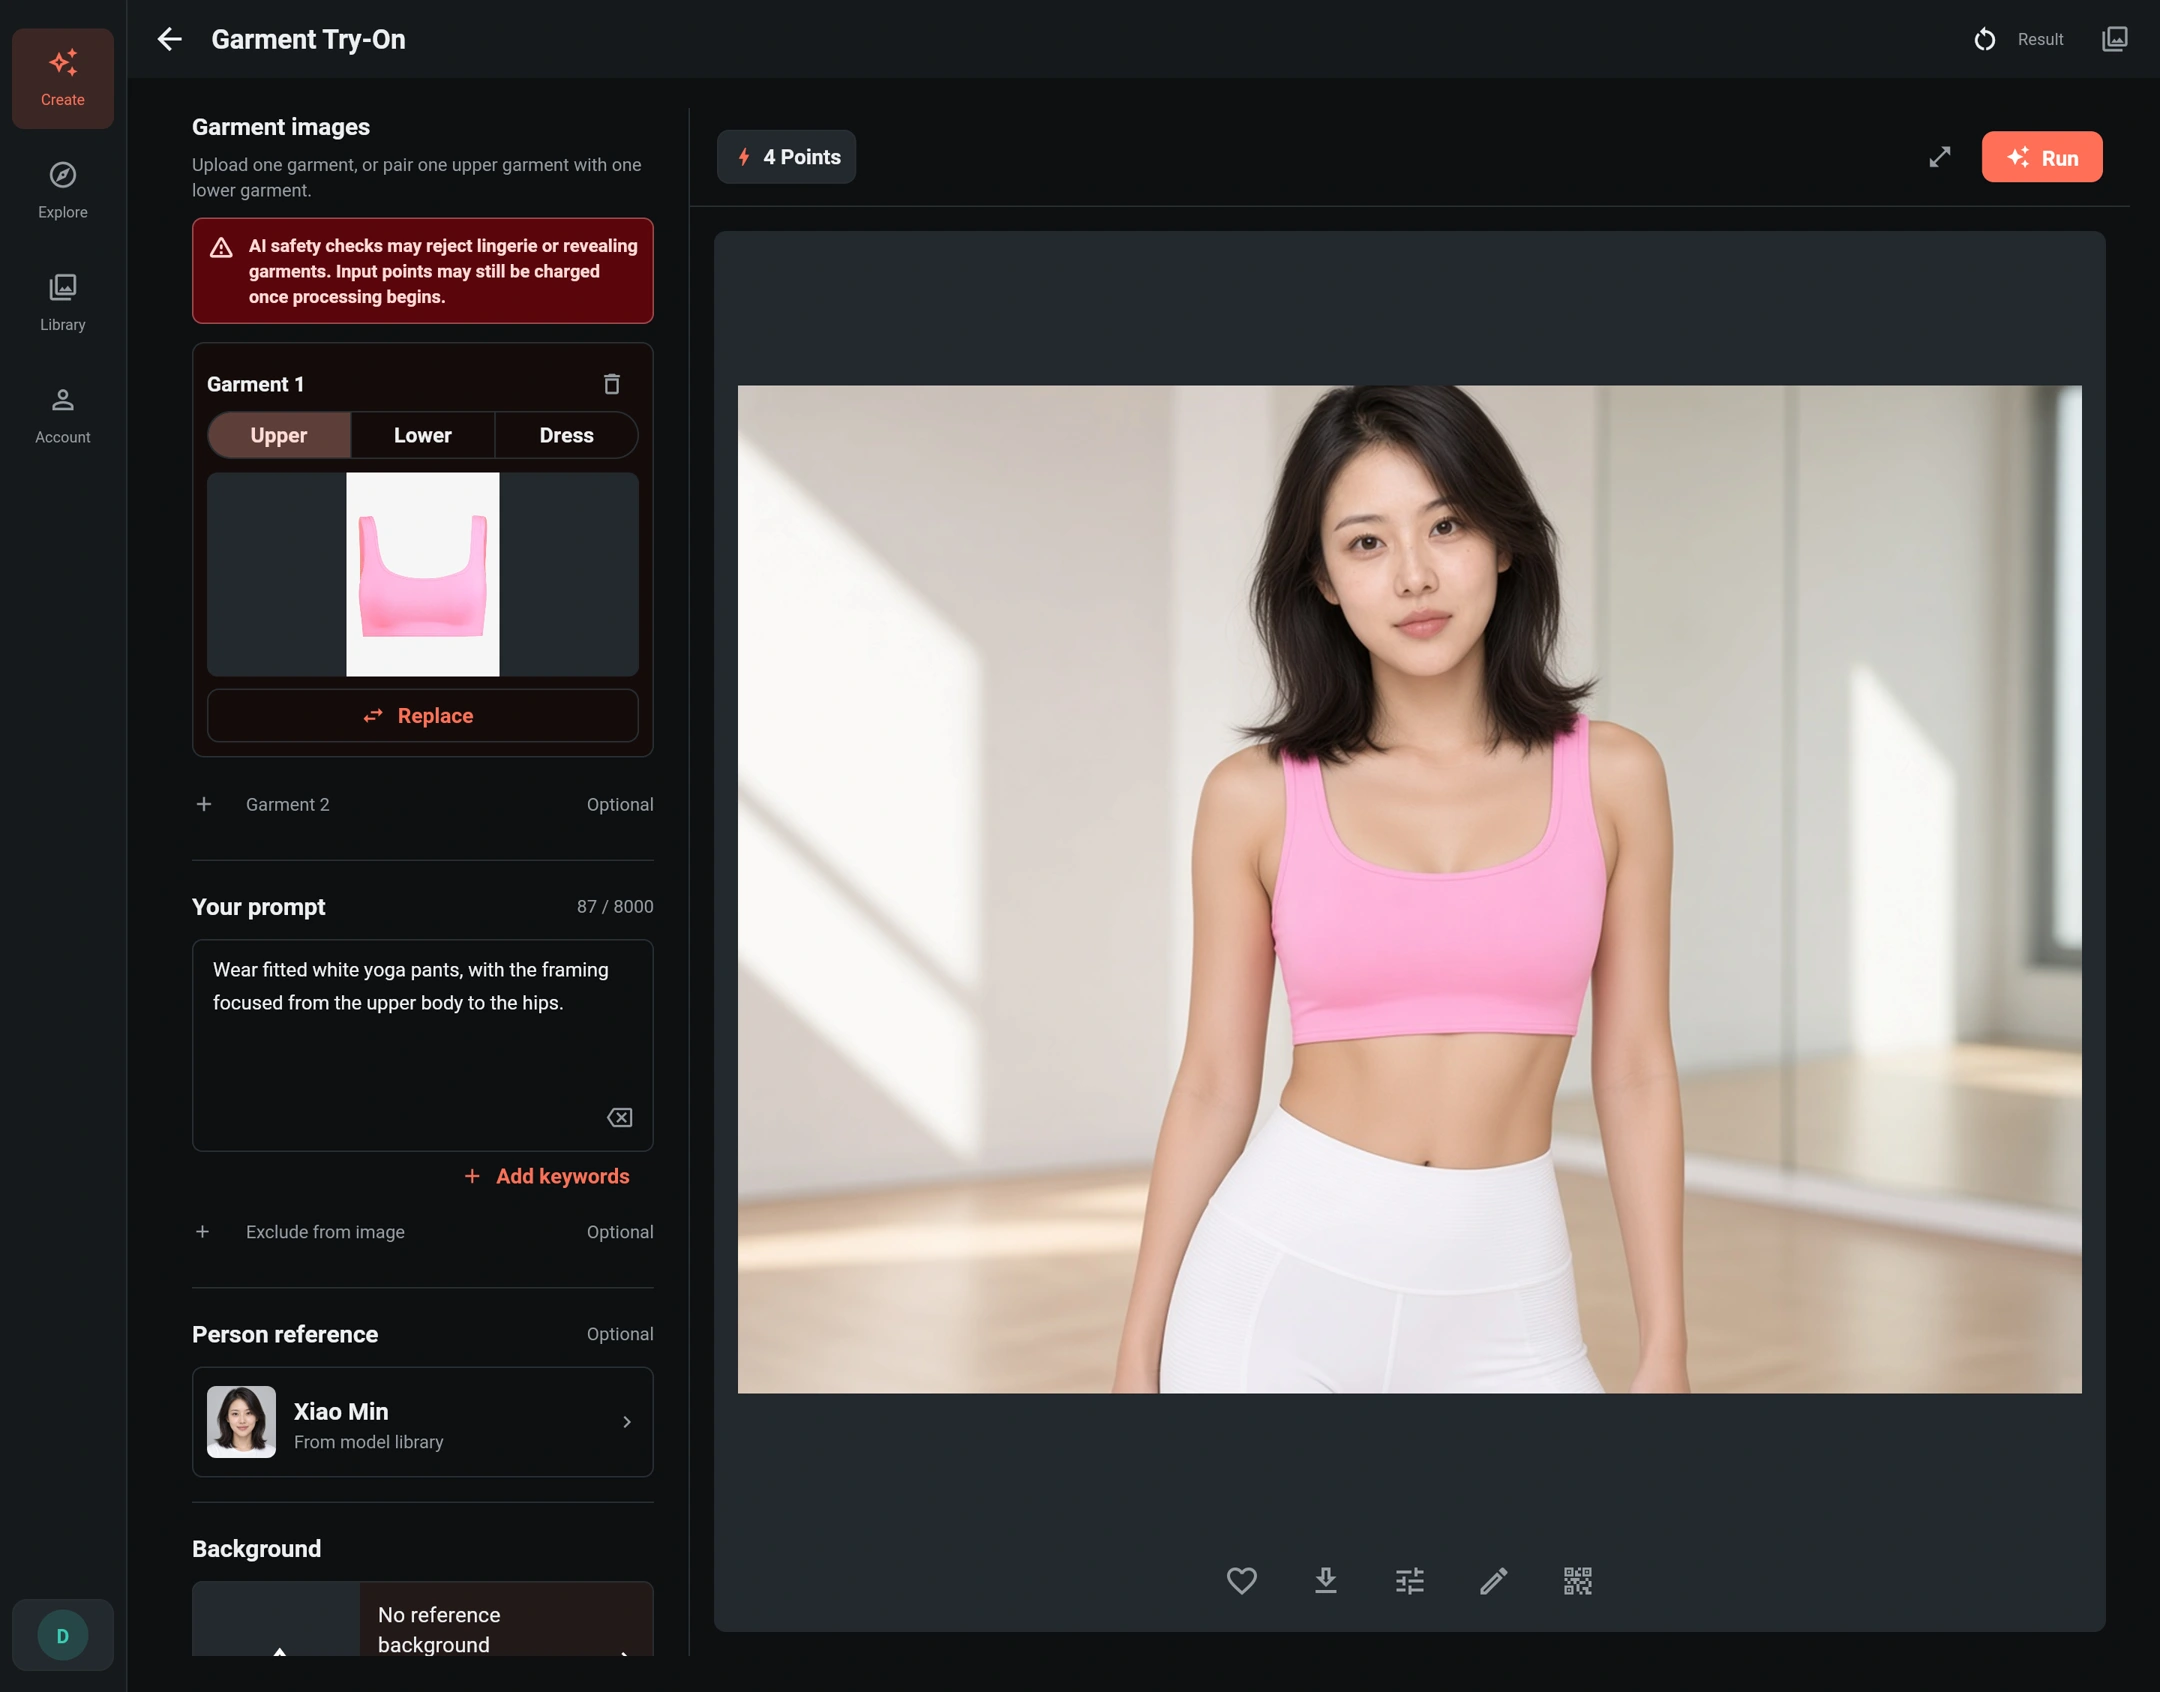
Keep the neckline, straps or sleeves, fastenings and hem visible. Use sharp, evenly lit product photos with a simple background. Do not crop away a sleeve, obscure a logo or expect an unseen back print to be reproduced accurately. A flat-lay, hanging garment or clear standalone product photo is a better starting point than a busy collage.
Add a second product only when needed
Expand Garment 2 to upload the matching item. Its category is set to complement the first garment:
| Garment 1 | Optional Garment 2 | Supported outfit |
|---|---|---|
| Upper | Lower | A top with trousers, shorts or a separate skirt |
| Lower | Upper | A bottom with a matching top |
| Dress | Not available | One dress or one-piece outfit |
Two upper garments or two lower garments are not supported as a pair. Selecting Dress removes an existing second garment; returning to Upper or Lower does not restore that removed photo. Removing Garment 2 returns to a single-product task. The worked example leaves this optional input empty.
Step 2: Choose the person wearing the garment
Open Person reference to choose a library model or upload a portrait you are authorized to use.
- Browse the categories, such as All, Women, Men, Children or Seniors, or search for a name.
- Select Xiao Min to follow this example.
- Select Apply to return the selection to the form. Closing the picker alone does not apply a different library model.
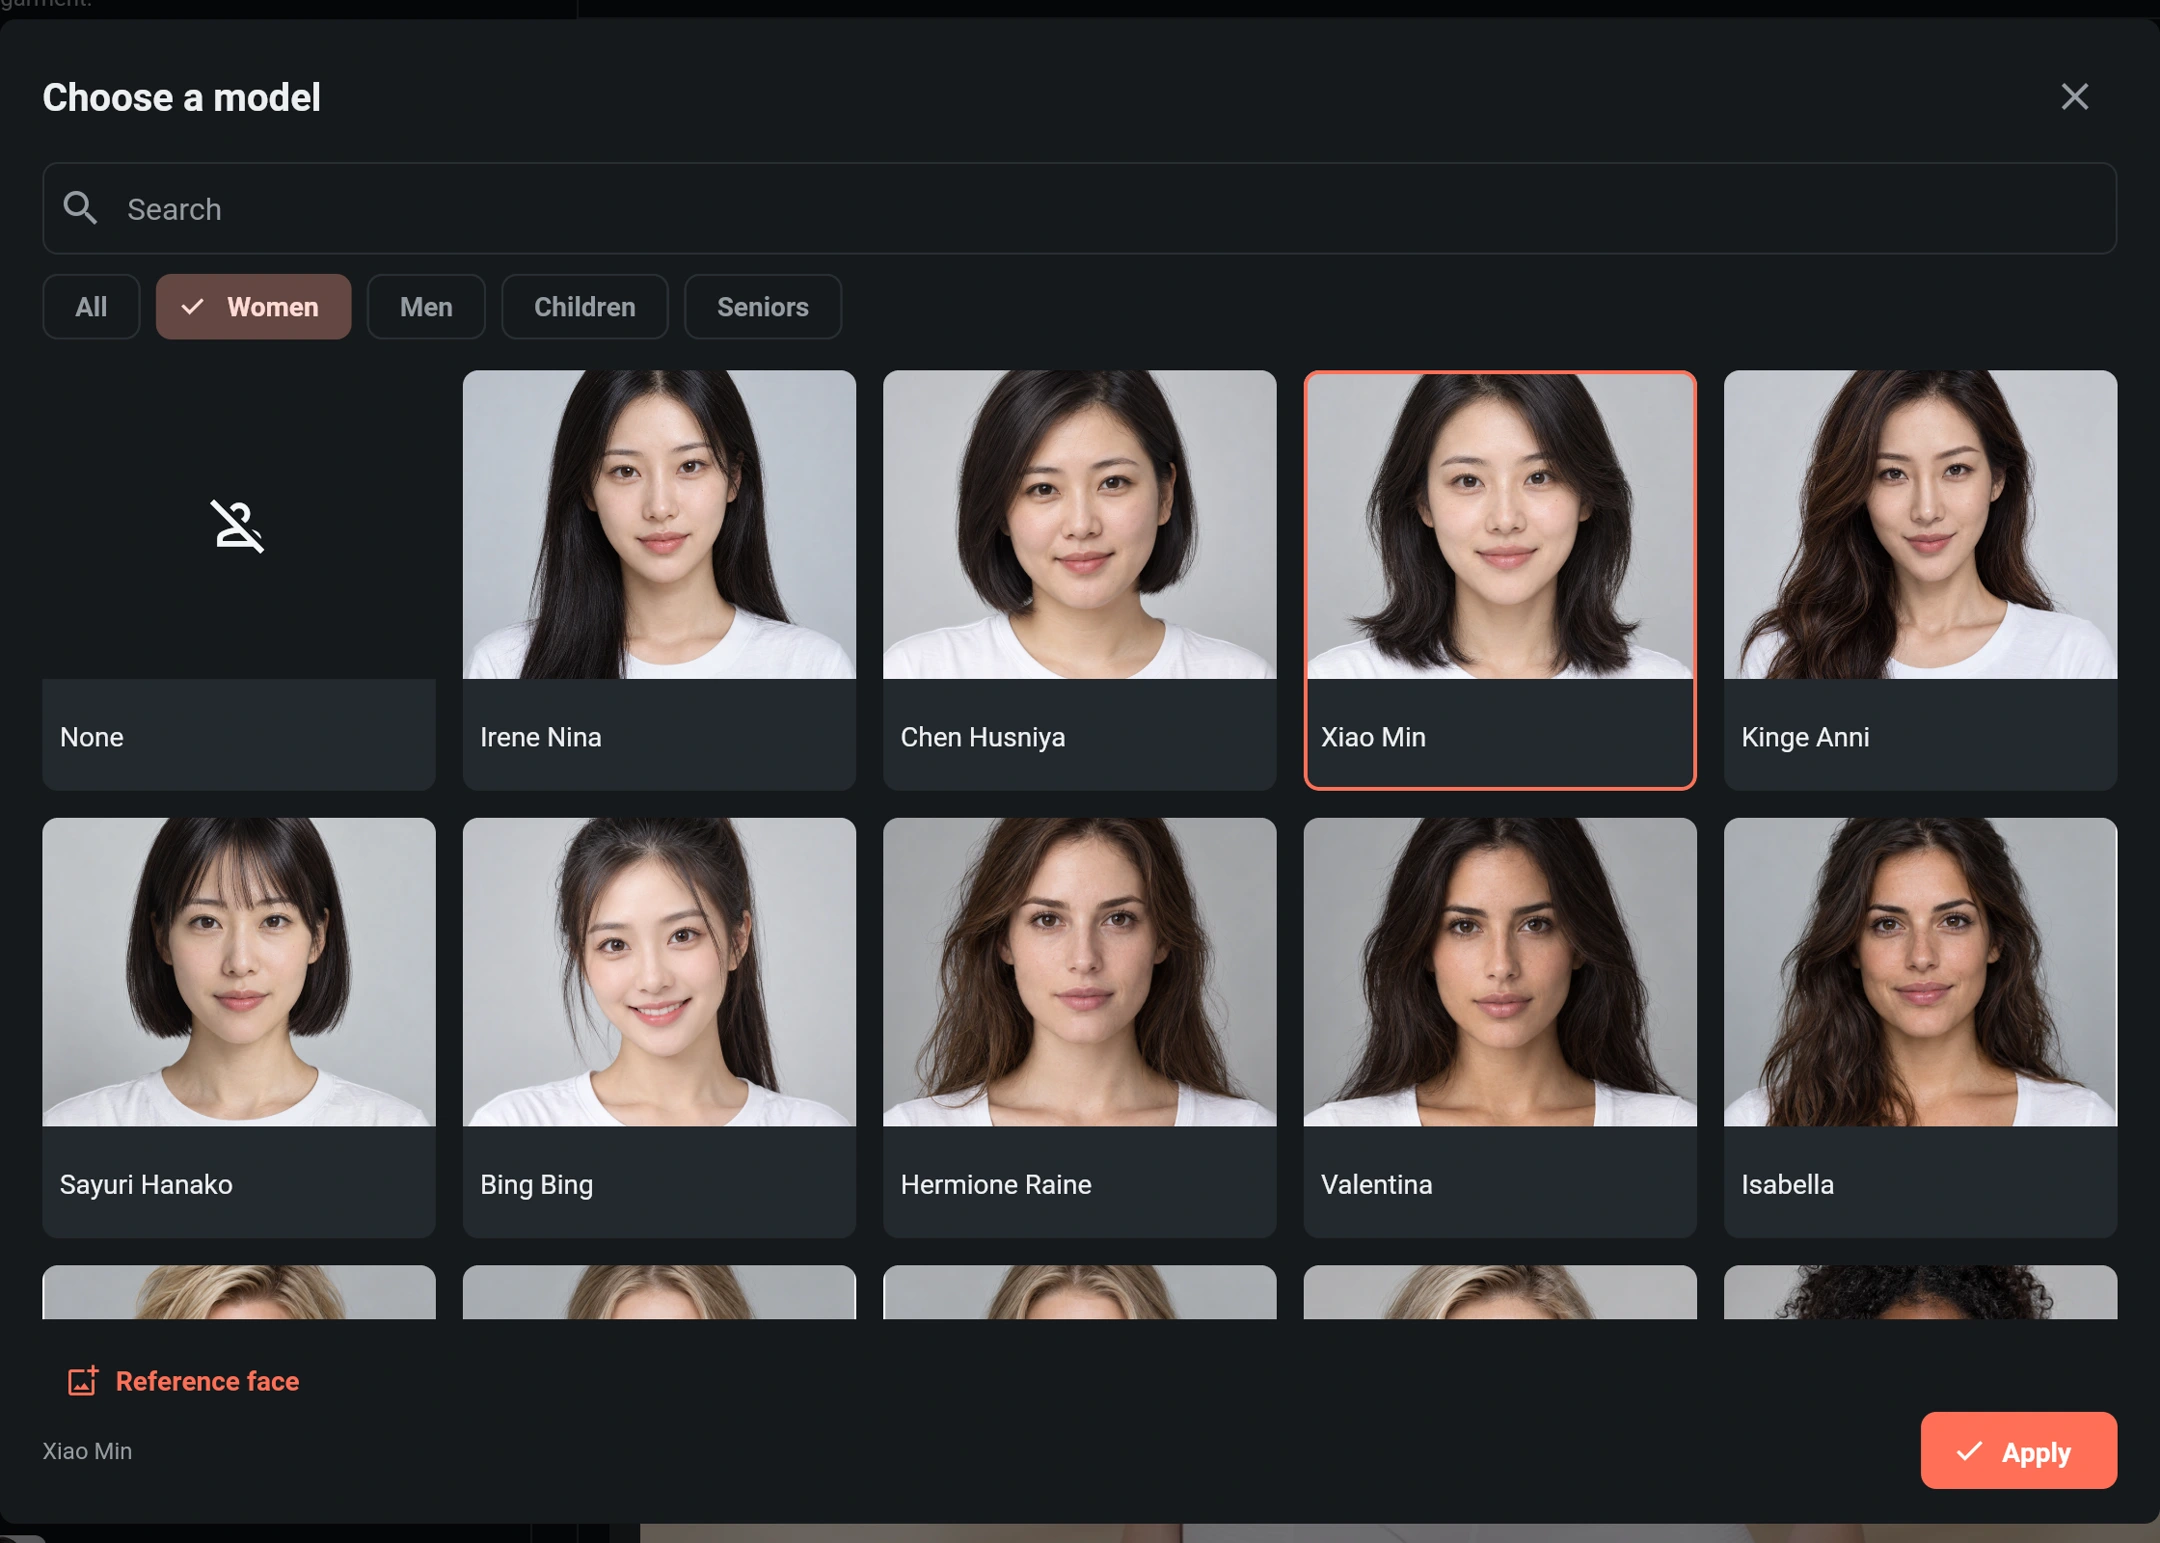
For your own identity reference, select Reference face in the same picker. Use one clear portrait with visible facial features and little obstruction. This is a person reference, not another clothing product or a background image. Use portraits and generated likenesses only with appropriate permission.
Step 3: Describe the look and choose output settings
Use an English presentation prompt
Enter the following in Your prompt. It expresses this example's styling and framing request in English:
Wear fitted white yoga pants, with the framing focused from the upper body to the hips.
The uploaded image already supplies the pink top. Keep the request focused on pose, framing, surroundings and companion styling, rather than asking the AI to redesign the product. For a more explicit product-focused instruction, you can use:
Put the uploaded pink cropped top on the selected model. Preserve its pink color, scoop neckline, wide shoulder straps, cropped hem and visible fabric texture. Pair it with fitted white yoga pants. Frame the model from the upper body to the hips, keeping the entire top visible.
This longer variation adds garment checks; it is not a second illustrated result. For two uploaded products, describe their presentation without requesting replacement clothing:
Dress the selected model in both uploaded garments. Preserve each garment's color, pattern, logos, neckline, sleeves, hems and fastenings. Use a natural front-facing pose, with both products fully visible and no accessories covering important details.
Keep the background reference optional
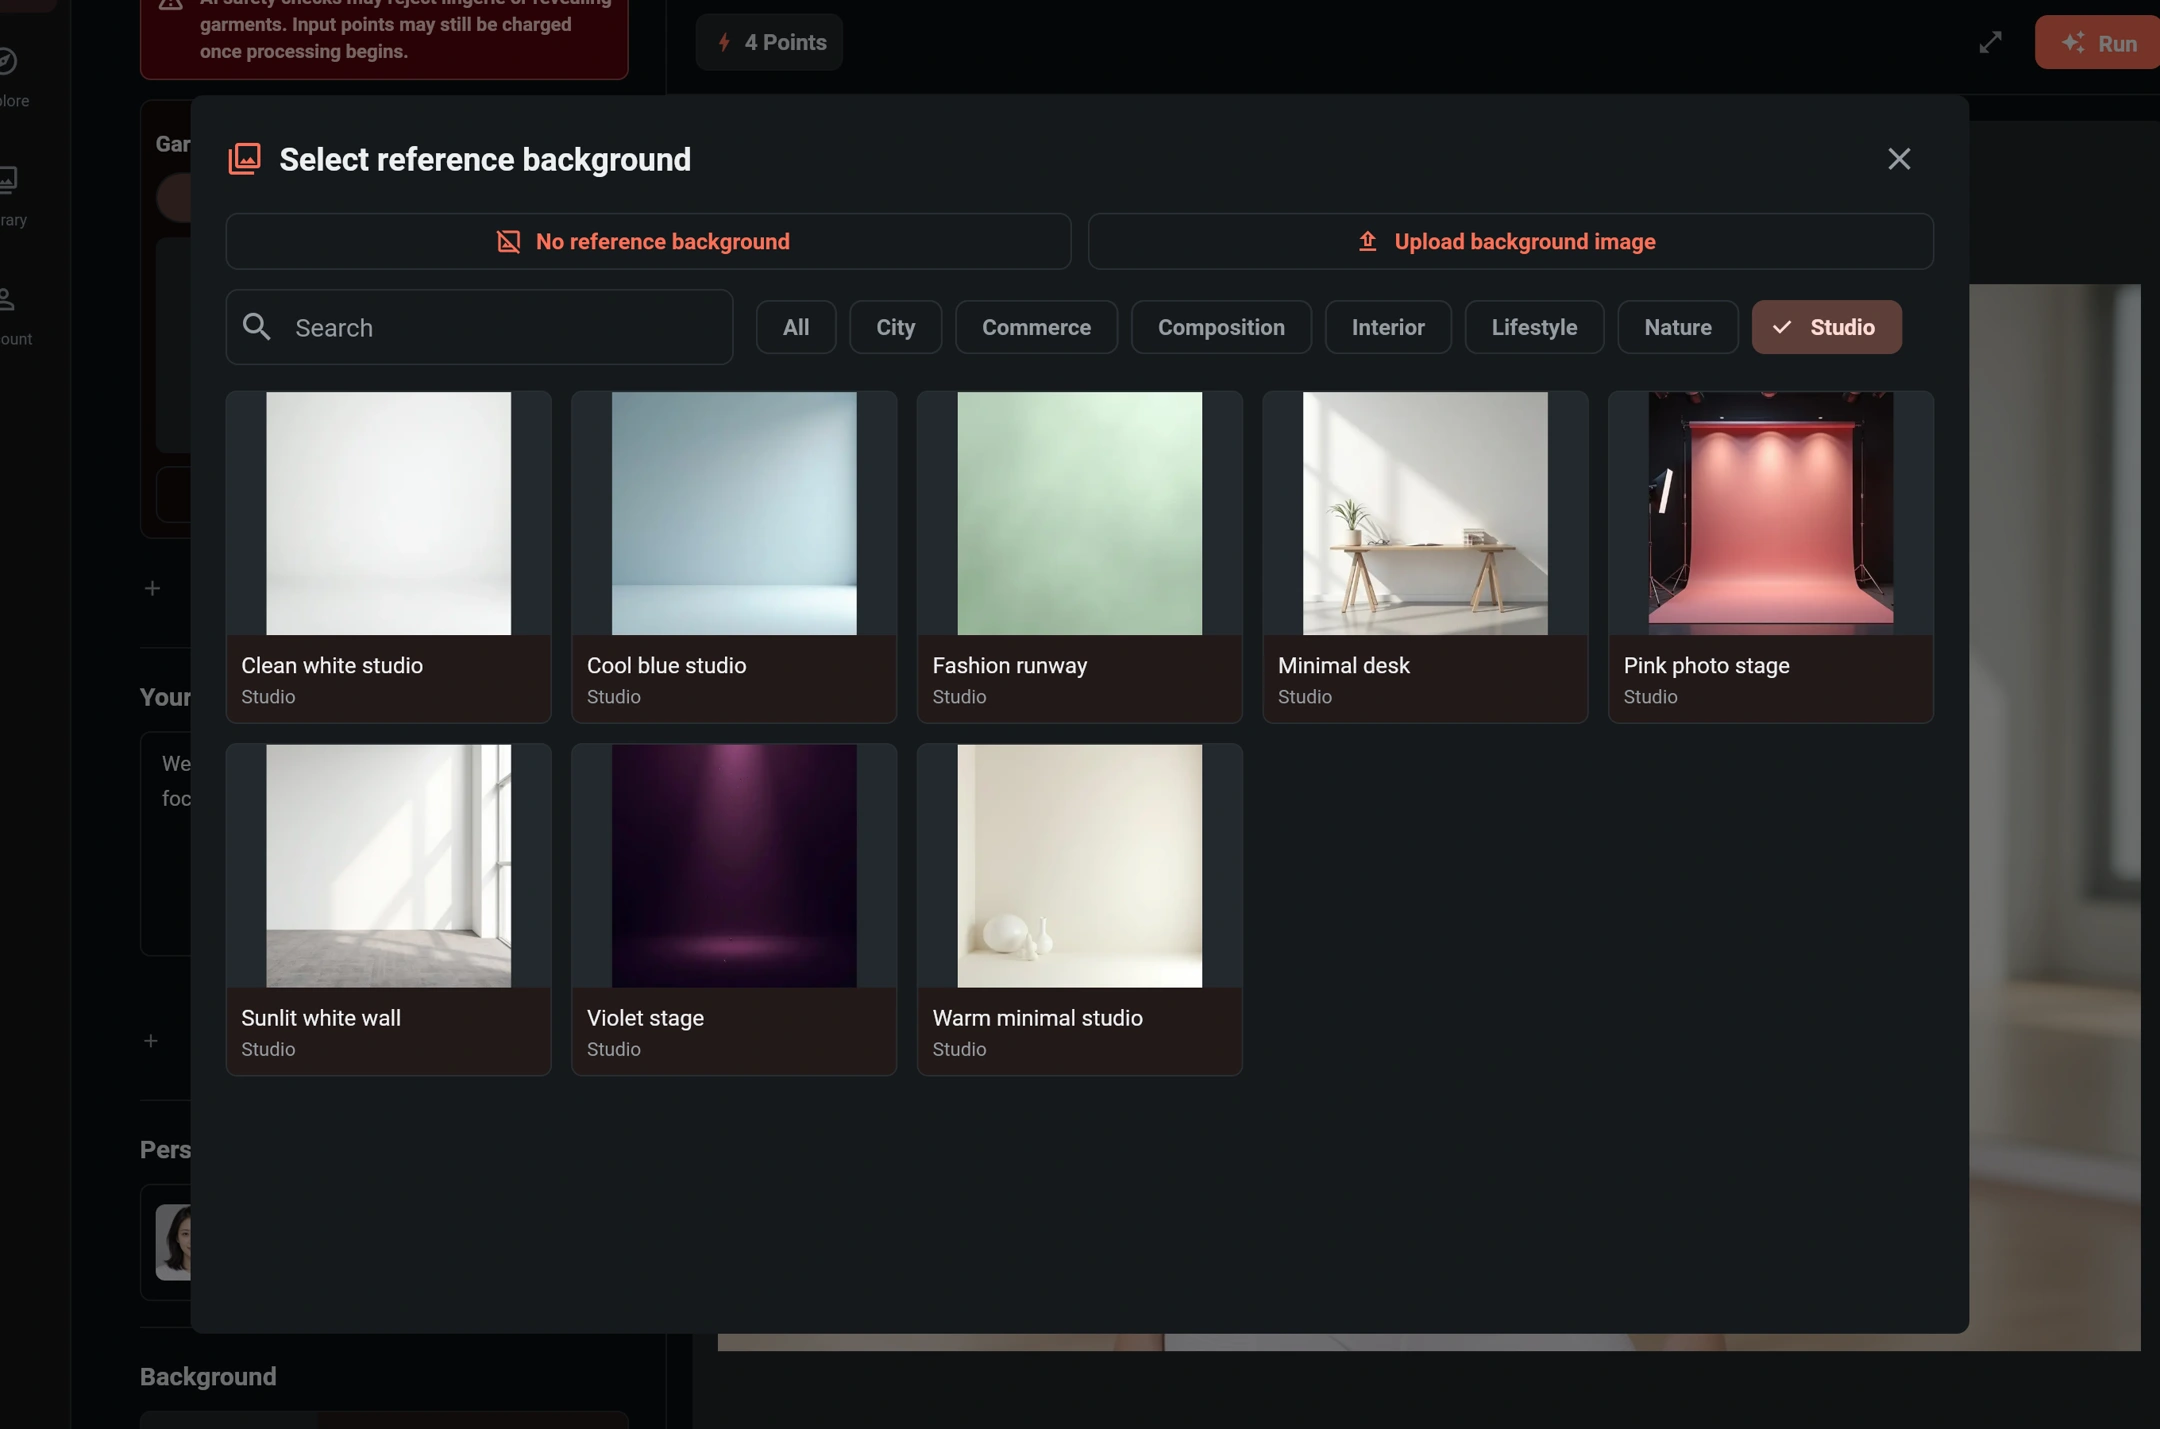
The example has No reference background selected. You do not need to upload a background to create a setting. The light interior in the result is generated; it is not proof that the plain background of the product photo will remain unchanged.
Open Background when you need a particular setting. Choose a template or select Upload background image. A template can append its scene description to the prompt, so review the final text after changing it. Keep the written request consistent with the background you chose.
Match the example's choices
| Setting | Example choice | What it controls |
|---|---|---|
| Garment 1 | Pink top · Upper | The product to put on the model |
| Garment 2 | Empty | No second product reference |
| Person reference | Xiao Min | The intended person |
| Background | No reference background | No fixed background image |
| Image size | 4:3, 1024 × 768 preset | A landscape composition with room around the model |
| Clarity | HD | Output clarity, separate from the chosen aspect ratio |
| Visual direction | No extra styles selected | No additional lighting, filter or photographic treatment |
This scene does not show a High/Normal selector. Standard and HD are clarity choices, not switches that guarantee garment fidelity. HD may produce a larger image than the size preset; check the delivered image's dimensions rather than treating the preset as an exact HD pixel promise. Review the current points quote when changing clarity or other output options.
Step 4: Generate and check the product
- Recheck the garment categories, model, prompt, background and output settings.
- Review the points quote beside Run, then select Run once. If submission is unconfirmed, check the existing task rather than sending another request.
- Open the completed image and compare the uploaded garment at a useful zoom level.
| Check | Look for |
|---|---|
| Color and pattern | The original colors, stripe spacing, prints and their placement |
| Text and logos | Correct lettering, size and location, not an invented substitute |
| Shape and construction | Neckline, strap width, sleeves, hem length, silhouette, closures, ties and pleats |
| Fabric and fit | Plausible texture, thickness, folds, seams and drape |
| Model and framing | The intended person, the requested crop and an unobstructed view of the product |
| Edges and anatomy | Clean transitions around hair, hands, arms and clothing, without broken joins |
In this example, pay particular attention to the top's pink color, scoop neckline, broad straps and short hem. AI may change fit, construction or fine details. Do not publish a result as an accurate product representation until the important garment details pass your comparison. This is a visual presentation tool, not a guarantee of physical fit or garment sizing.
Save a result you want to keep. Select Edit image to continue with a targeted correction in AI Retouch; a new AI task has its own points quote. Use the result's sharing action to create a QR code; Sharing and importing explains how the recipient restores the inputs and generates their own result. Restoring this scene is unavailable once the original task is older than 30 days.
Common questions
Why do the white pants differ from my actual product?
Words describe a style, not a specific product. Upload the pants as Garment 2 if their real design must be preserved. Then review both garments, including their joins and any overlapping fabric.
Can a dress be paired with another garment?
Not in this form. Use one dress, or use the supported upper-and-lower combination. Dress removes the second-product input.
Why is a garment detail different?
Check photo sharpness, whether the detail was fully visible and whether the prompt or visual styles requested a conflicting change. Improve the source and change one setting at a time. Higher clarity does not make an invented logo or altered hem correct.
What happens if a safety check rejects the garment?
Underwear, swimwear and similarly revealing garments are outside the supported scope of this version. AI safety review may stop generation; this is a content-policy decision, not a legal judgment about the garment. Read the warning beside Garment images and the task's points settlement. Processing that has already begun may still incur input points; an unsuccessful final image is not automatically proof of zero charge.