Background redraw
Background redraw does more than put a different picture behind a subject. It can blend the person, clothing and background lighting into one coherent photograph: highlights, shadows, exposure, color temperature and reflected light help the subject belong in the new environment.
Use it for an existing portrait, an outfit photograph or a product whose setting needs to change. The intended change is the environment and its light, not the person's identity or the garment's design. For transparency or a flat color rather than a new scene, use Background Cutout.
A portrait moves into the city daylight
The source shows a woman wearing a wide-brimmed straw hat and a navy-and-white striped shirt against a plain background. The reference is Modern city boulevard, with glass towers, trees and a sunlit paved avenue.
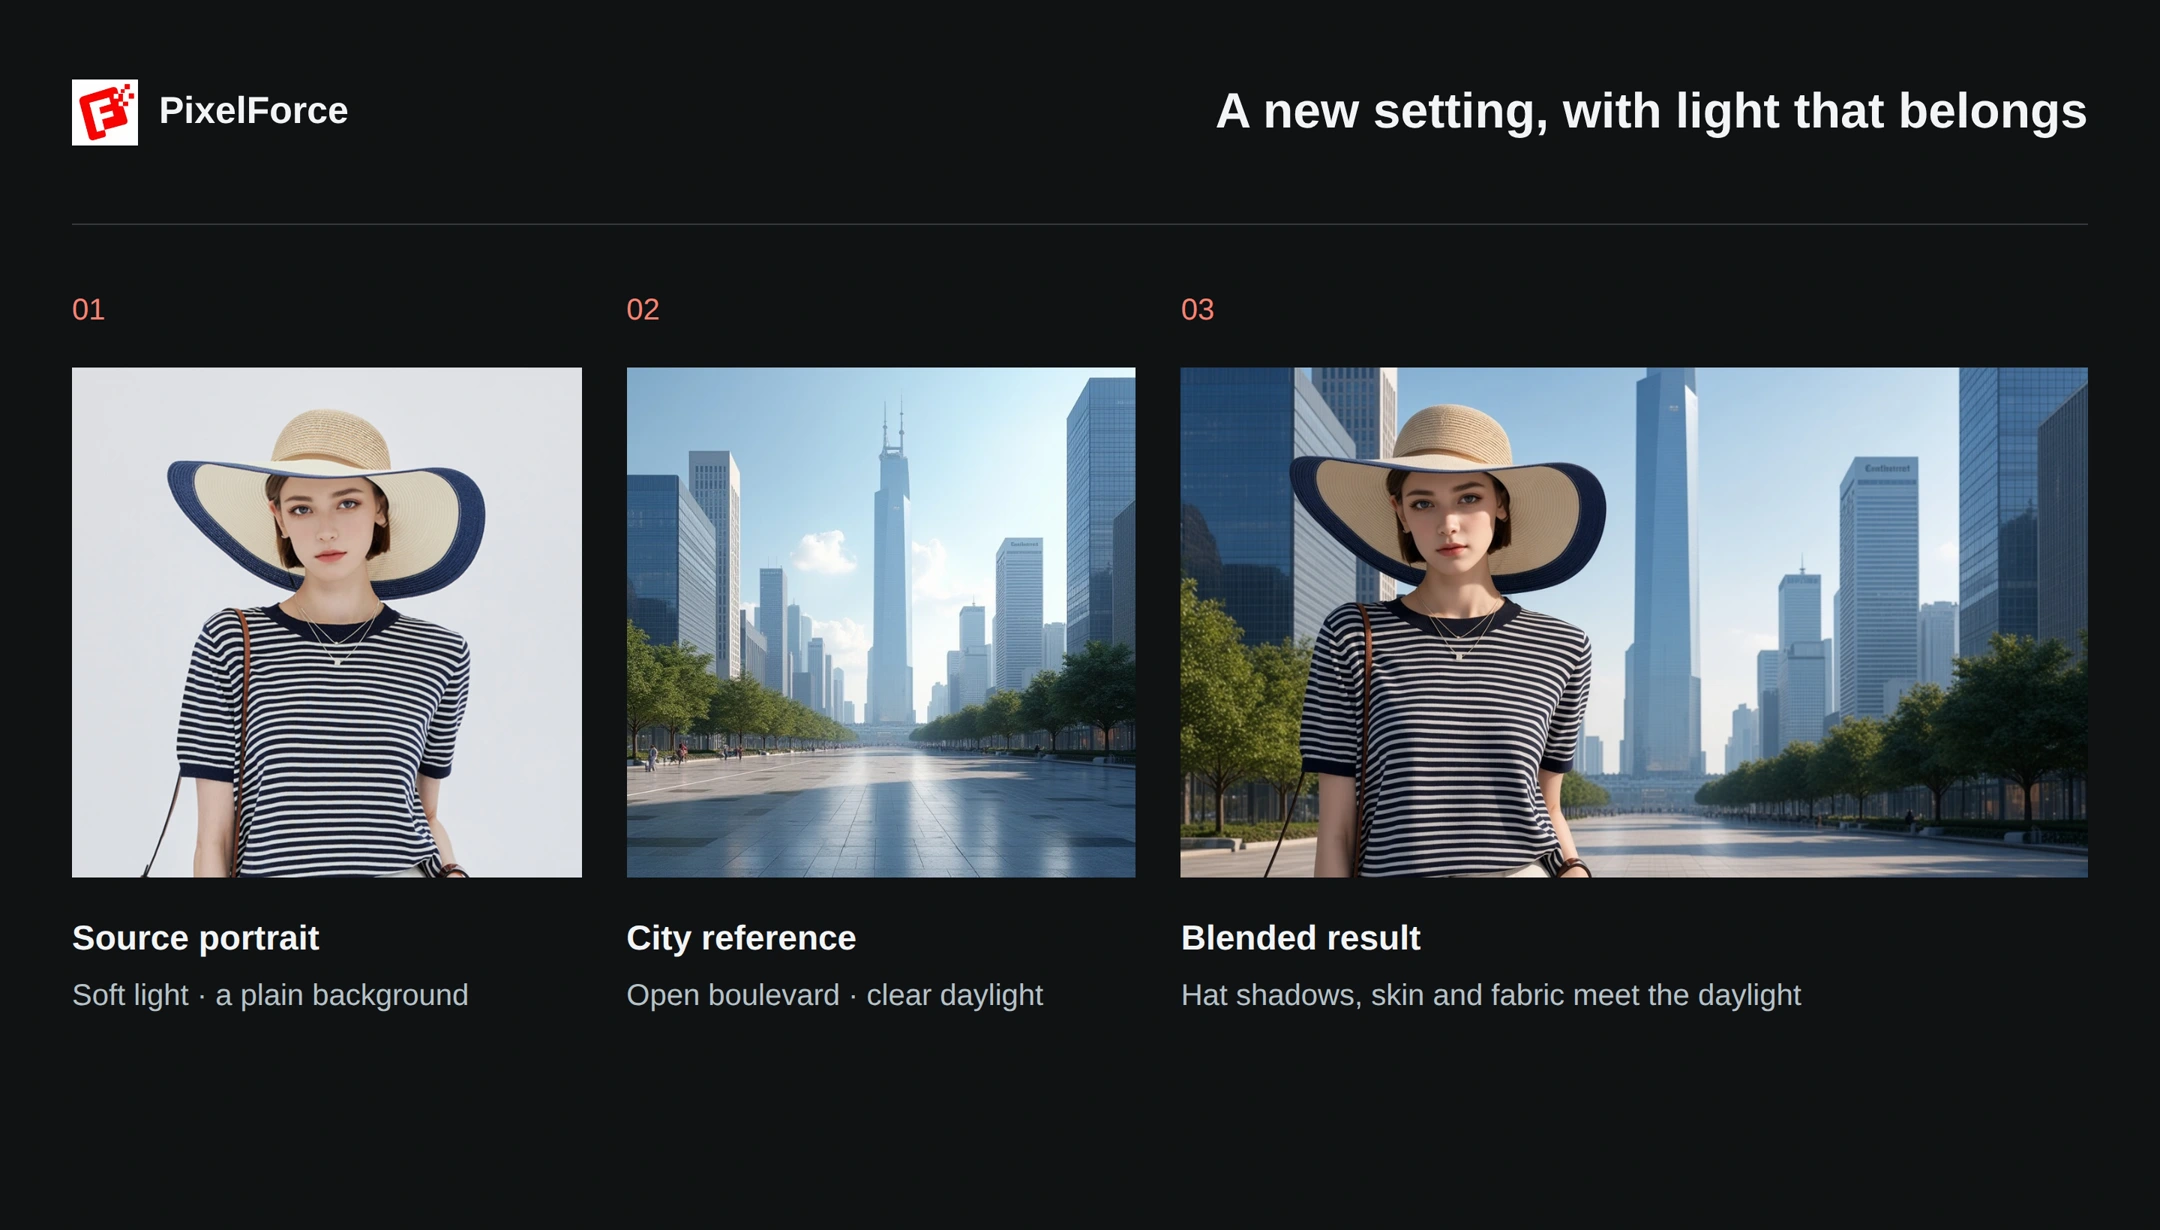
Compare more than the buildings. In the result, the hat brim casts a more defined shadow across the face, the skin and arms have stronger light-and-shade separation, and the shirt's folds and stripes sit within the outdoor lighting. The person looks more at home in the city scene than a softly lit cutout would.
This example also selects Shadow effect lighting. Its result reflects the combination of the city reference, the written scene description and that lighting choice, not the reference image alone. There is no custom mask.
Changing exposure, shadows or reflected light can change how a color looks in the photograph. That is different from replacing the garment's intrinsic color, stripe pattern, text, silhouette or fabric construction. Compare these details with the source before publishing a product image; AI-generated lighting and fidelity still need review.
Step 1: Prepare the source photo
- Open Background redraw from Create and add the source photograph. Android and iOS offer Photo library, Take photo and Browse files; Web uses a file picker.
- Select Edit inputs to open the source-preparation workspace. Check that the whole subject and important clothing or product details are visible.
- Leave Custom mask empty for this example. If you need to define the redraw area yourself, prepare a mask and check its preview before confirming.
- Select Confirm to return to the form. Use Replace if the source is blurred or cropped too tightly.
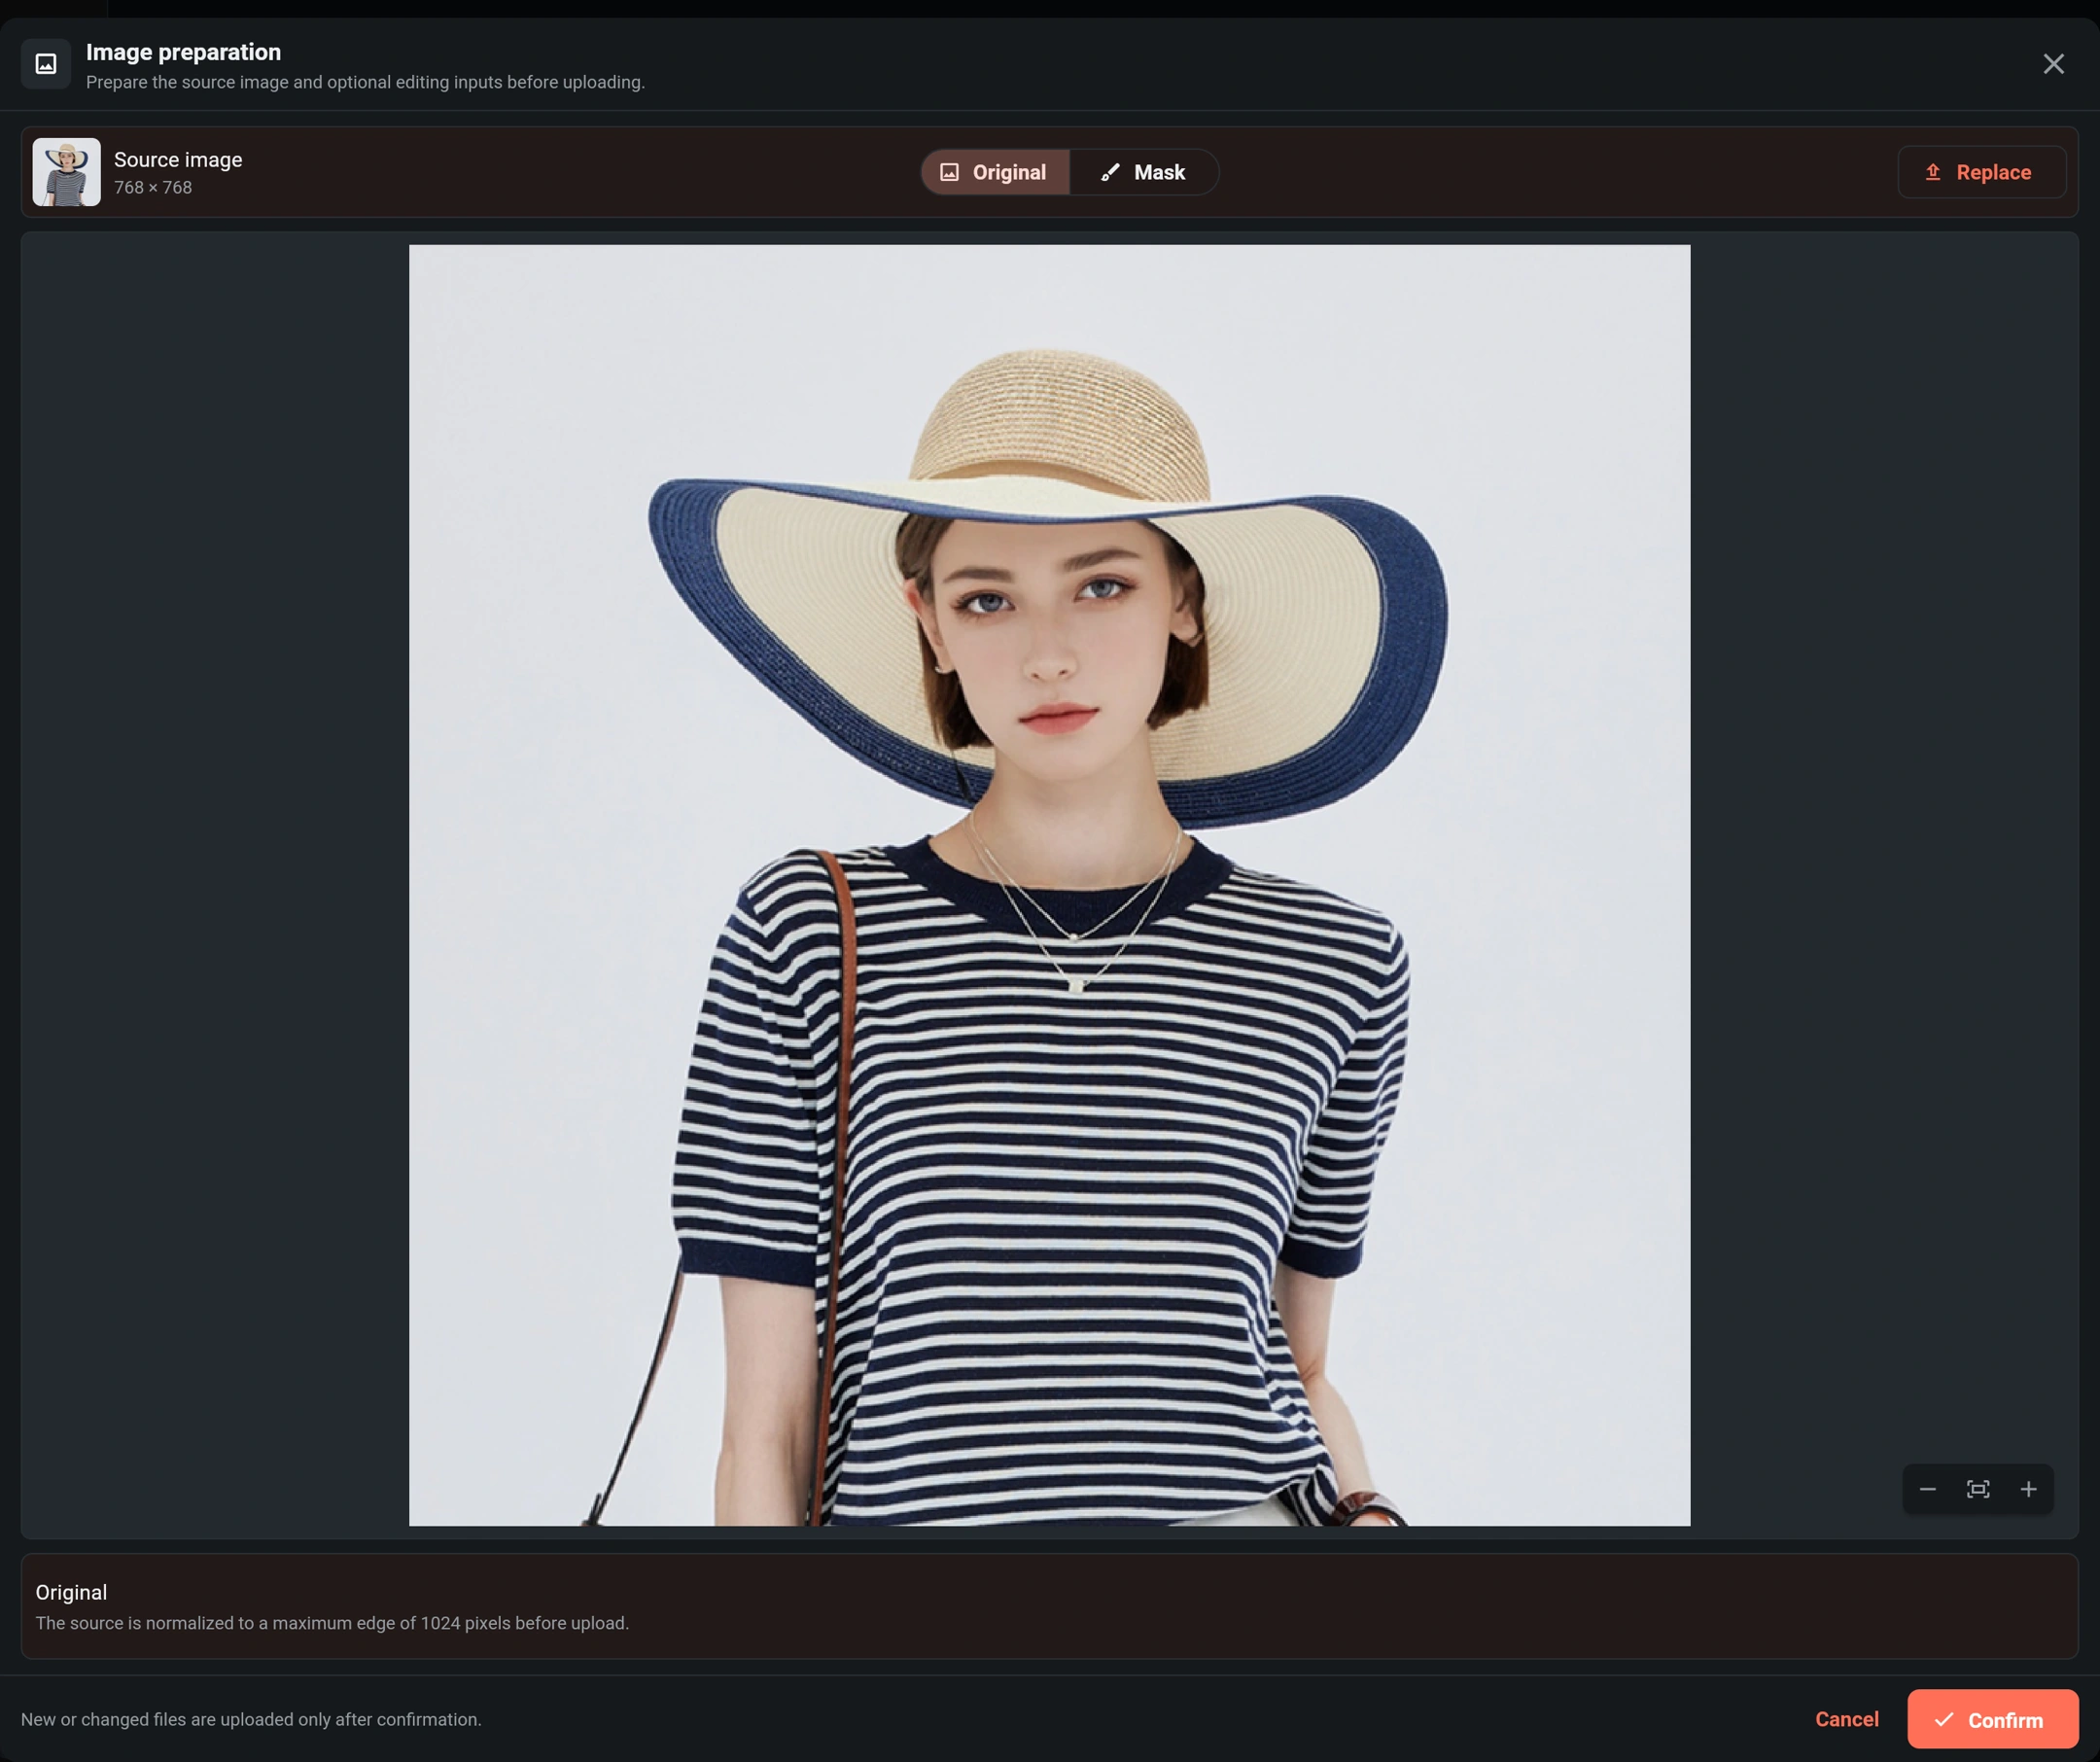
Start with clear edges around the hat, hair, straps and sleeves. Avoid cutting off a product label or an important garment detail. A mask is optional, not a prerequisite for changing the background. A custom mask constrains the editable region and locks subject layout; do not use one that protects the entire background you intend to replace.
Step 2: Choose the setting and describe its light
Follow the city example
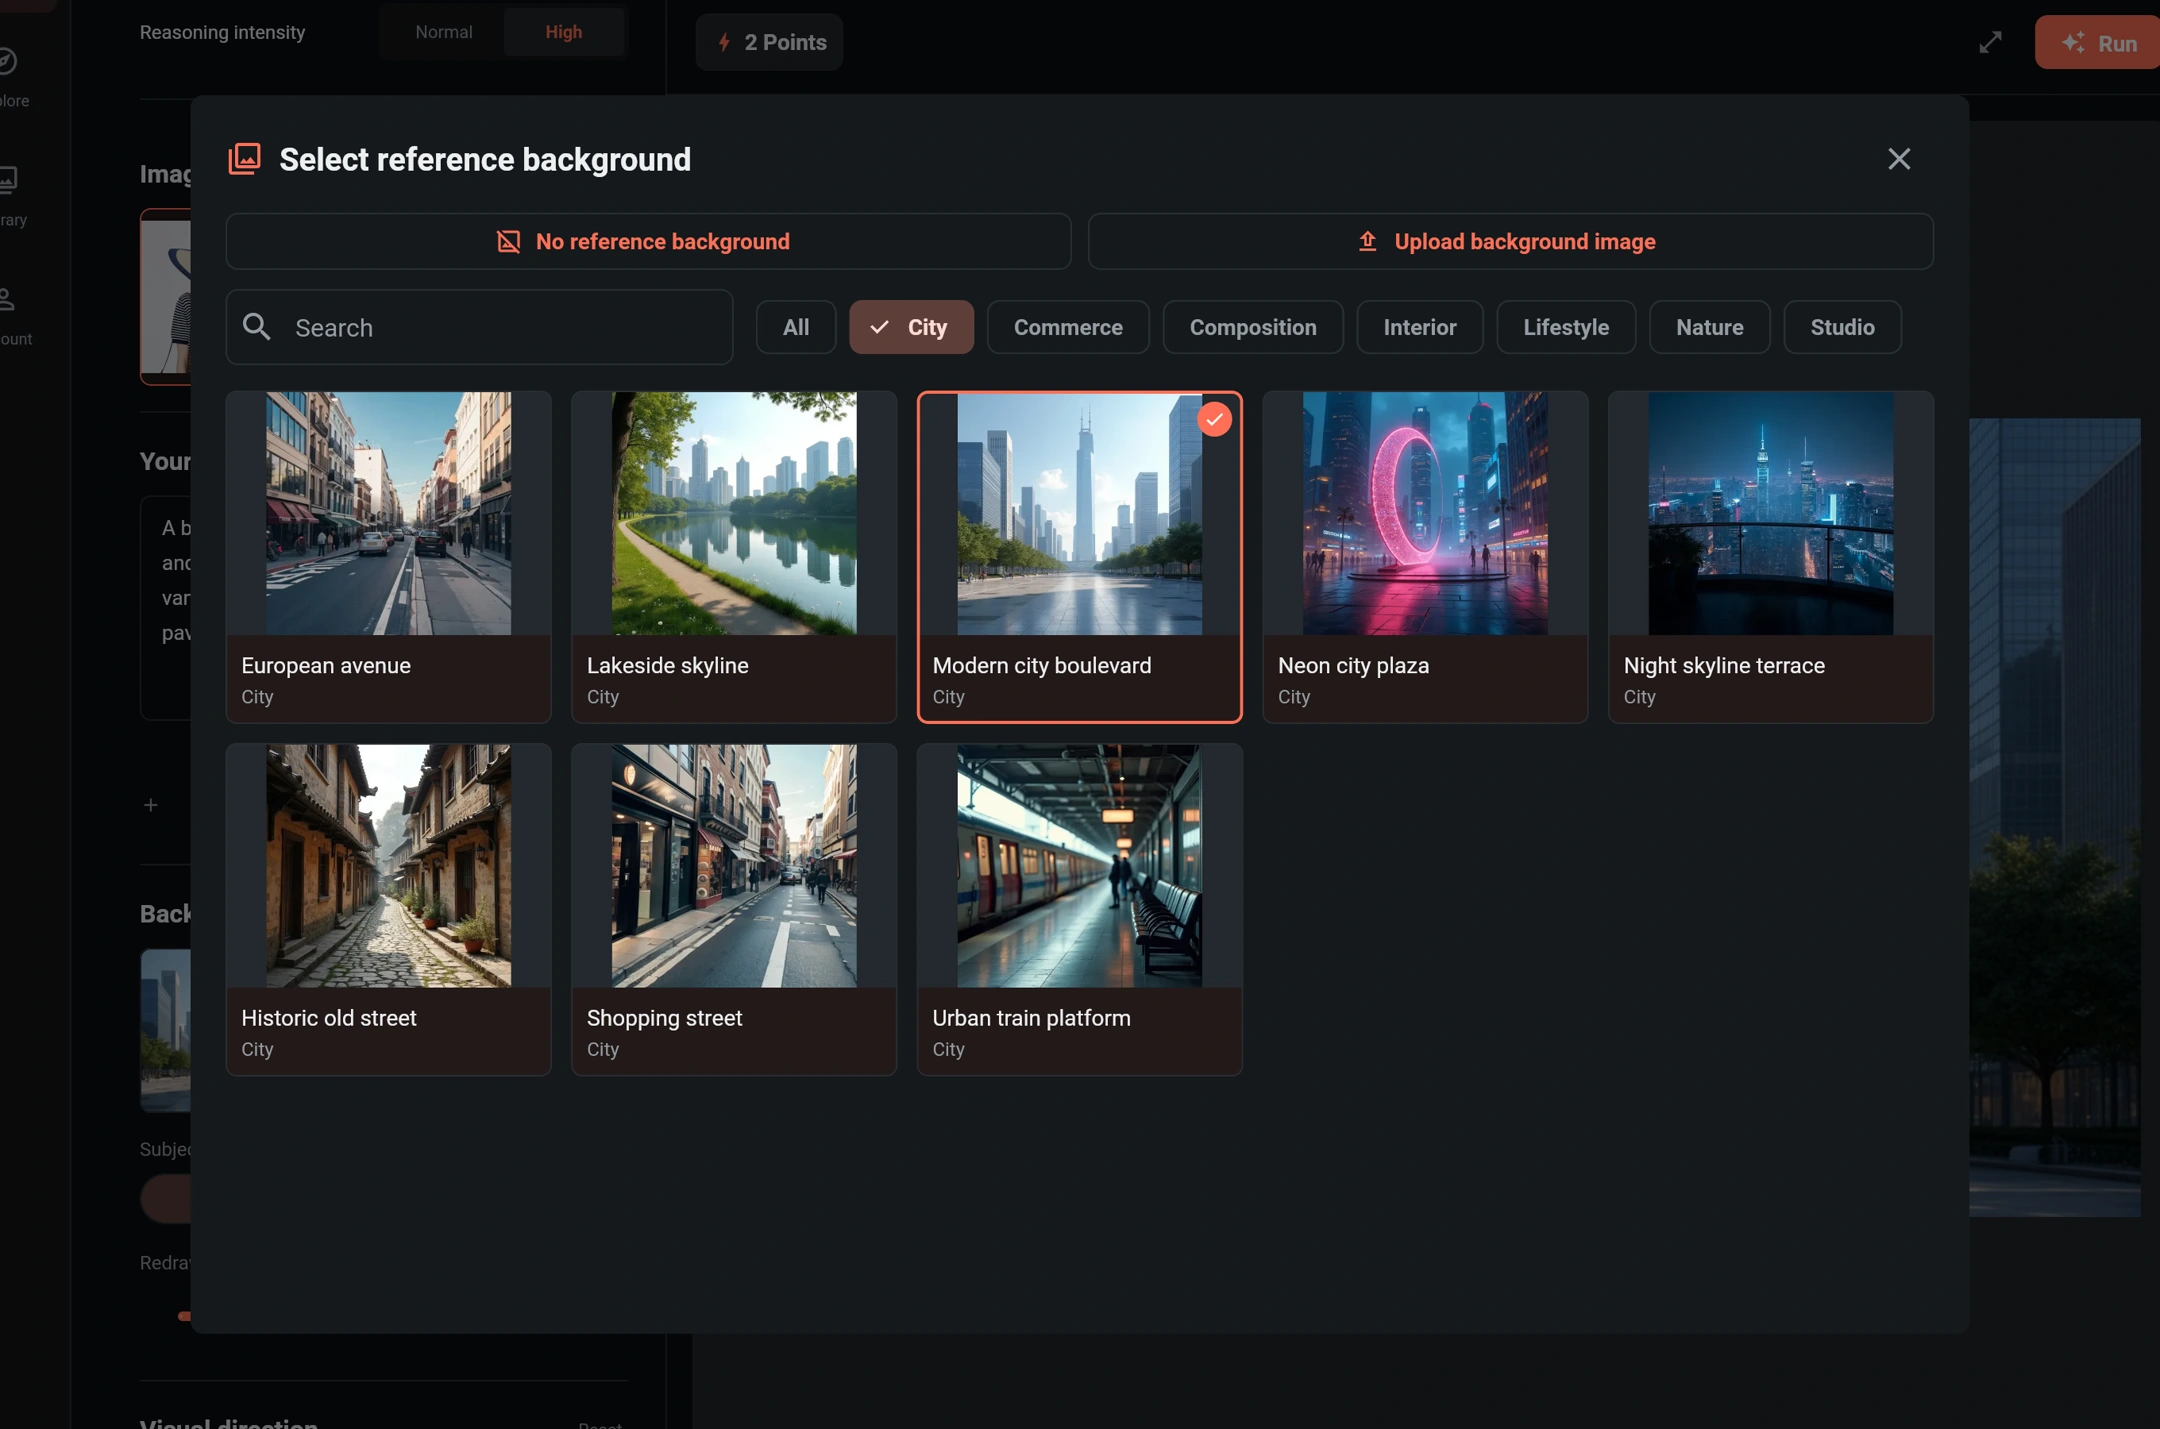
- Open Background and filter by City.
- Select Modern city boulevard to return it to the form.
- Check Your prompt. Selecting a template can append its scene description; remove leftover descriptions from previous settings if they conflict.
The example uses this English prompt:
A broad modern city boulevard framed by glass-and-steel skyscrapers, a central tower at the vanishing point, rows of trees, pale stone paving, and clear blue daylight.
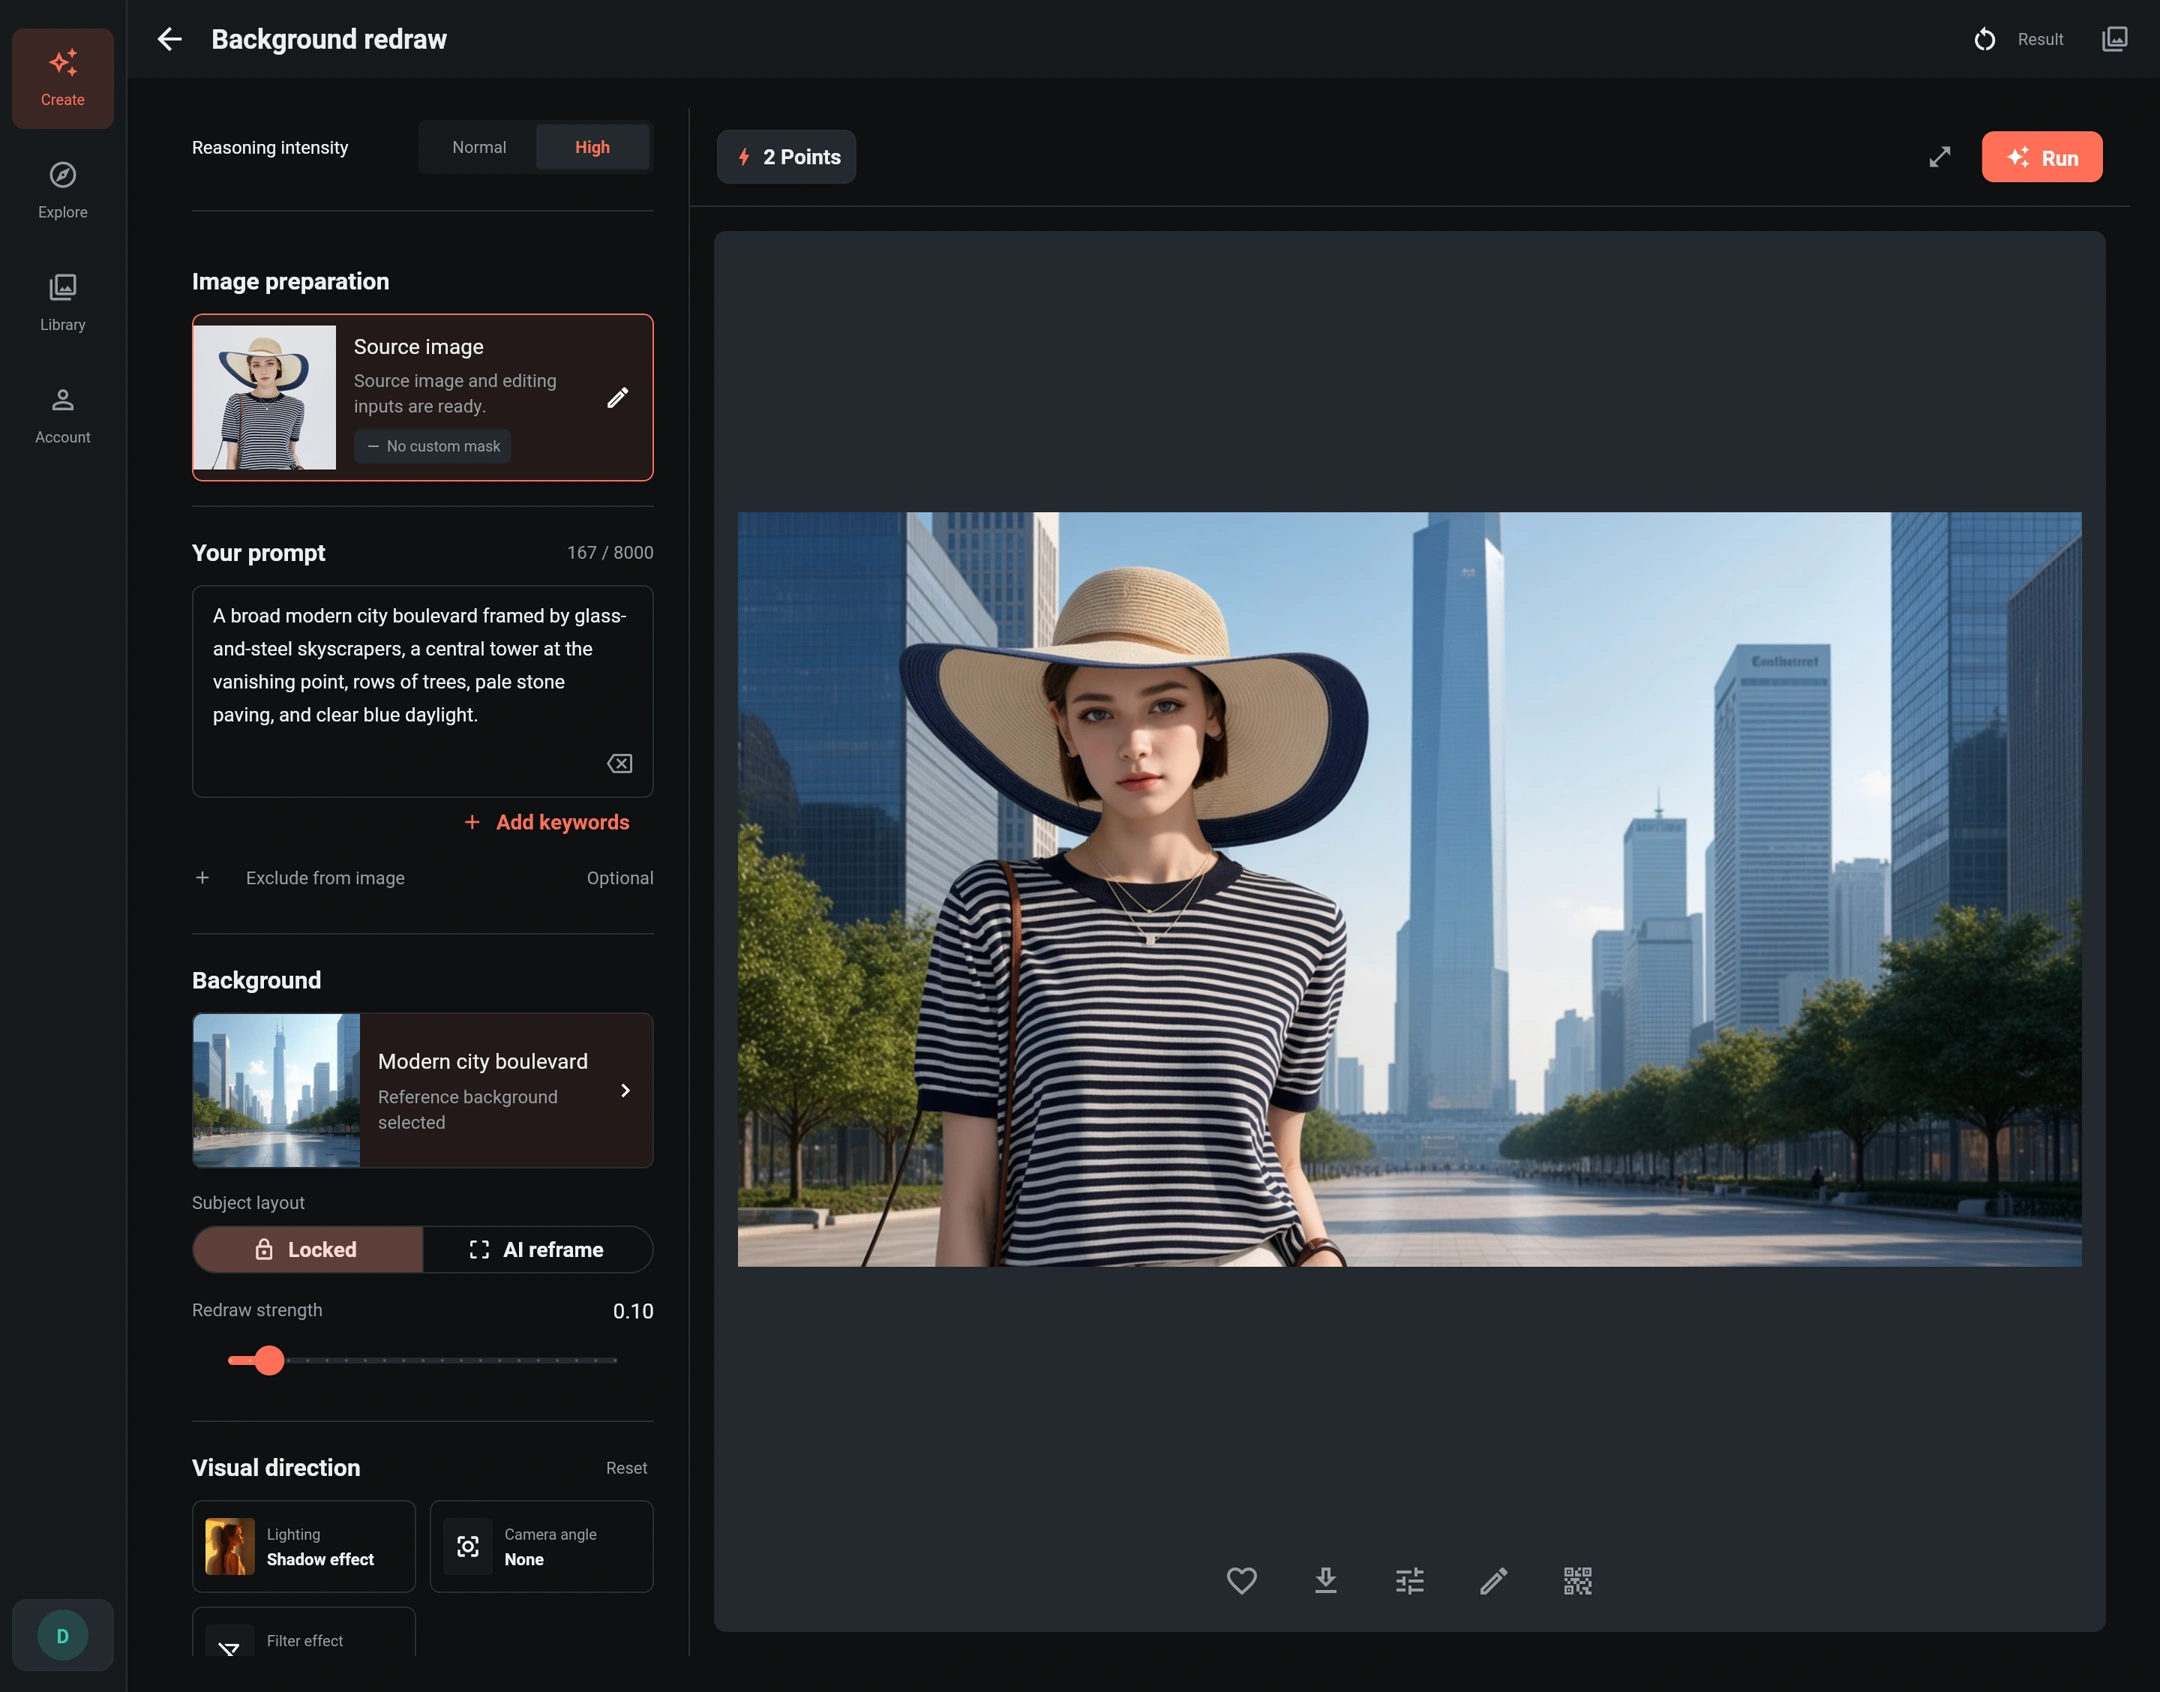
Select Shadow effect in the lighting options to follow the illustrated result. Keep lighting, weather and other visual styles consistent: a daylight reference and a request for a neon night scene pull in different directions.
Use your own setting
Select Upload background image when a particular environment matters. Or choose No reference background and describe the new setting in words. A reference helps guide scenery and perspective; it does not guarantee a pixel-for-pixel copy.
When writing your own prompt, describe the setting, the light and the details that must stay unchanged. For example:
Place the woman in the uploaded city boulevard under clear daylight. Match the light direction, hat-brim shadow and soft reflected light on her skin and shirt to the surroundings. Keep her identity, straw hat, navy-and-white stripes, neckline, sleeves, necklace and bag strap unchanged. Do not redesign the clothing.
This longer instruction is an optional variation, not the prompt used to produce the illustrated result. A concise, consistent request is more useful than repeating many competing styles.
Step 3: Set layout, strength and output
| Setting | Example choice | Purpose |
|---|---|---|
| Background reference | Modern city boulevard | Guide the city scenery and daylight |
| Reasoning intensity | High | Uses more AI resources to produce finer detail and better results; check the current points quote |
| Subject layout | Locked | Keep the subject's arrangement rather than invite AI reframing |
| Redraw strength | 0.1 | Favor the reference, with subtle environmental integration |
| Lighting | Shadow effect | Add deliberate light-and-shadow treatment |
| Output image size | 16:9 · 1368 × 768 | Leave room for the city around the portrait |
| Source position | Left-center | Place the square source toward the left of the wider canvas |
| Clarity | Standard | The example's output clarity |
| Custom mask | Empty | Use automatic subject/background handling |
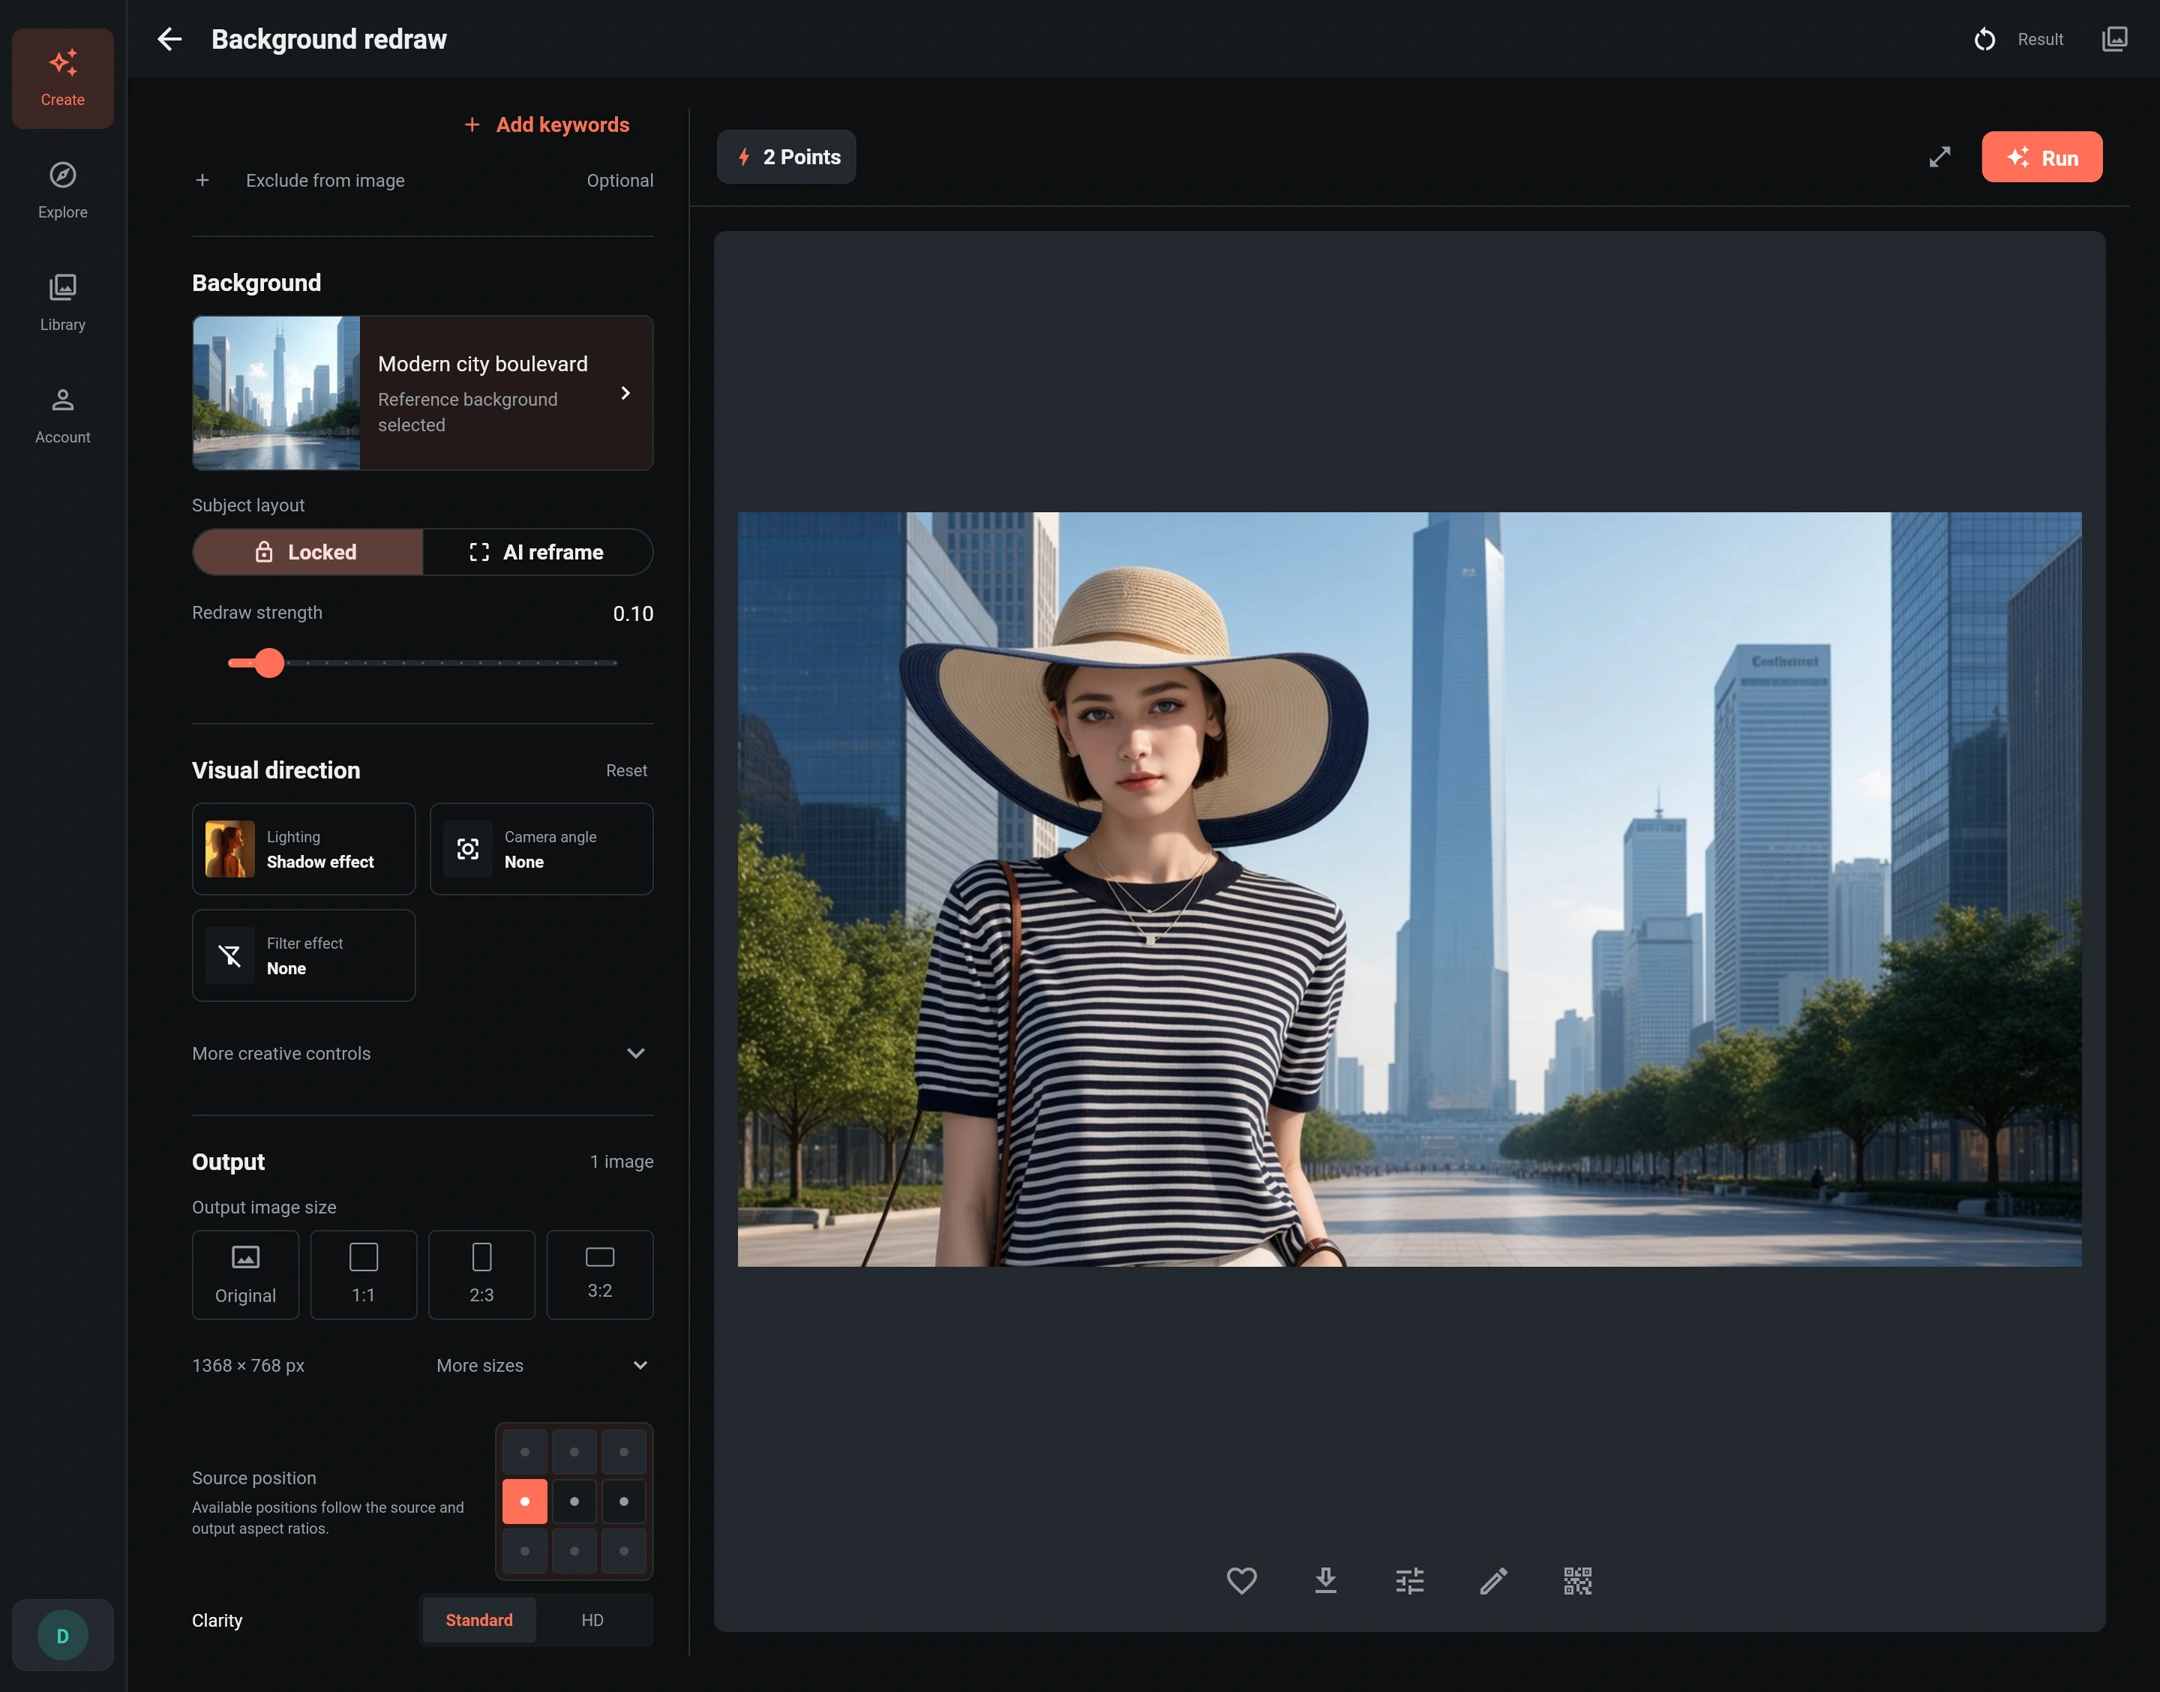
Three controls, three different jobs
- High / Normal select reasoning, not a numerical redraw-strength value. They do not replace your lighting choice.
- Redraw strength is available with a reference background. A low value favors that reference and subtle blending; raising it allows more background reinterpretation. It does not authorize changing the person or clothing design, and it is not a separate “lighting intensity” slider.
- Standard / HD control output clarity. HD does not guarantee more accurate clothing or a stronger lighting effect. Review the updated points quote when changing output options.
Use Subject layout → Locked when you want to keep the source arrangement. AI reframe, when available, allows limited scale and position adjustments for composition; it is not a model-change option. In the current form, layout choice requires High and no custom mask. A custom mask locks layout and may constrain output-size choices.
Source position offers only placements compatible with the source and output aspect ratios. With this square source and wide output, left, center and right are meaningful; vertical placement stays centered. This placement is separate from asking AI to reframe the subject.
Step 4: Generate and compare
Review the source, prompt, background, lighting and output options, then check the points quote beside Run. Select Run once. If submission is uncertain, check the existing task rather than submit again.
When the image is ready, compare it at a useful zoom level:
| Check | What to look for in this example |
|---|---|
| Light direction | Hat, face, arms and buildings should suggest a compatible light source |
| Shadows and reflections | A plausible hat-brim shadow, readable facial detail and natural light on fabric |
| Clothing fidelity | Navy-and-white stripe spacing, neckline, sleeve length, folds and material appearance |
| Accessories and identity | Hat shape and trim, necklace, bag strap and recognizable facial features |
| Edges | No bright halo or dark pasted-on outline around the hat, hair, sleeves or arms |
| Composition | One complete subject, sensible scale, perspective and space around the person |
The goal is a subject photographed in the new environment, not merely pasted over it. Check both realism and fidelity; attractive lighting does not excuse an altered logo, stripe pattern or garment shape.
Save a result you want to keep, or select Edit image to continue in AI Retouch. A follow-up AI task has its own points quote. The result's sharing action creates a QR code that restores the creation settings and source/reference images; see Sharing and importing. Check that you are comfortable sharing those inputs before publishing the QR code. Background-redraw recipes cannot be restored once the original task is older than 30 days.
Common questions
Why does the person still look pasted on?
Check for conflicting lighting or styles, an unsuitable source angle, poorly defined hair or clothing edges, or a mask that prevents the intended adjustment. Keep the reference and text consistent. Change one setting at a time and compare the same edges and shadows.
Is a lighting preset required?
No. The environment can guide natural light matching without an extra preset. This example deliberately uses Shadow effect; choose a lighting option only when you want that additional direction. Do not assume the same result from the background reference alone.
Why is the background different from the reference?
It is a generated scene, not an exact pasted copy. Check the redraw strength and prompt. Start with a low strength when the reference matters, and avoid requesting a different location, time of day or style.
Why do the clothes look lighter or darker?
New light can change apparent brightness, shadows and color cast. The underlying design should still match the source. If stripes, text, intrinsic color, shape or construction have changed, improve the source and simplify conflicting instructions before regenerating. Higher clarity alone does not correct design drift.