Find your way around
PixelForce keeps the same four destinations across Android, iOS, Web and macOS. Once you know where to start, where results appear and how to return to an earlier work, you can move between devices without learning a different workflow.
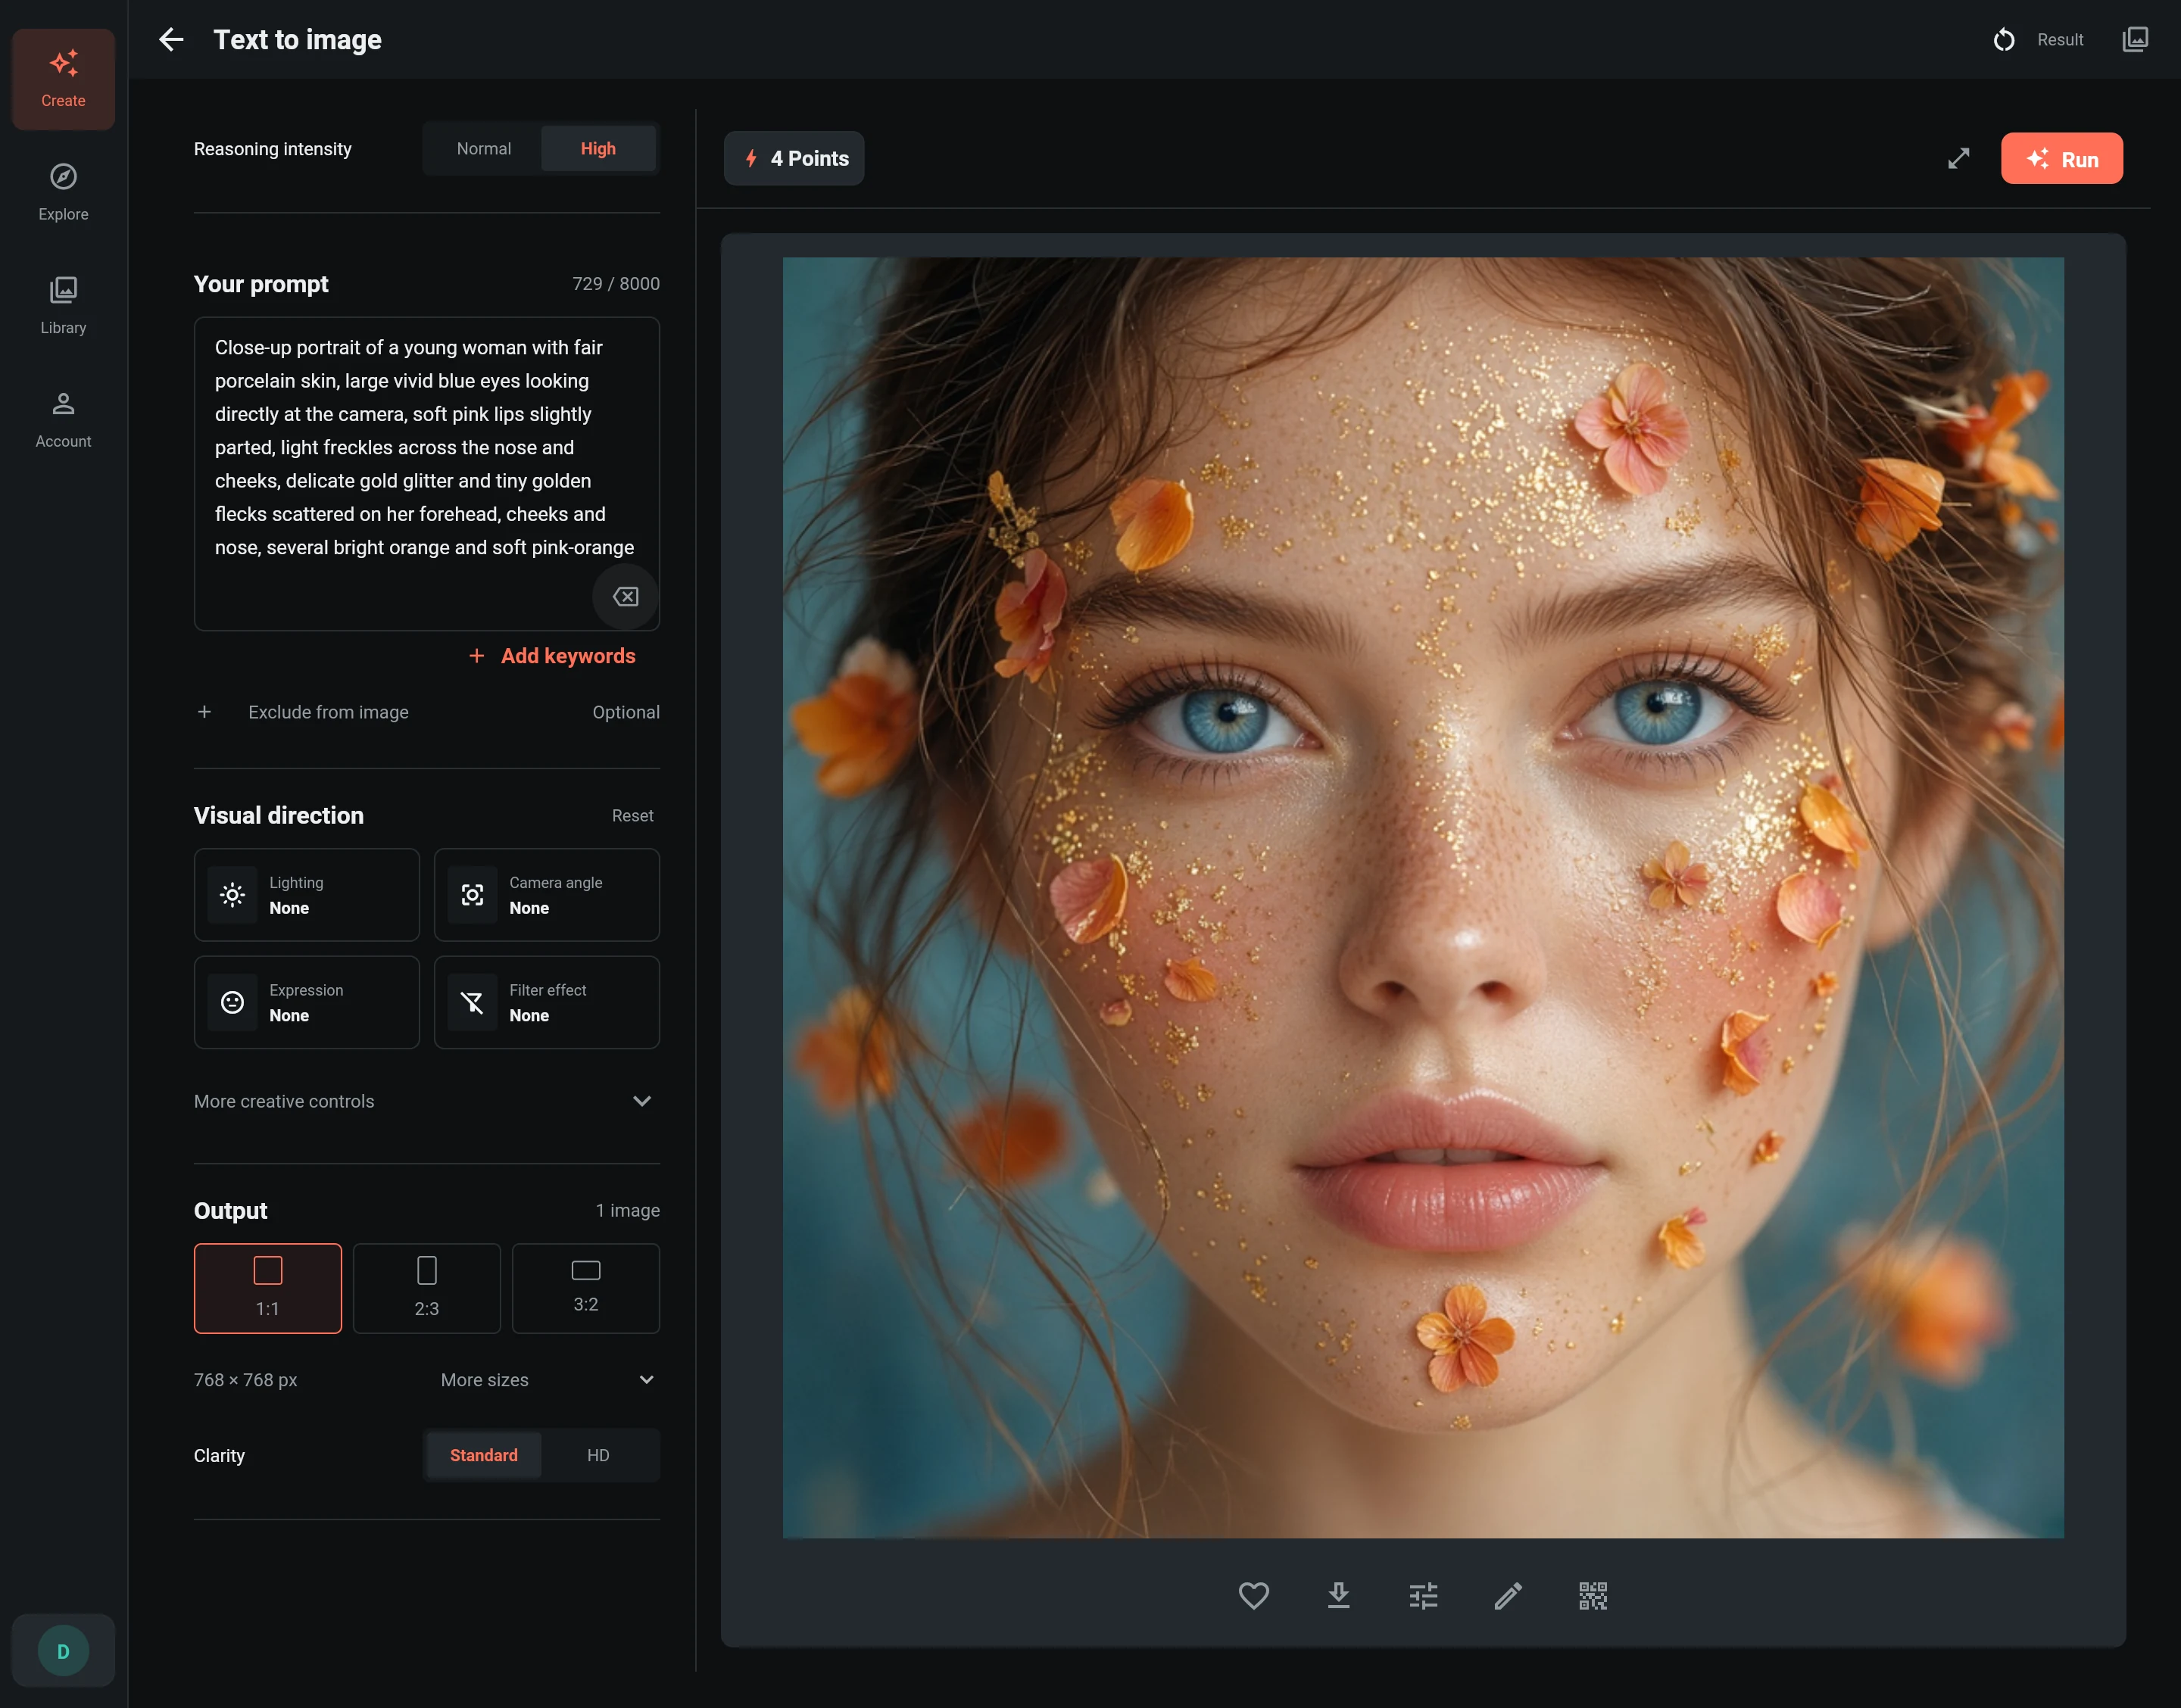
For a first complete creation, follow Make your first image. This chapter explains how the workspace fits together. The desktop example below uses Text to image; other tools show their own inputs and controls.
Choose the right destination
| Destination | What you do here |
|---|---|
| Create | Start with a tool for portraits, product images or everyday edits. Available examples can help you get started. |
| Explore | Browse the tool catalog, use categories or search, then open the tool you need. |
| Library | Return to recent creations, favorites and task activity; open a result or reuse an earlier work. |
| Account | Check your identity and points, open recharge records, and change language or appearance. |
Opening a tool or loading an example does not start an AI generation. You first review its creation form, then choose Run when you are ready. If a tool is temporarily unavailable, it cannot accept a new generation.
Work with settings and results
Each tool has two parts: a creation form for inputs and settings, and a result area for progress, finished images and image actions.
- On a wide screen, the settings usually sit beside the result. You can inspect the image while keeping the form in view.
- On a phone or narrow window, switch between Create and Result. These are tabs within the tool, separate from the four main navigation destinations.
- A tablet or resized desktop window can change layout to suit the available space. The tool and your choices are the same; only their arrangement changes.
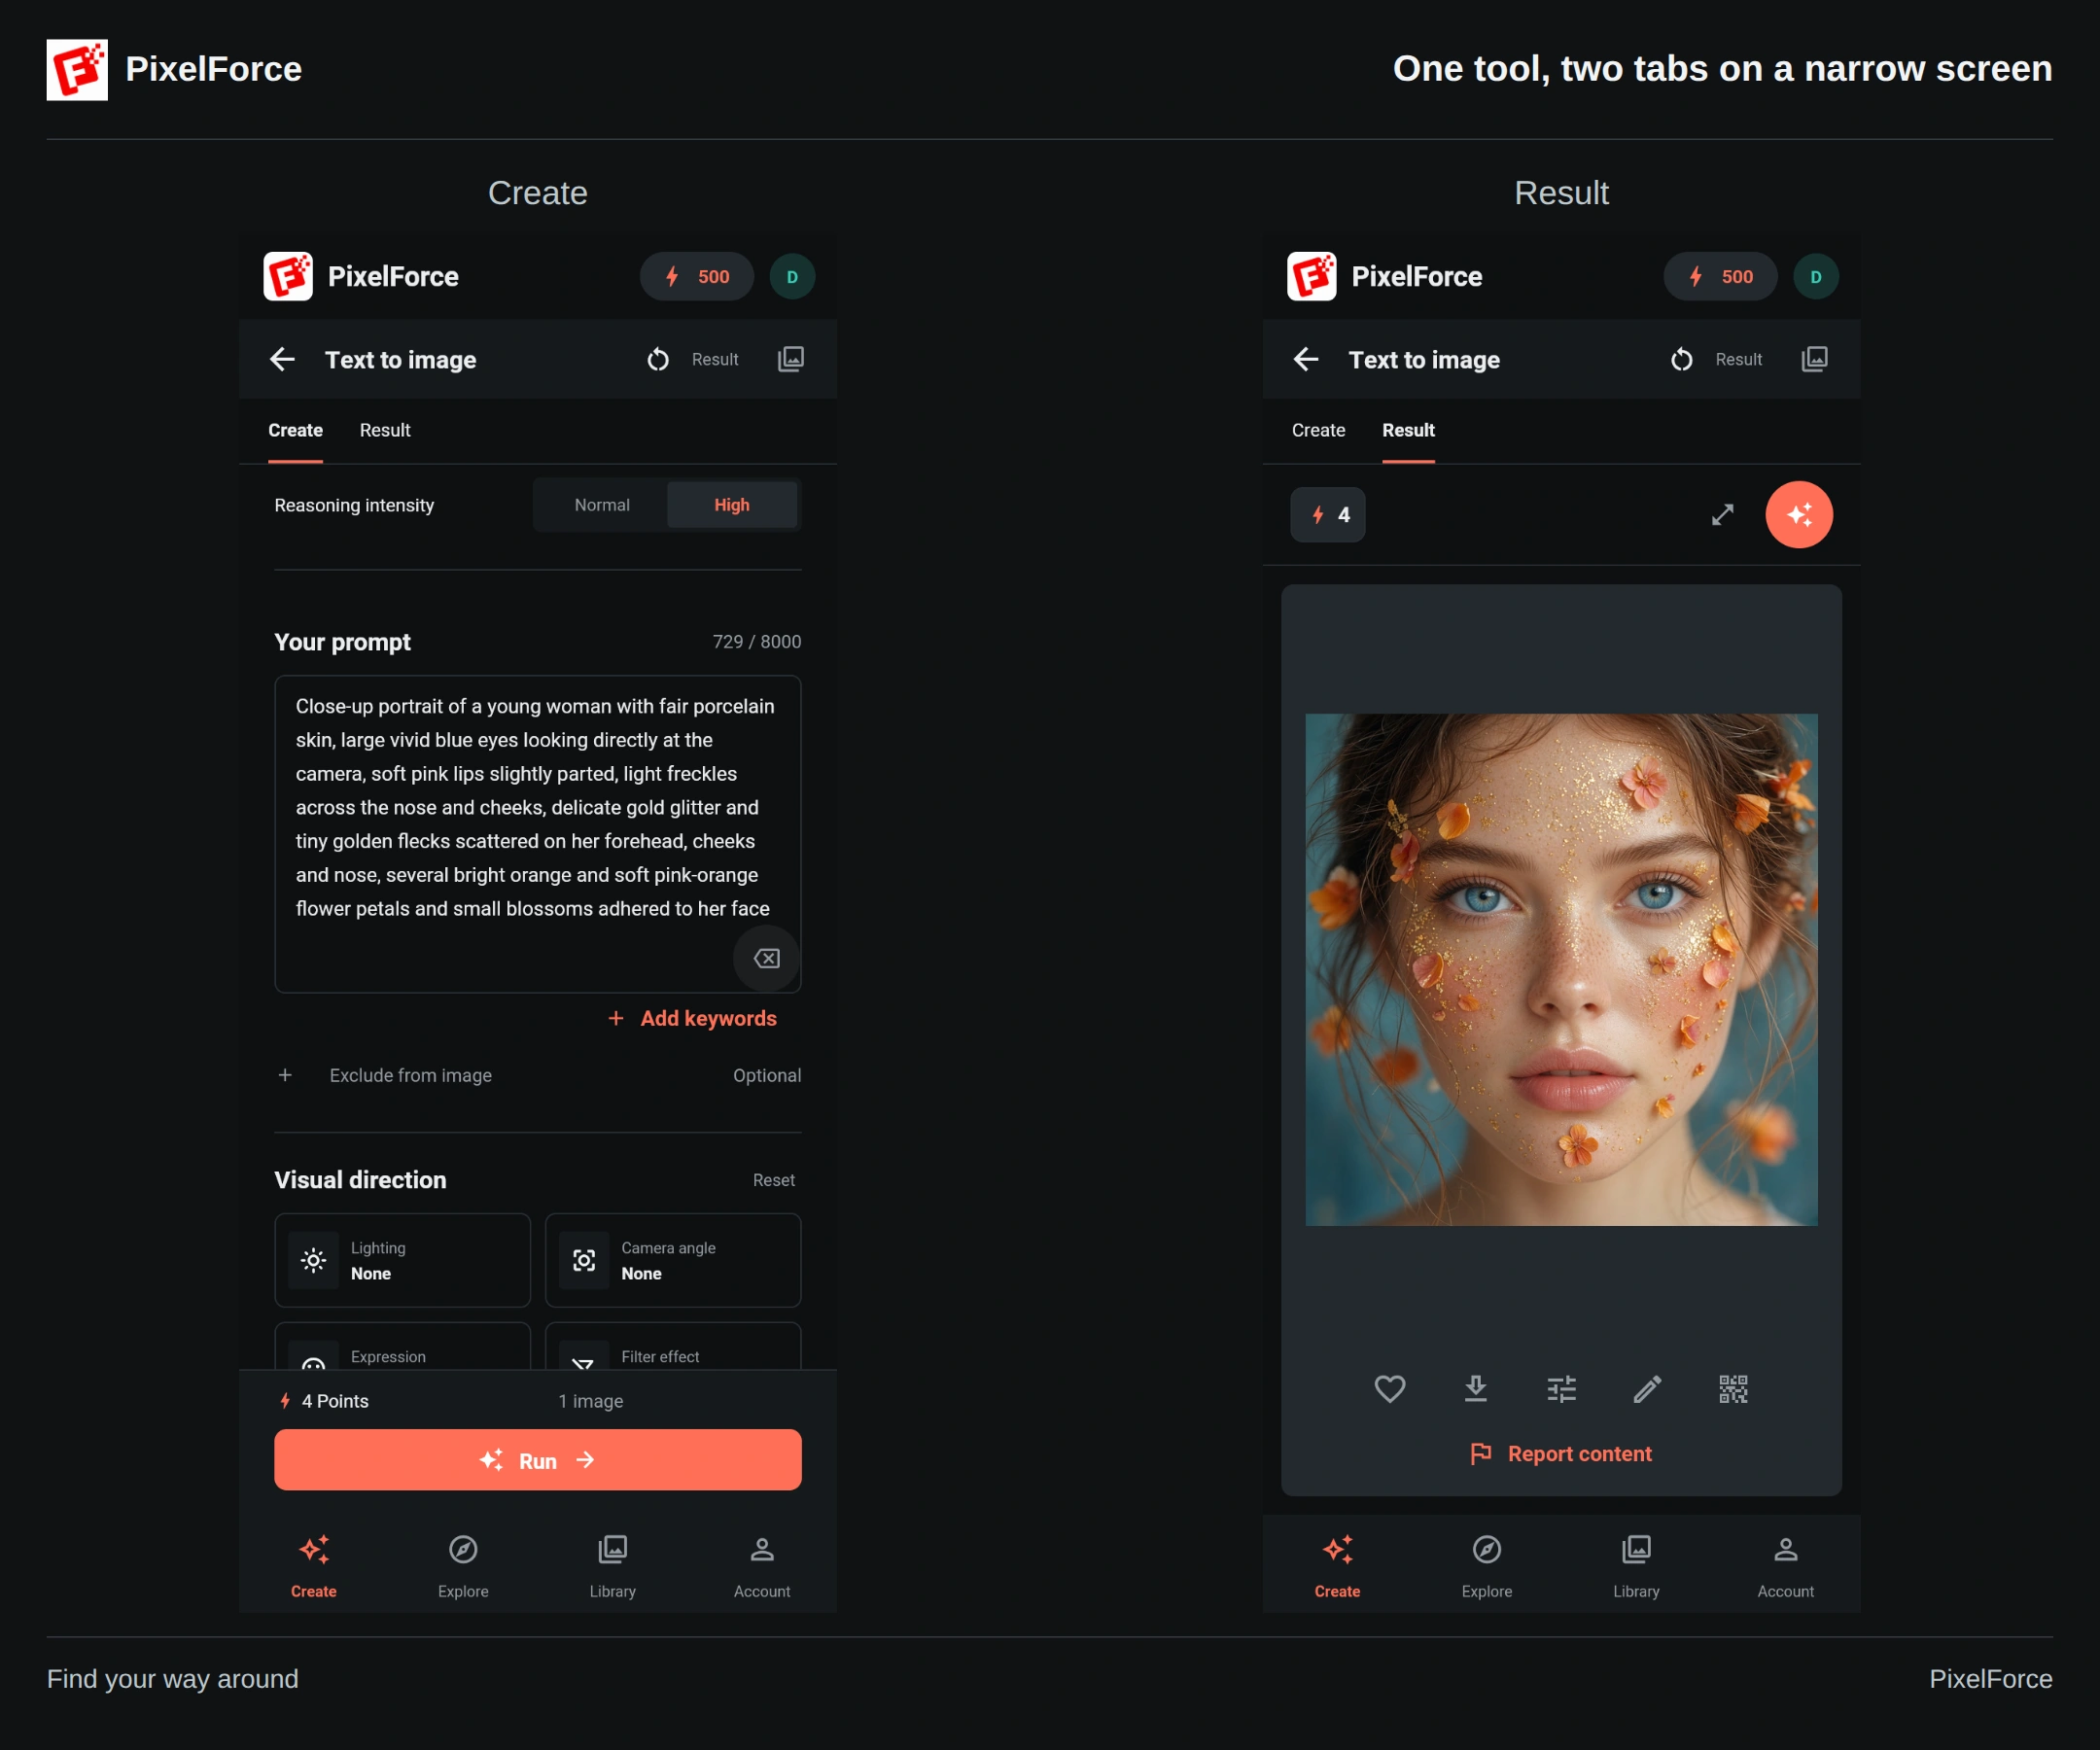
In the form, start with the required inputs. Text to image needs a prompt; a photo-editing tool needs its source photo, and some tools also offer a reference image, a mask or specific controls. Follow the labels in the tool you have opened, rather than looking for every setting from another tool. See choosing images and shared controls.
Where reasoning intensity is available, High uses more AI resources for finer detail and better results. Clarity, image size and output count are separate settings and are not offered in every tool. Check the current points quote after changing settings; a number in a screenshot is not a fixed price.
Select Run once, then follow that task. If progress stops updating, use Check task instead of submitting the same request again. The task guide explains recovery.
Return to a work in Library
Open Library to find recent cloud works for the account you are signed in to. Choose All for your images, Favorites for works you have marked, or Activity to inspect tasks and their status. Tap or click an image to open its preview.
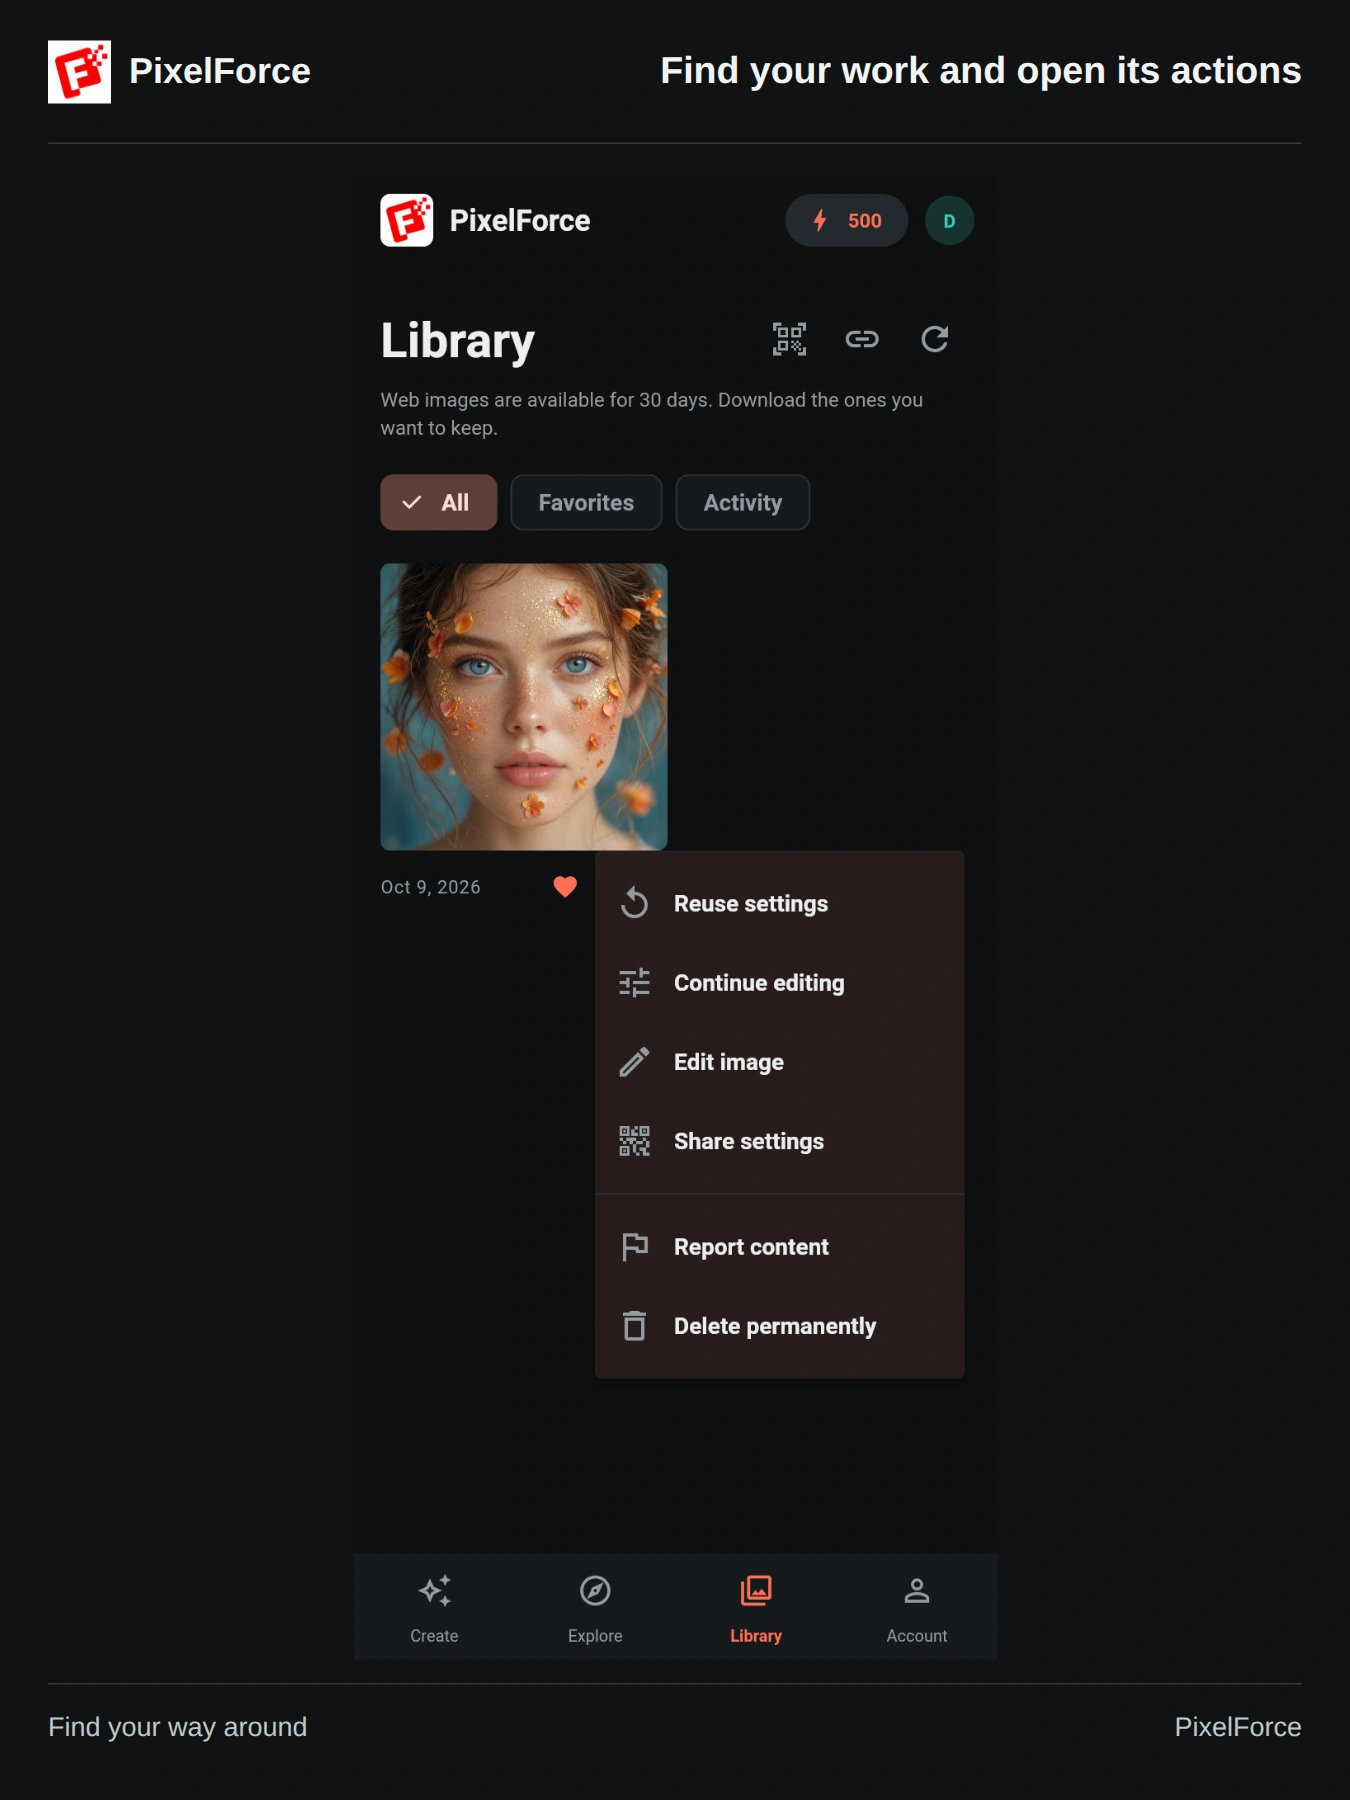
The heart marks a favorite. The three-dot menu beside a work opens actions such as Reuse settings, Continue editing, Edit image, Share settings, Report content and Delete permanently. The preview also offers Save image and the image actions.
| You want to... | Choose this |
|---|---|
| Try the same idea with different settings | Reuse settings restores the saved inputs to the creation form. Review them before running again. |
| Ask AI to change the finished picture | Continue editing opens AI Retouch with that result as its source. A new generation has its own points quote. |
| Crop, add a filter, adjust colors or add text | Edit image opens the local Image Editor without starting an AI generation. |
| Let someone inspect and reuse the setup | Share settings creates a share link and QR code. See sharing. |
| Remove the work from your account | Delete permanently removes it across devices after confirmation; previously exported copies remain. |
At the top of Library, the scanner icon opens Import settings and the link icon opens Shared settings. Importing fills a reviewed form; it does not automatically run a task or spend points.
Cloud history covers the past 30 days. Favorites are not a permanent backup, so use Save image for anything you want to keep. Web exports the original through the browser; Android and iOS open the system share sheet; macOS asks for a file location. More details are in Library and retention.
Start a new idea or continue an old one
Open another tool from Create or Explore to start with its creation form. To bring earlier inputs back intentionally, use Reuse settings or import shared settings. To make the finished image itself your new source, use Continue editing.
If a generation is still active, PixelForce may return you to that task rather than replace its inputs. Check or wait for that task before moving on to a different tool.
Do not confuse these actions with Run: loading inputs, opening a preview and switching tabs do not create another AI image. Before a new run, check the source, prompt, output choices and current points requirement. Keep a separate copy of important unsent text rather than treating an unfinished form as a permanently saved project.
Set up your account and workspace
In Account, check your display name and tenant identifier, your points balance, top-up options and recharge history. This is also where you change Language and Appearance.
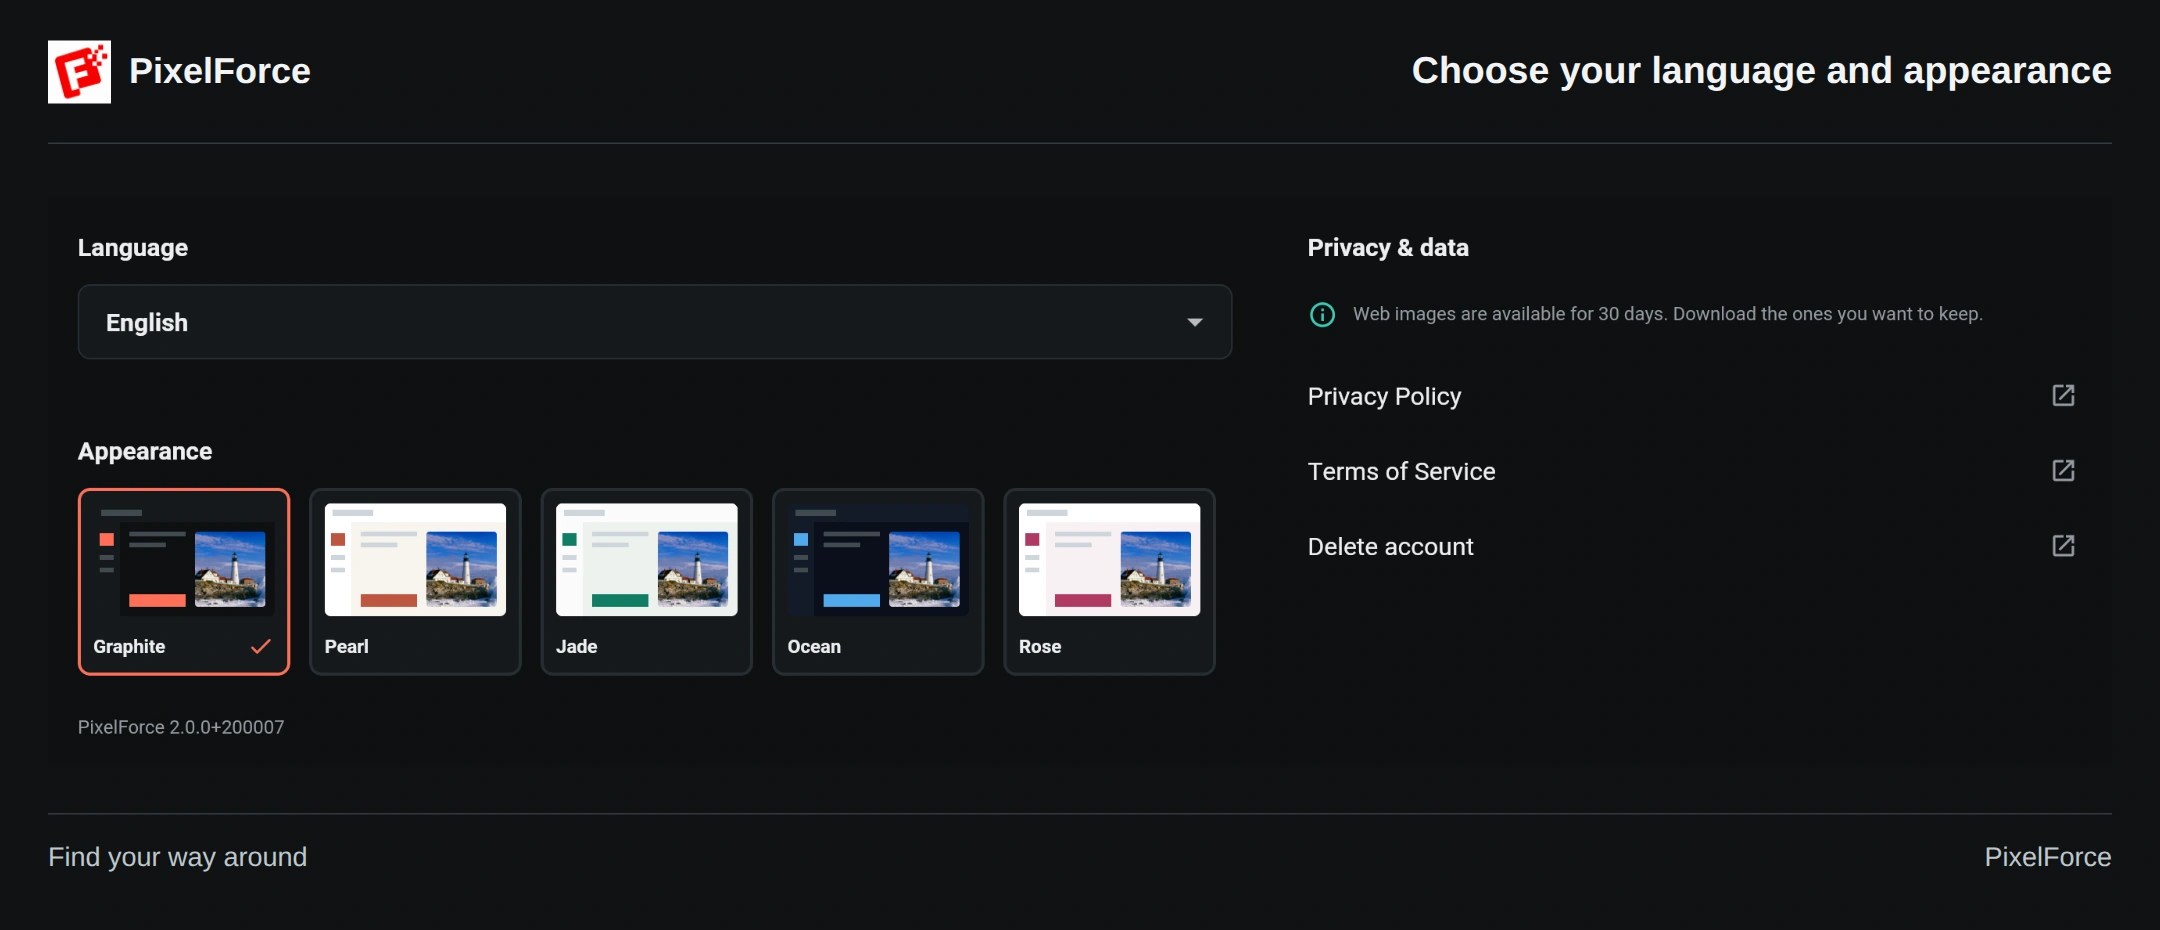
On a phone, Appearance first shows the current theme; tap it to open the theme chooser. On a larger screen, the theme choices are shown together. Appearance changes the workspace, not the generated image. Language changes interface labels; it does not translate the prompt you have already entered.
The account page also links to privacy information and account deletion, and displays the application version including the build number. Include that version when asking for help. Use the same account and sign-in method on your other devices to access the same cloud works and points; see sign-in methods.