AI Relight
Give an existing photo a new lighting direction, without setting up another shoot. AI Relight lets you place light sources on the image and adjust each one, then add a short description of the look you want. Use it to shape a portrait, bring out texture or explore a different lighting mood.
From flat light to a soft window-light look
The source in this example has fairly even light, a gray sweater and a neutral background. One soft, near-neutral light is placed toward the upper-left of the image. In the result, the hair and left shoulder catch more light, while the face has a more defined light-and-shadow balance. The background also picks up a brighter, warmer area on the left.
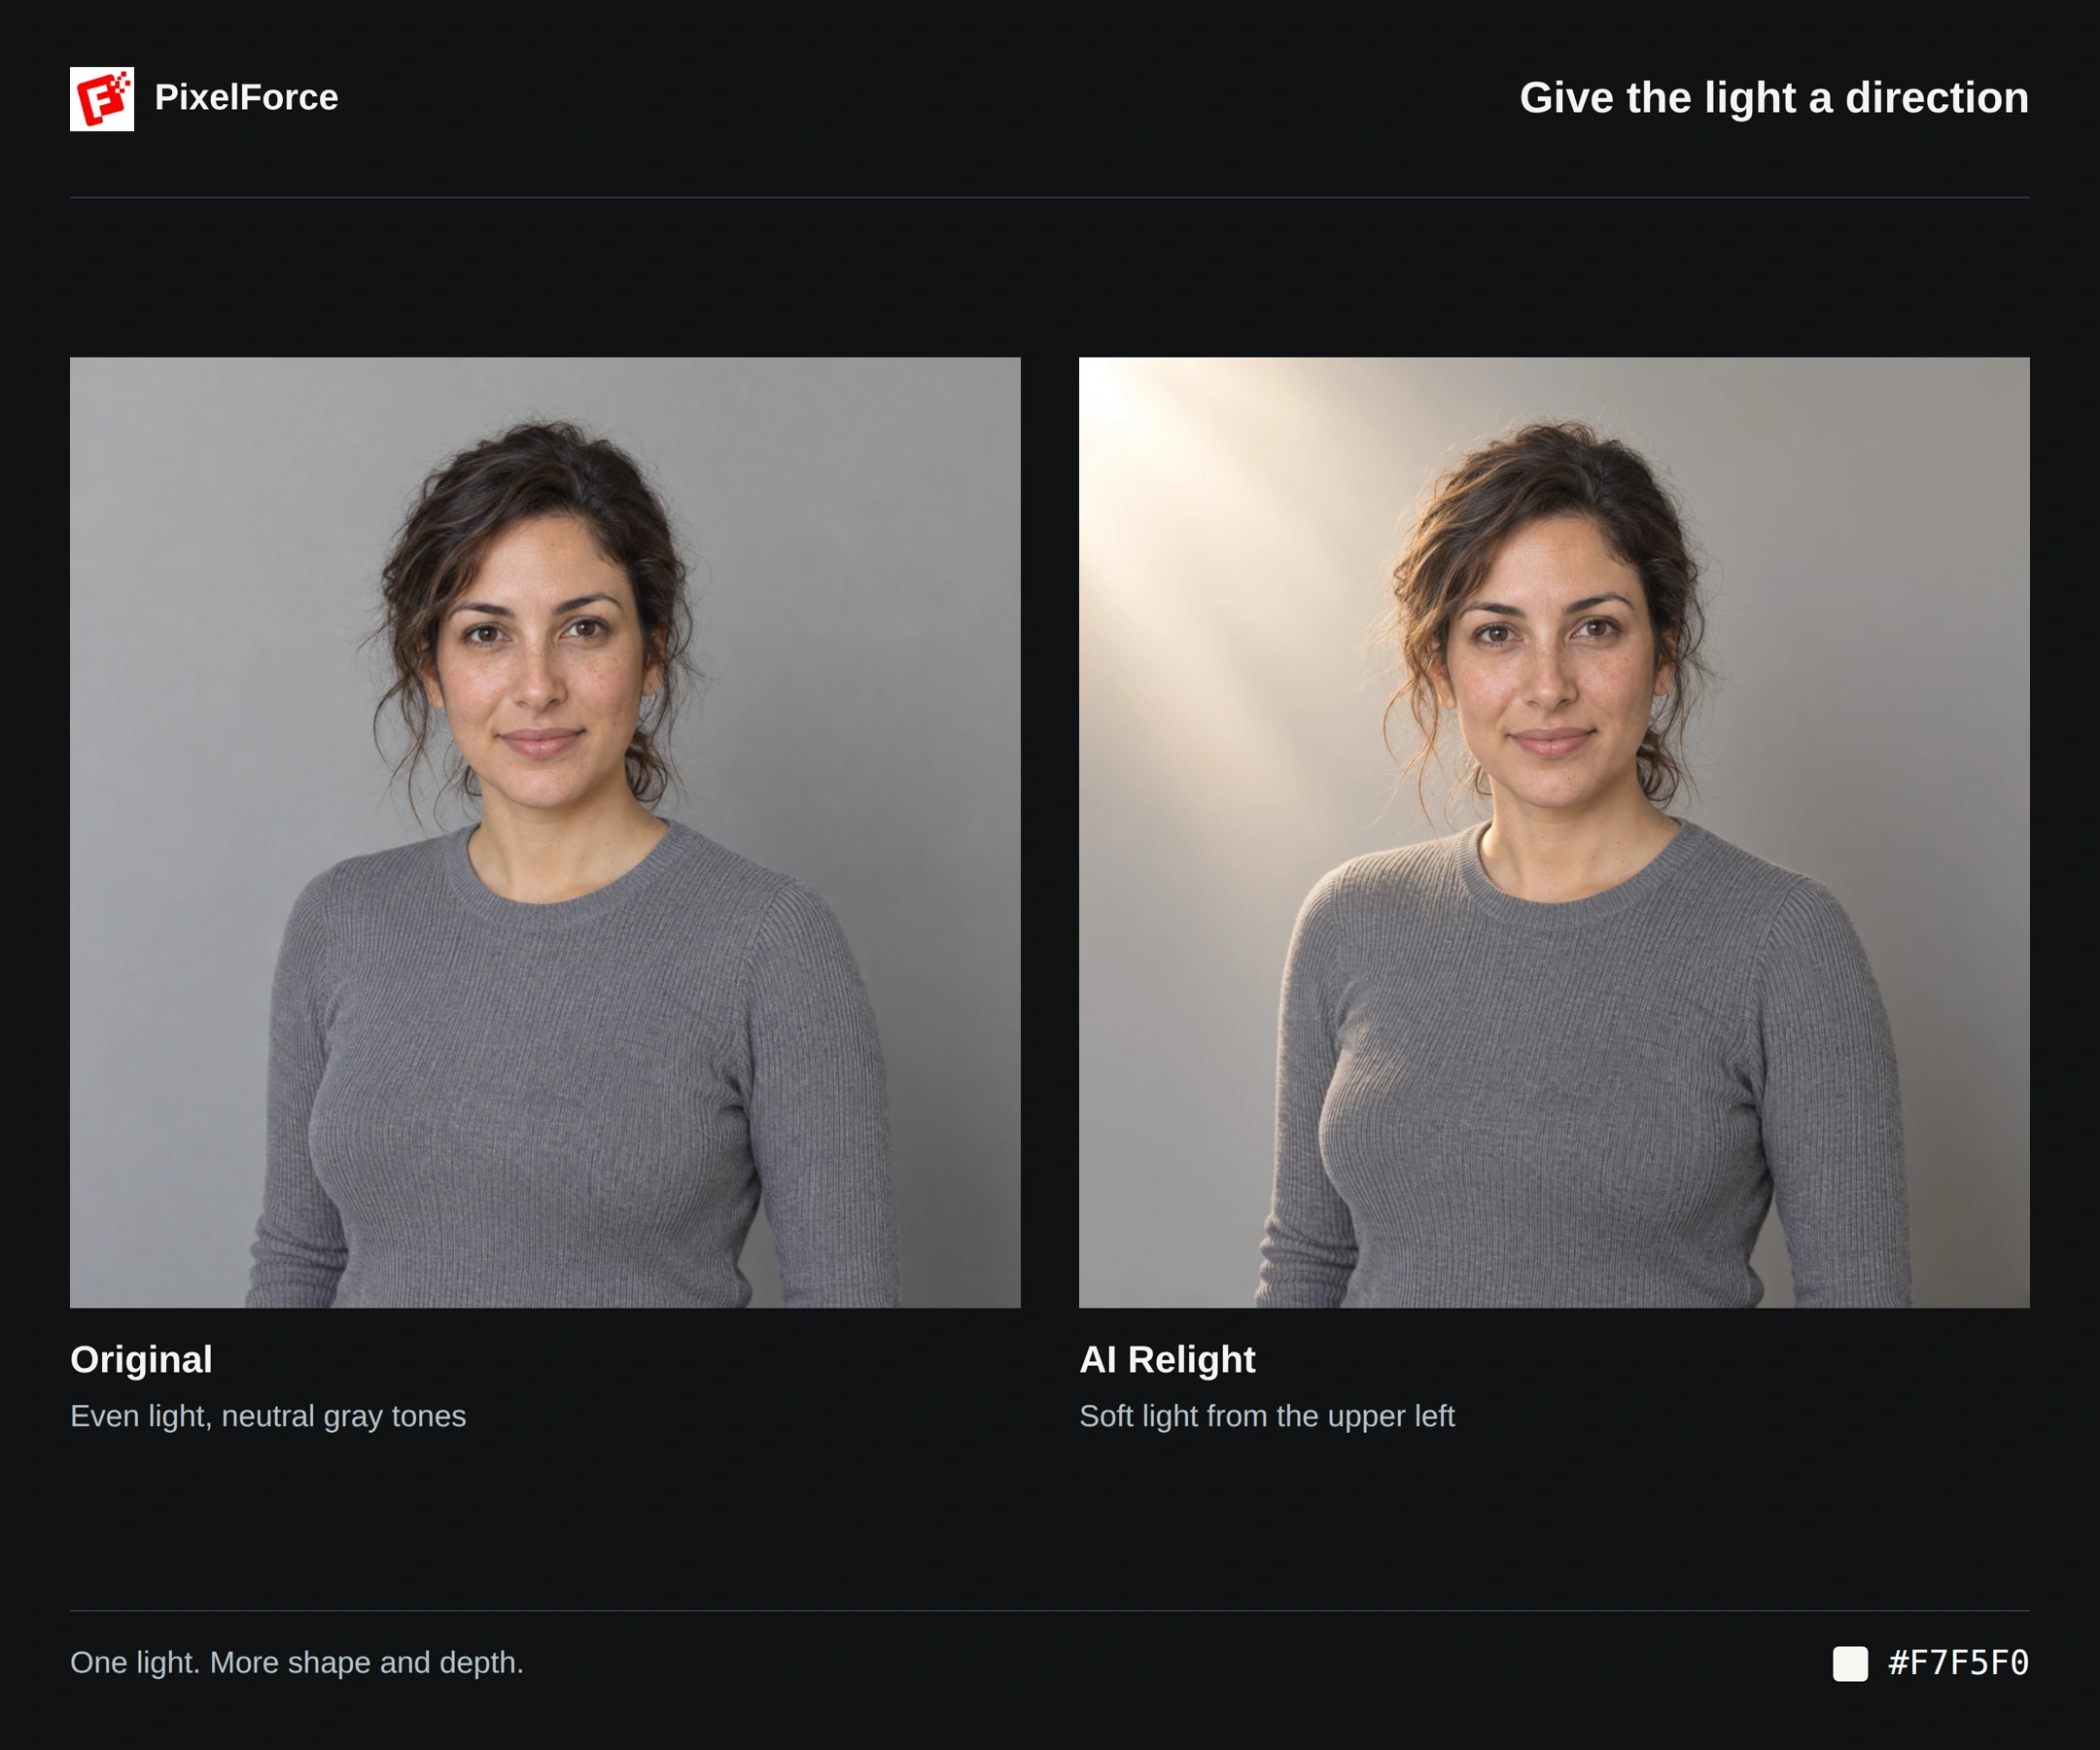
Notice how the lighting changes the relationship between the person and the background. It is not just a brightness increase across the whole image. The example also shows why you should inspect the result: a near-white light can still produce a warm-looking highlight, and the background may change in brightness even when its layout stays similar.
Place the light, not just the words
“Make the lighting softer” leaves a lot open to interpretation. Where should the light fall? How wide should it be? Should it be neutral or colored? AI Relight gives those choices their own controls.
| What you want to decide | How AI Relight helps |
|---|---|
| Where the light belongs | Place it directly on the source image instead of describing the position only in words. |
| How much of the subject it should cover | Adjust the shape, width and height of each light guide. |
| How it should feel | Set color, softness and an exposure range separately. |
| How several lights should work together | Configure up to four lights individually, for example a main light and a subtler fill or rim light. |
| What to change on the next attempt | Reuse the saved settings and adjust one property without rewriting the entire description. |
This makes your lighting request more explicit and easier to refine than text alone. The on-image overlay is a placement guide, not a live preview of the final illumination. These controls guide an AI-generated edit; they do not specify a physical lamp, calibrated exposure values or an exact lighting simulation.
Relight your photo
1. Prepare the original
Open AI Relight from Create or Explore and add a photo. Use a clear image with visible detail in both highlights and shadows. Extremely dark or blown-out areas leave less useful detail to work with.
Open Edit inputs to check the framing. Keep the features you want to preserve visible, such as the face, hairline, clothing edges or a product label. On Android and iOS, you can choose from your photo library, take a photo or browse files.
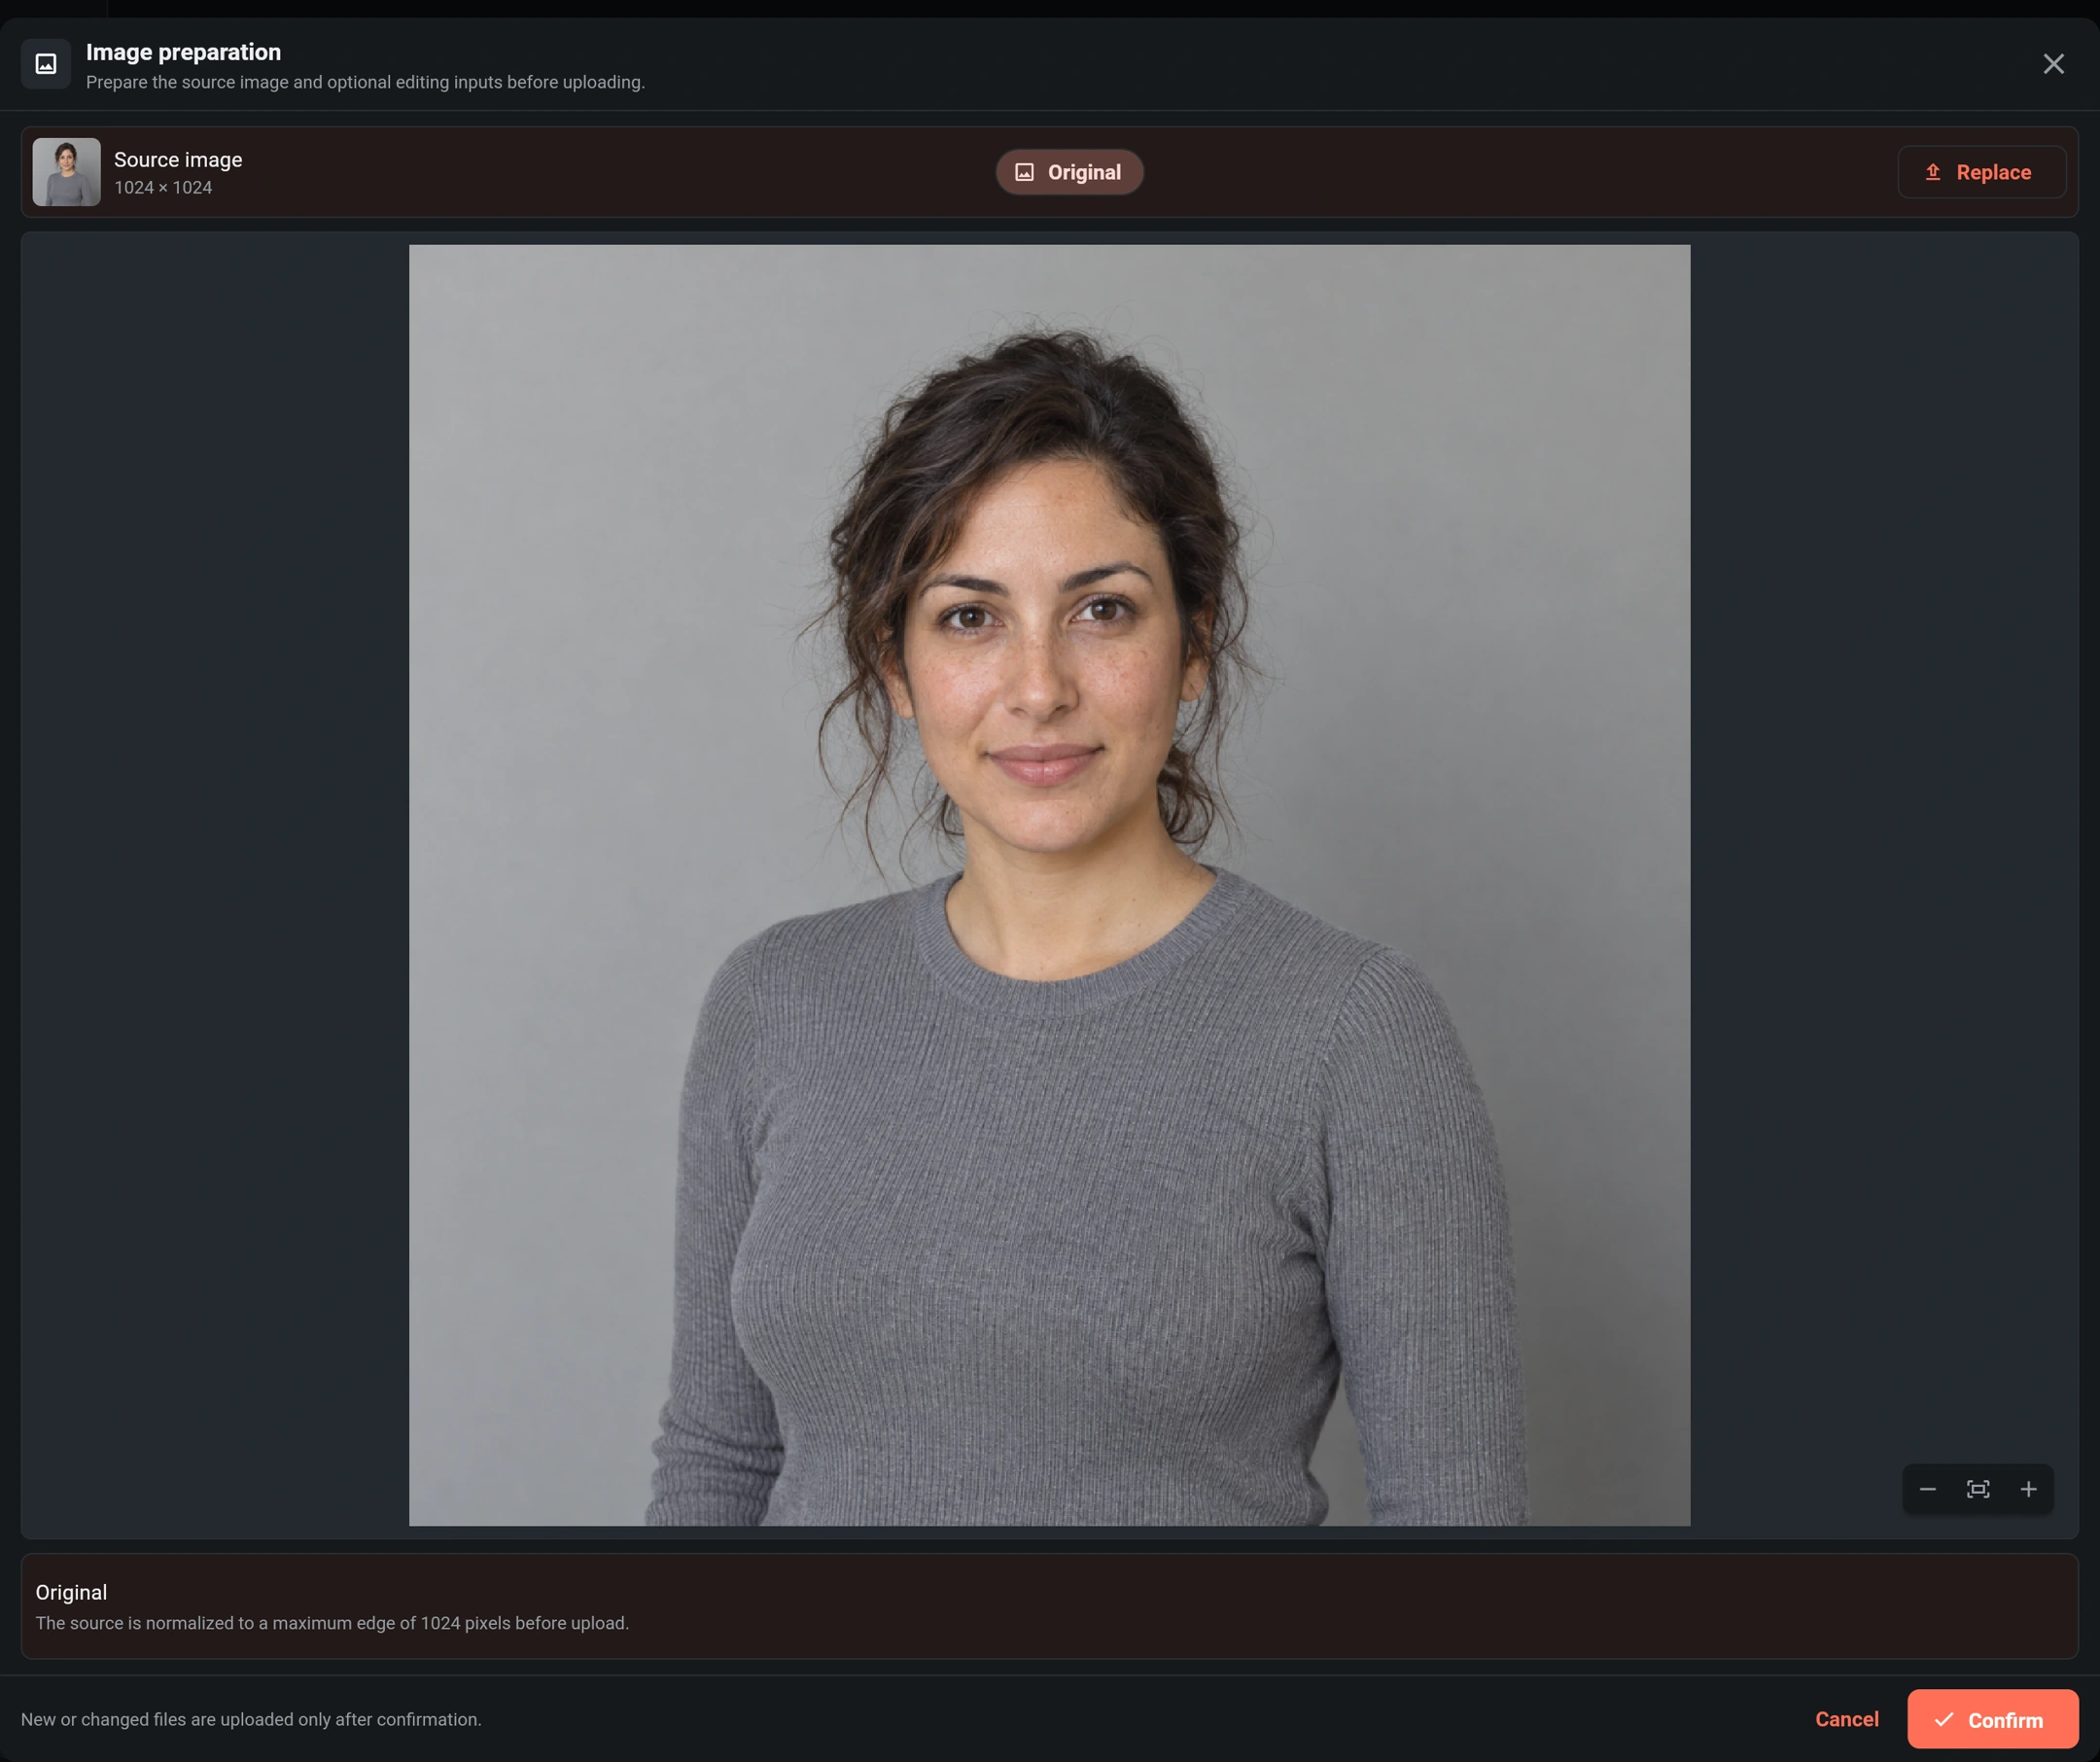
2. Add and position a light
After the source image loads, use the plus icon in Light sources, labeled Add light source. In Position on image, click, tap or drag to place the light. Left and right refer to the image as you see it, not the subject's own left and right.
For this example, place the center roughly 32% across from the left edge and 24% down from the top. It sits above and to the image-left of the face. Start with one light so you can judge its effect before adding more.
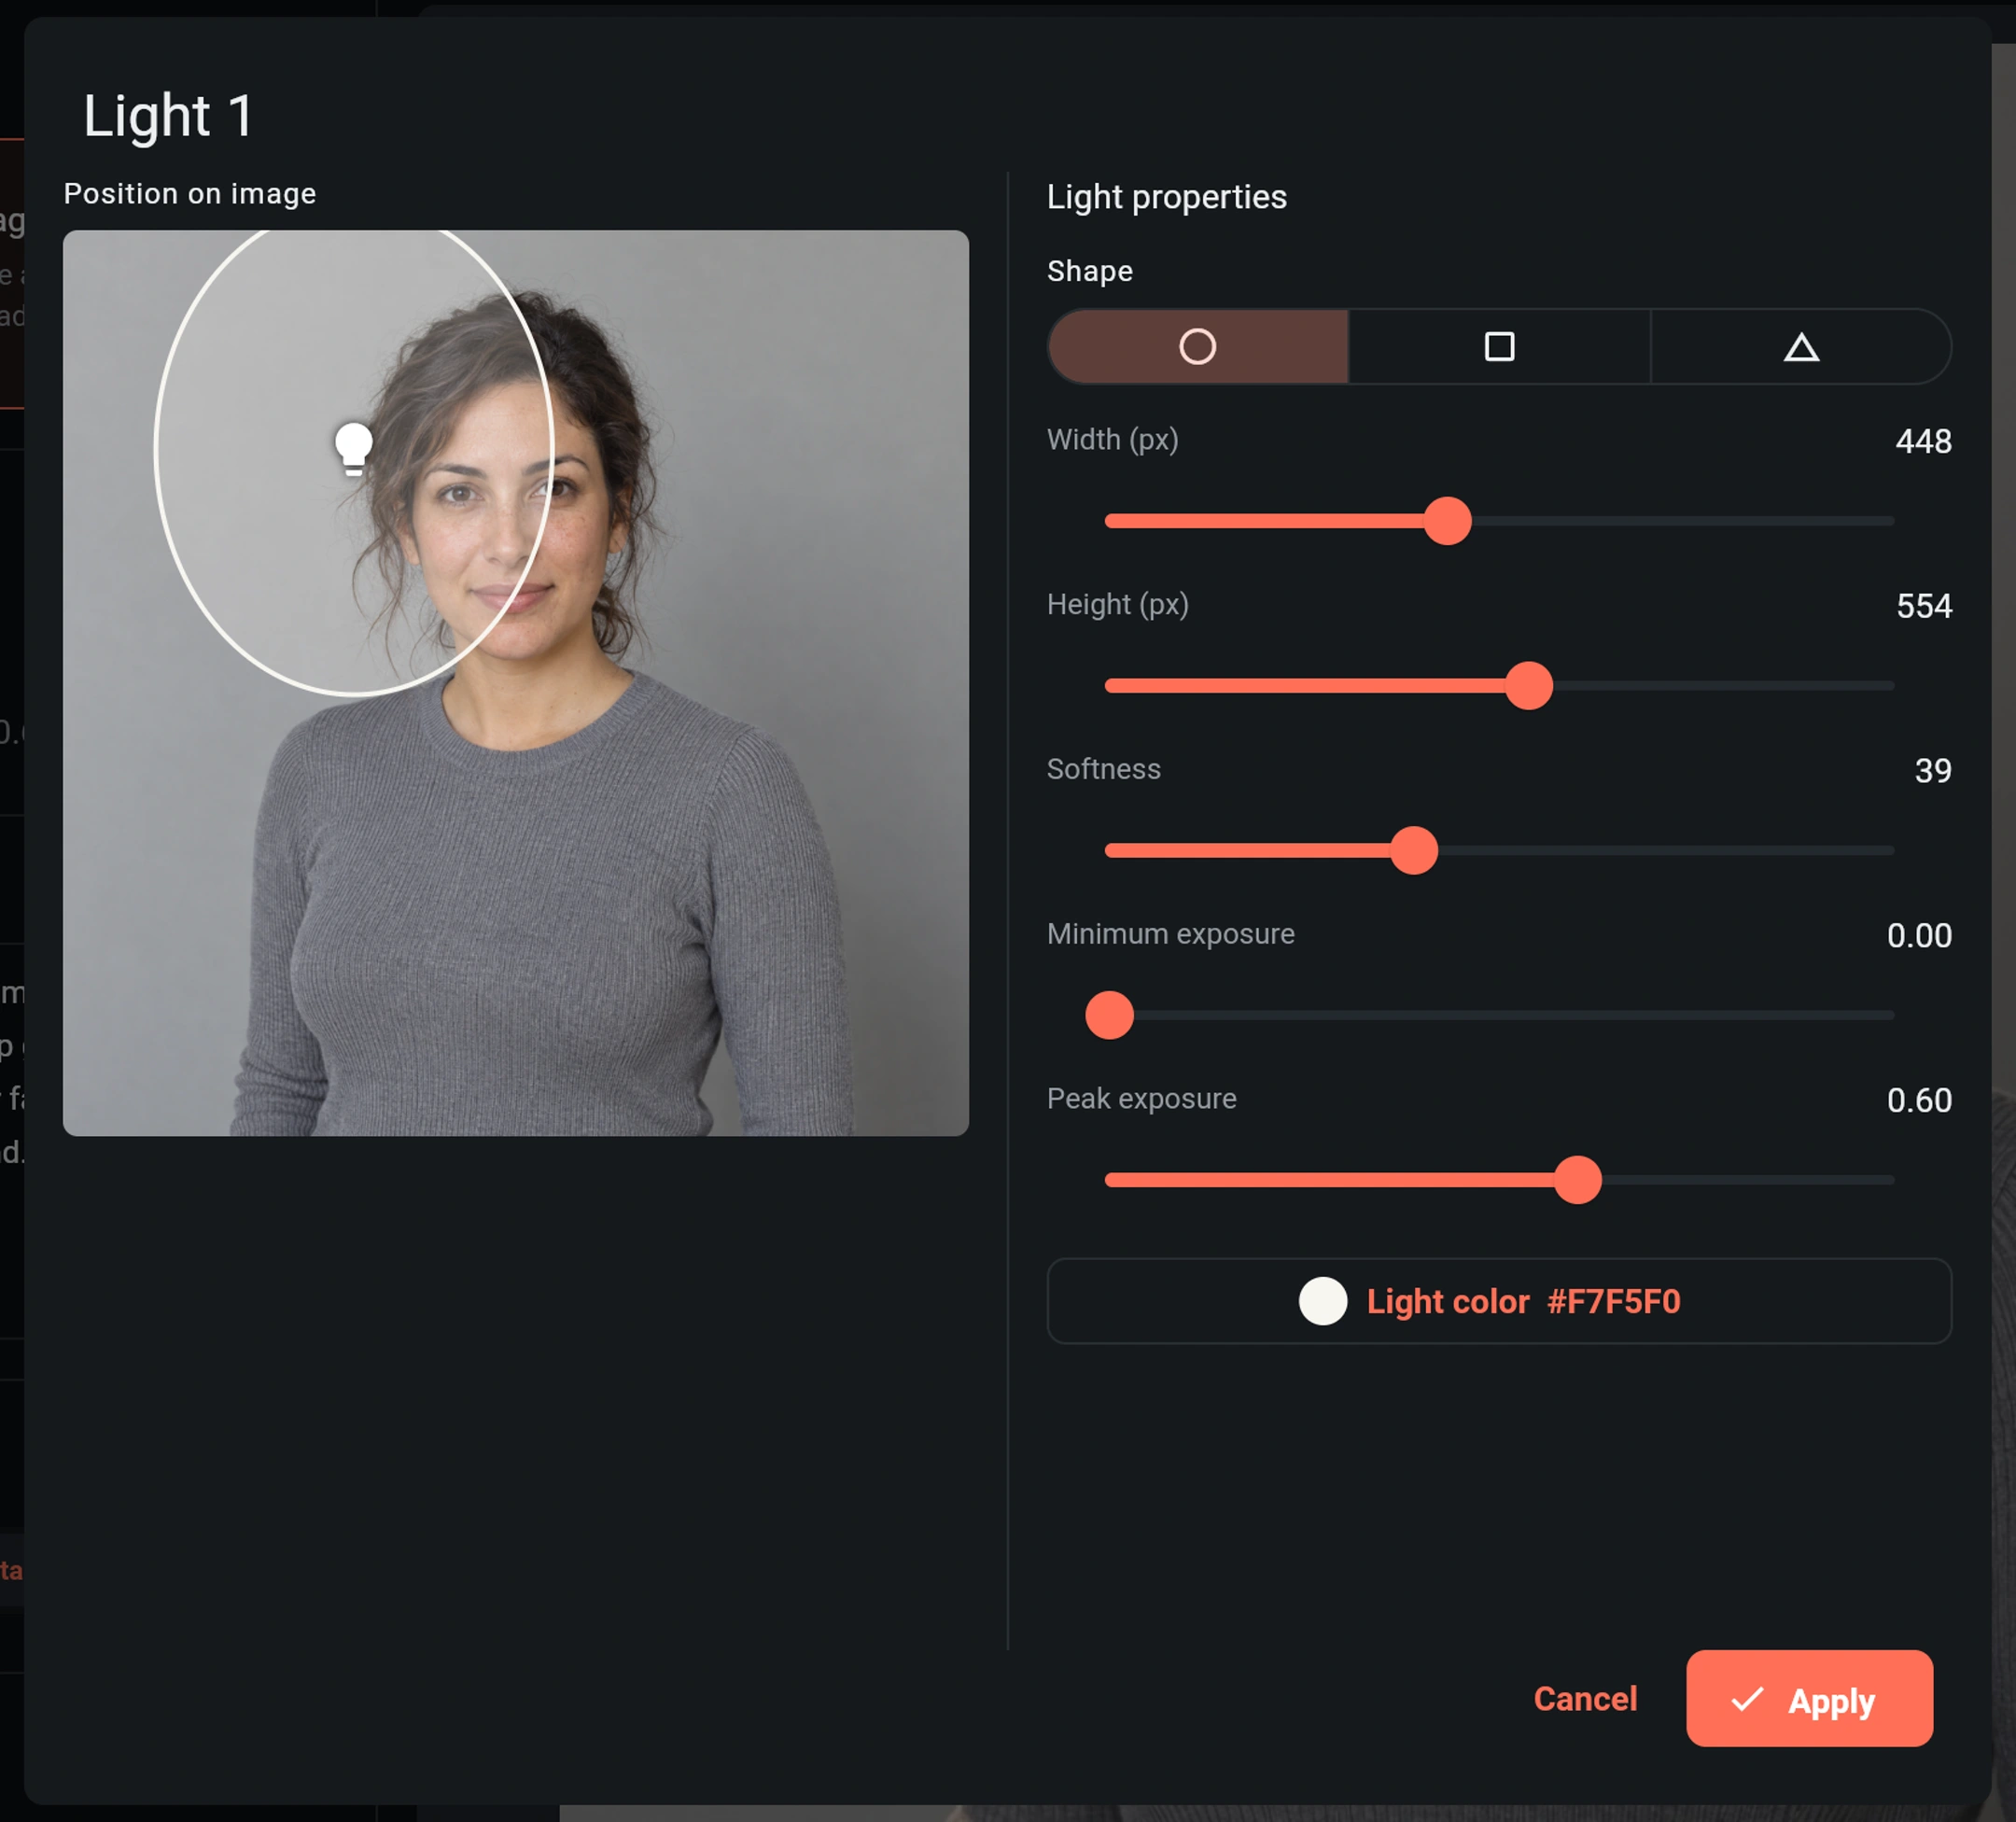
On a wide screen, the position preview and Light properties appear side by side. On a phone, switch between those two views. Choose Apply to keep your edits. Cancel closes the editor without applying the changes you just made.
3. Shape the light and add a short instruction
Here are the actual settings used for the example:
| Control | Example value | What to adjust |
|---|---|---|
| Shape | Circle | The outline of the light guide. Square and triangle are also available. |
| Width (px) / Height (px) | 448 / 554 | The guide's coverage on the editing canvas. A taller circle guide appears elliptical. |
| Softness | 39 | The requested softness of the transition around the light. |
| Minimum exposure / Peak exposure | 0.00 / 0.60 | The requested lower and upper intensity levels, not photographic EV values. |
| Light color | #F7F5F0 | A slightly warm, near-white color direction. |
The example uses a 1024 × 1024 light-positioning canvas, with center coordinates 329, 248. Those coordinates explain the screenshot; place the light visually rather than looking for an X/Y input. For another image size or composition, follow the relative position and subject, not the same pixel values.
Keep the text focused on the intended look and what should remain unchanged. This is the exact prompt used for the result:
Soft neutral window light from image-left, slightly above eye level. Keep gentle shadows on image-right. Preserve her face, skin texture, gray sweater and background. No visible lamp or light beams.
The light controls establish the placement and character; the prompt adds photographic intent and preservation instructions. Avoid conflicting directions, such as placing the main light on the left while asking for strong light from the right.
4. Generate and compare
The example uses High reasoning intensity and Standard output clarity. Higher reasoning intensity uses more AI resources to produce finer detail and better results. High is not a brightness setting, and Standard/HD is separate from the light's exposure range. Check the light summary, prompt, output settings and points quote, then choose Run.
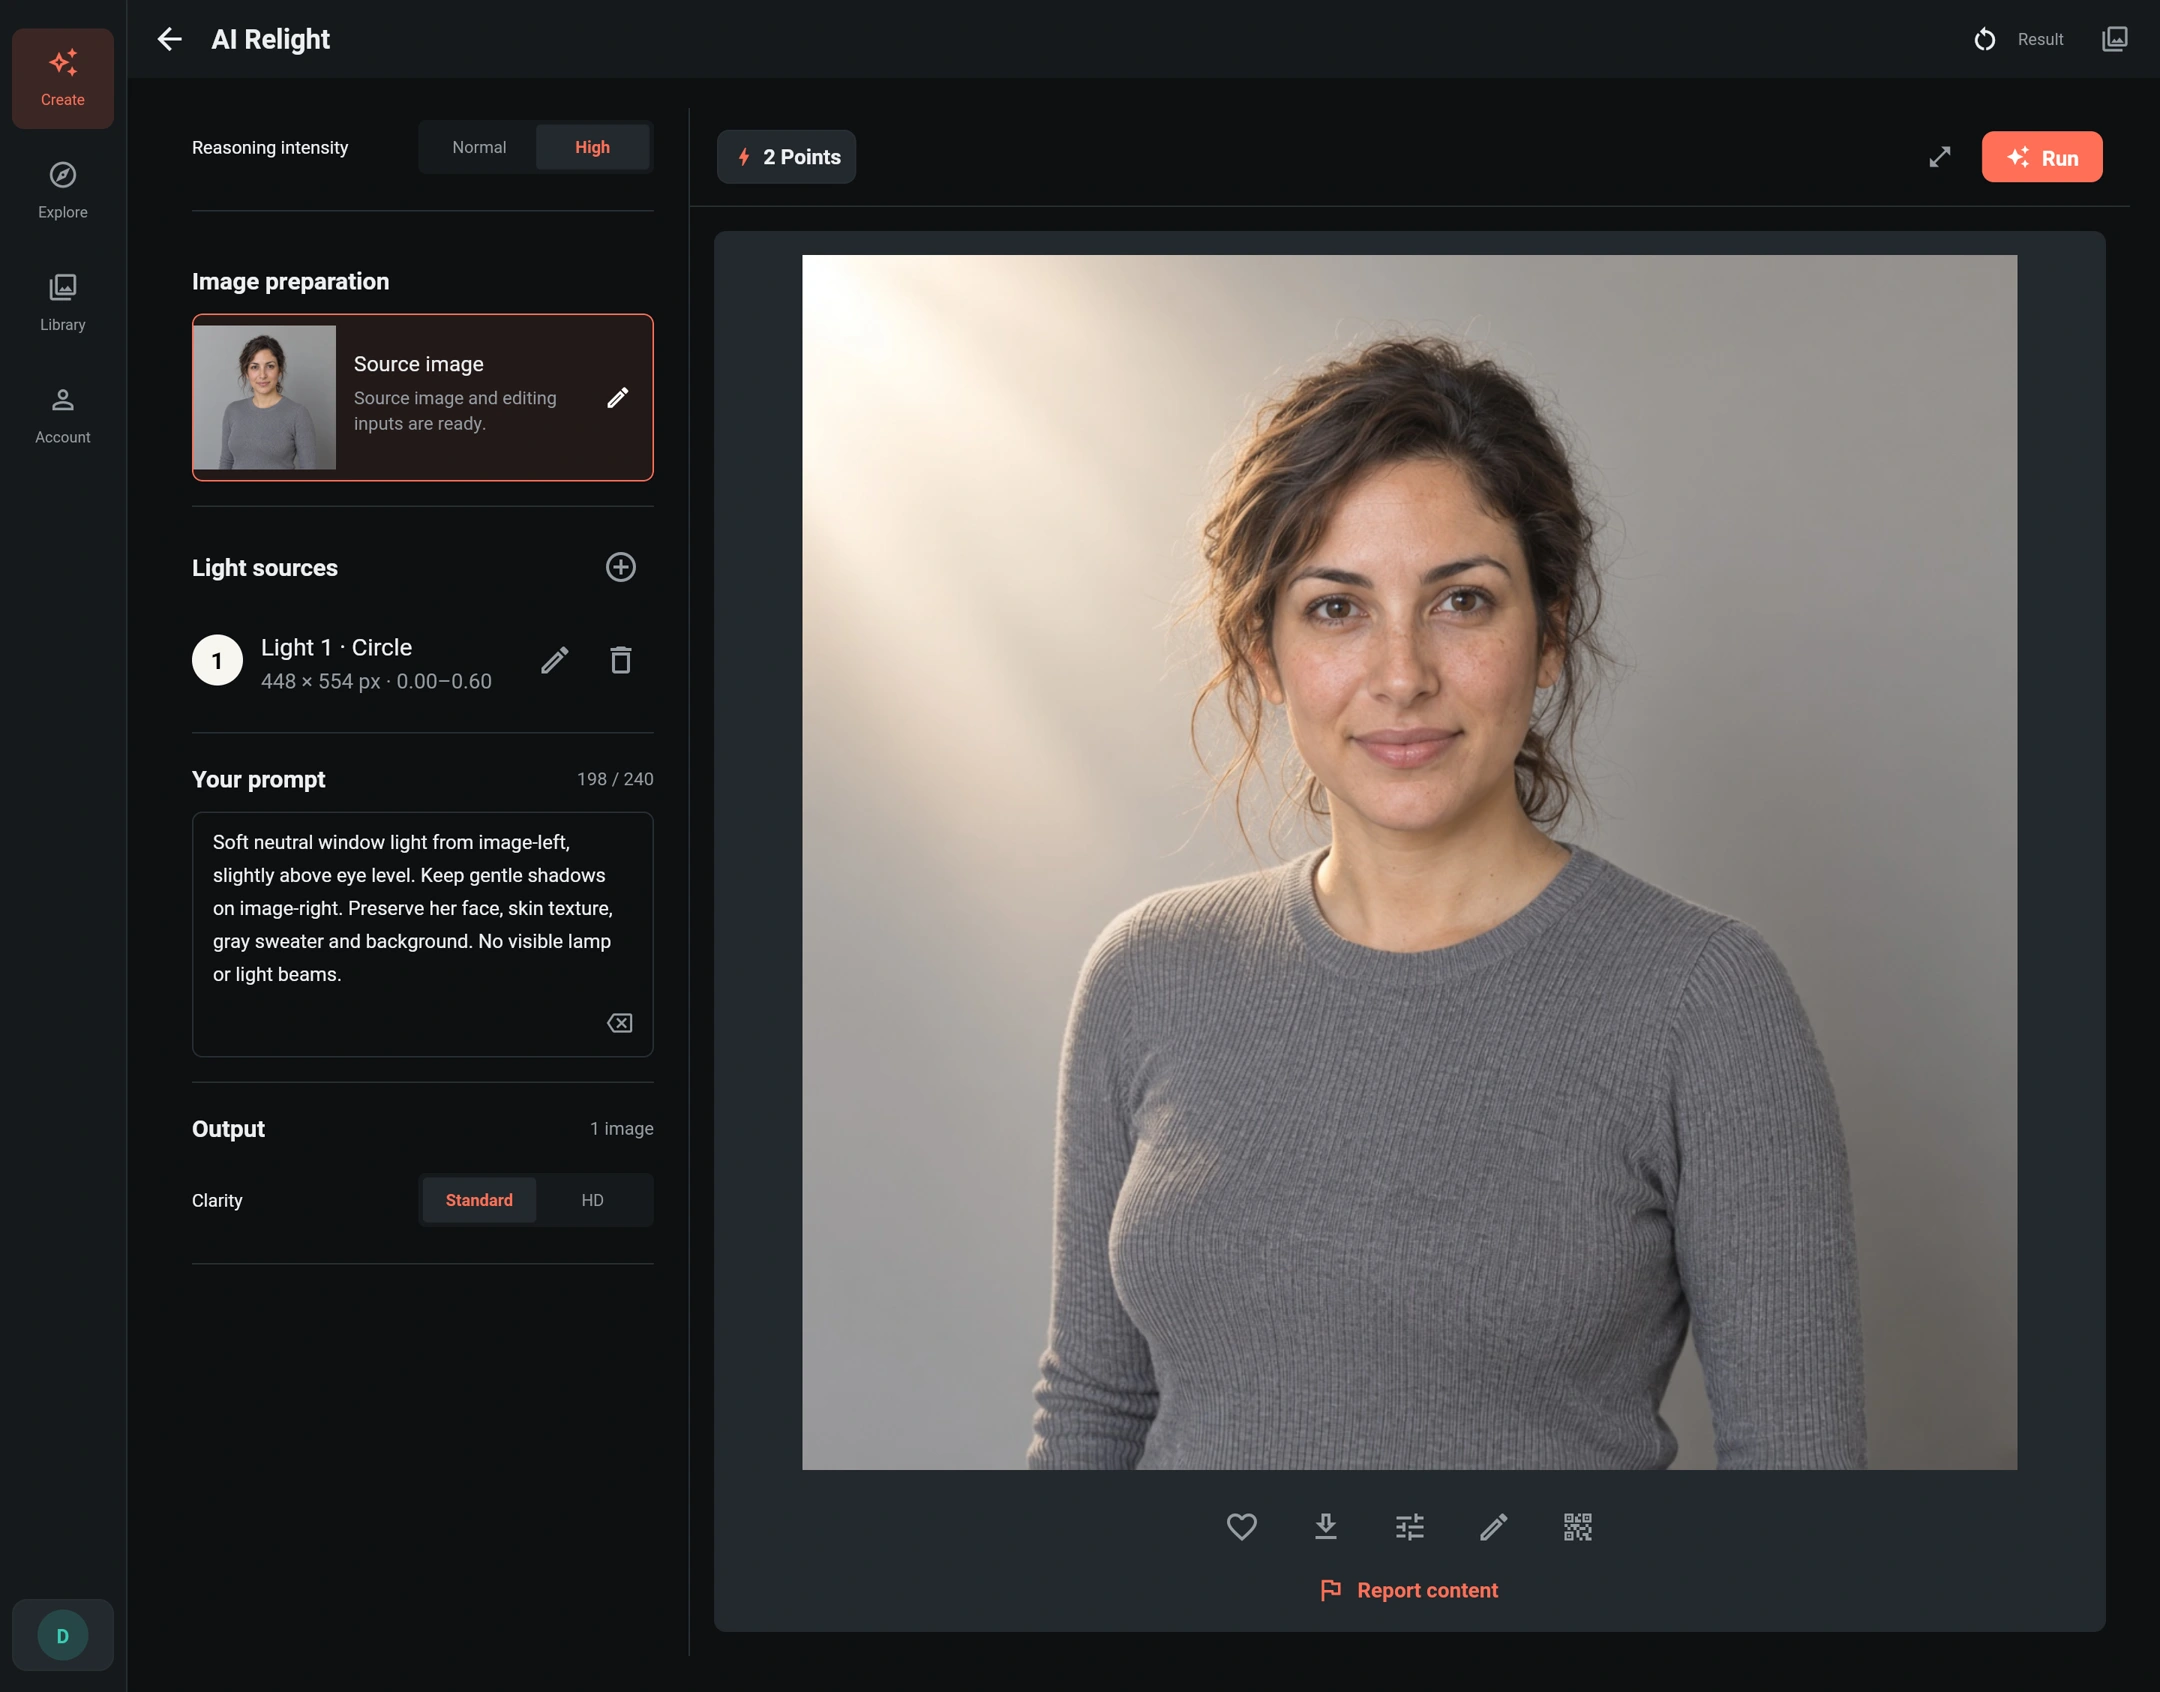
When the image appears in Result, open it at a larger size. Compare the face, hair, fabric and background with the original, not just the overall mood.
Refine one decision at a time
- Too bright or washed out? Lower the peak exposure first. Check the forehead, cheek and pale fabrics for lost texture.
- A harsh transition? Increase softness or broaden the guide, then compare again. These are directions to explore, not guaranteed corrections.
- An unwanted color cast? Move the light color closer to neutral white and simplify any colored-light wording.
- Need a second light? Add a weaker fill or rim light with a distinct purpose. Four is the maximum, not a target.
- Need to revise or remove a light? Use its edit or delete icon in the summary. Replacing the source image resets the light setup, so position the lights again for the new photo.
In Library, Reuse settings brings the saved inputs back into the creation form. Change one setting at a time to make comparisons easier. Reusing settings does not run another generation or guarantee the same output; review the quote before submitting again.
Check the details before using the image
Inspect skin texture, facial features, hair edges, garment color, pattern, seams, neckline and silhouette. For products, also compare lettering, logos, material finish and construction details. New highlights should not make a fabric look like a different material or misrepresent the item's real color. AI editing can alter details, so keep the original and reject results that do not preserve what matters.
For a simple overall exposure or contrast adjustment, use Image Editor. To change the setting as well as its lighting, use Background Redraw. See results and saving for what to do next.